
Microsoft® Lync™ 2010 Attendant is an integrated call management application that enables you to effectively manage many conversations at once by quickly handling and routing phone calls and instant messages.
In this article
Make and receive calls
Making and receiving calls are among the most common tasks performed with Lync 2010 Attendant. The procedures are similar for sending and receiving instant messages. You can still receive instant messages while you’re on a call.
To make a call
To call someone in your Contacts list, double-click that person’s name, or click the phone button next to the name.

-
By default, when you double-click a name in your Contacts list a phone call is placed to that person.
You can change the default so that double-clicking sends an instant message instead:
-
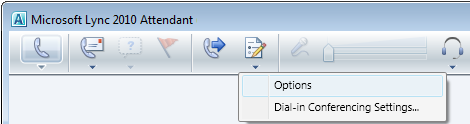
In the toolbar, click the Options button, click Options in the drop-down list, and then click the Actions and Alerts tab.
-
In the drop-down list next to When I double-click a contact, do the following, select Send an instant message.
-
Press OK.
-
You can search for a contact by typing their name in the Search box. As you type, matching names appear in your Contacts list. Note that it takes time for your search to complete the initial indexing.
-
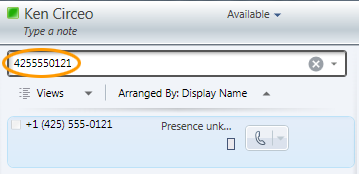
To dial by number, enter the number in the Search box, and then double-click the Search result.
To answer a call
-
When someone calls you, an alert appears in the Incoming area of the Lync main window. To answer it, double-click anywhere on the alert.

Note: The call alert looks different for a repeat caller — a contact who has called you more than once within 30 minutes. Respond to the call by double-clicking the alert or by clicking Accept or Decline.

To decline a call
-
To decline a voice call, right-click the incoming call alert, and then click Ignore. If voice mail is enabled, the call is redirected to voice mail.
To redirect a call to voice mail
-
To redirect a call to voice mail, right-click the incoming call alert, select Redirect, and then select an alternate number or Voice Mail.
What to do during a call
When you’ve answered a call, it appears in the Active area. Using the call controls, you can perform various tasks.
To place a call on hold
-
In the Conversation window, click the Hold icon.

To transfer a call
-
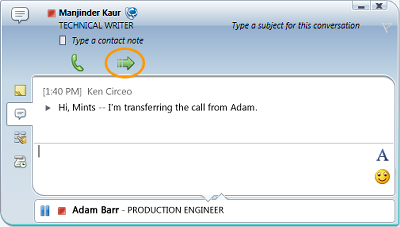
In the Conversation window, click the Transfer icon.
-
Double-click the name in the Contacts list to whom you want to transfer the call.
-
The call just disappears from your Conversation window. By default, an error message appears if the transfer is unsuccessful.

Note: To disable alerts, click Options, click the Actions and Alerts tab, clear the appropriate check boxes, and then click OK.
To consult with the intended recipient before transferring a call
-
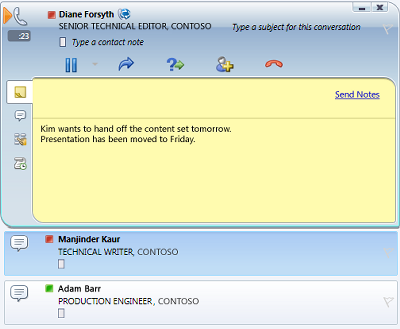
In the Conversation window, click the Consult before transferring or merging calls button. The call is placed on hold.

-
In the Contacts list, click the recipient’s phone icon. (Or, click their IM icon to consult by instant messaging.)

Note: When you consult with the intended recipient, a new Conversation window opens. The original caller remains connected and their conversation is placed on hold and moves to the Hold area. Double-click to switch between conversations.
-
If the recipient agrees to take the transfer, click the Call this contact, connect button.
Note: If the recipient does not want to take the transfer, end the consultation. To resume the conversation with the caller, click the Hold/Resume call button. You can then speak with the caller and take notes before ending the conversation.
If the transfer is successful, no visual indicator is displayed — the call just disappears from your Conversation window. An unsuccessful transfer displays an error message, unless you disabled alerts in the Options window.
To invite someone else to join the call
-
To add contacts during a conference call, click the Add icon, and then double-click the contact name or drag the contact from the Contacts list into the Conversation area. You can also enter a mobile phone number using the dial pad.

To end the call
-
To end the conversation, click the End Conversation icon.

Manage multiple conversations
The Conversation area (left side) of the main window is where all conversation activity occurs. By paying attention to the Incoming, Active, and Pending (on hold) conversations, you can manage multiple conversations at once.
One active conversation
-
Keep in mind that the conversation in the Active area is the one you’re addressing at the moment. To answer an incoming call or to move a pending call to the Active area, just double-click it.
Multiple active conversations (phone and IM)
-
You can maintain multiple active conversations at the same time, provided only one of them is a voice conversation. For example, you can accept an incoming call while you’re maintaining two other instant messaging (IM) conversations. In this case, whichever IM conversation you are addressing at the moment moves to the Active area, and the voice conversation would still be active (indicated by the red arrow) even though it moves to the Pending area on your screen.
Double-click a call alert or conversation to move it to the Active area.
Contacts list and groups
The Contacts list is a list of co-workers, family, friends, and associates with whom you communicate most often. It shows the availability of your contacts and allows you to view additional contact details by right-clicking the contact’s name, and then clicking Properties. The Contacts list is your starting point for communicating with your contacts. With a mouse-click or two, you can place a phone call, start an instant messaging (IM) session, start an e-mail conversation, or start a conference.
To find and add contacts
Use the Search box to find the people you want to add to the Contacts list.
-
In the Search box, type the display name or e-mail address for a person. All matching names appear in the Search Results. It may take a minute for your search to complete.
Note: By default, Lync 2010 Attendant lists all matching users from the Active Directory® Domain Services and the Microsoft® Outlook messaging and collaboration client Contacts list.
-
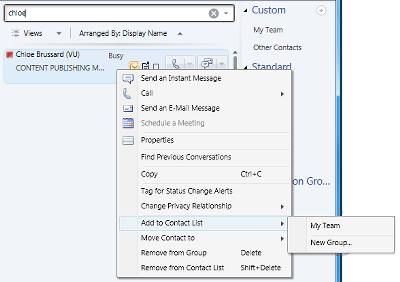
Right-click the person’s name and point to Add to Contact List. Your custom groups list is displayed.
-
Click a custom group, or click New Group to create a new group for the contact.
To sort contacts
You can sort your contacts by different criteria, such as display name, availability, or company. Sorting your contacts makes it easier to organize, find, and connect with your teammates quickly.
-
At the top of the Contacts list, click the arrow next to Arranged By. Display Name is the default sort order in Lync 2010 Attendant.
-
In the drop-down list, select a sorting criterion (such as Availability).
Note: You cannot hide contacts who have a presence status of Offline or Unknown.
To organize custom groups
For quicker access to associated contacts, you can organize them into custom groups. For example, you might have custom groups named Development, Sales, and My Team.
Create an empty custom group
You can create a custom group from the Group List. The custom group is empty until you add contacts to it.
-
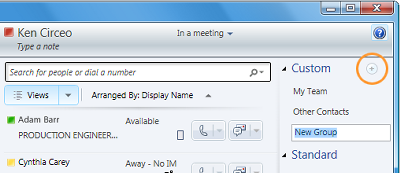
In the Group List, click the plus sign next to Custom. A new group appears in the Group List.
-
Type a name for the group, and then press ENTER.
Create a custom group from your Contacts list
You can create a custom group that is immediately populated with contacts that you select.
-
Select one or more contacts in the Contacts list, or use the Search box to find a contact.
Note: To select multiple contacts, CTRL+Click the names, or SHIFT+Click on adjacent names.
-
Right-click one of the contacts, and then point to Add to Contact List.
-
Click New Group.
-
Type a name for the group, and then press ENTER.
-
To add more contacts, just drag them to the group from the Contacts list.
Arrange custom groups
By default, custom groups are arranged alphabetically. To rearrange them, do one of the following:
-
Drag and drop a group to another place in the list.
-
Right-click a group, and then click Move Group Up or Move Group Down.
-
Click a group to select it, and then press ALT+SHIFT+Up Arrow or ALT+SHIFT+Down Arrow.
To view standard groups
Lync 2010 Attendant includes three standard groups: Frequent, Available, and All Contacts.
-
Frequent lists in descending order the names of people with whom you have had recent contact through Lync 2010 Attendant.
-
Available lists all contacts whose presence does not indicate Away, Unknown, or Offline.
-
All Contacts lists all contacts that have been added to your Contacts list (except by way of being a member of a Distribution List).
To display recent searches
-
Click Last search to display your most recent search criteria and results using Lync 2010 Attendant.
How does team-call work?
You can add a contact to a team-call group who can answer your calls on your behalf. You can edit your team-call group members anytime.
To add a contact to a team-call group
-
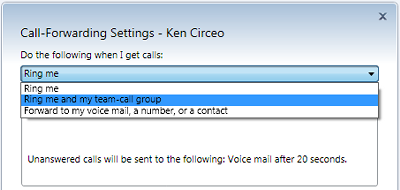
In the toolbar, click View or change call-forwarding settings.

-
In Call-Forwarding Settings, under Do the following when I get calls, select Ring me and my team-call group.
-
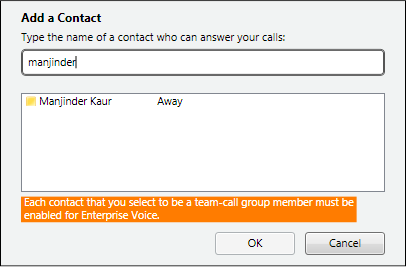
Under Add team-call group members to answer call on your behalf, click Add.
-
Type the name of a contact who can answer your calls, and then click OK.
Important: Each contact that you select to be a team group member must be enabled for Enterprise Voice.
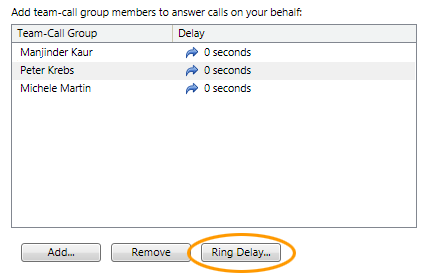
To set a ring delay
When you enable team-call, it is important to set a ring delay. When you turn on a ring delay, incoming calls ring you first and then your team-call group, after a delay.
-
To set a ring delay, click Ring Delay.
-
Check the Turn on ring delay check box, and then set the ring delay time.
-
Click OK when you’re done.
-
At the bottom, click OK again, to save and apply these settings.
Note: Before saving these settings, you should select the check box to apply these setting during your working hours specified in Outlook.
Answer calls for a response group agent
As a response group agent, you’ve been selected to help answer phone calls for a group or for multiple groups. You can use Lync 2010 Attendant to answer and manage the phone calls that come into your group.
-
When the server administrator makes you an agent for a response group, you’ll see an alert in Lync 2010 Attendant that tells you to which group you’ve been added.
To answer a call
When you’re signed into a group, you’re ready to take a call.
-
An incoming call alert shows you which group is routing the call to you, in the Via field.
-
To answer the call, just click the alert.

Park calls
When you receive a call that needs to be transferred to another department, instead of putting the call on hold, you can park the call in a holding queue. The holding queue then gives you a retrieval number, which you can use to retrieve the call. Make sure your support team has configured the park call feature.
To park a call
-
Answer the incoming call alert.
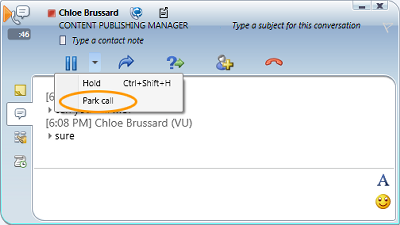
-
To park the call, click the drop-down menu under the Hold button, and then select Park call.
-
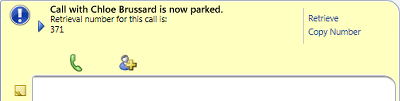
When the call is successfully parked, you get a notification with the retrieval number.
-
Communicate the retrieval number to the person or department that the call is being transferred to.
To retrieve a parked call
-
If the notification is visible, click Retrieve.
-
Or in the search box, enter the retrieval number for the parked call. You are then connected to the parked caller.


