When you insert or select WordArt a new WordArt Tools tab becomes available. This article will tell you how to insert and delete WordArt, and walk you through using the features of the WordArt Tools tab.
In this article
WordArt Overview
WordArt is a gallery of text styles that you can add to your publications to create decorative effects, such as shadowed or mirrored (reflected) text. You can use WordArt to add special text effects to your document. For example, you can stretch a title, skew text, make text fit a preset shape, or apply a gradient fill. This WordArt becomes an object that you can move or position in your document to add decoration or emphasis. You can modify or add to the text in an existing WordArt object whenever you want.
Insert and delete WordArt
Insert WordArt:
-
Select the Insert tab.
-
In the Text group, select the WordArt pull-down menu.
-
Select from either the Plain WordArt Styles or WordArt Transform Style galleries.
-
Type your text in the Edit WordArtText box, select the font, font size, and apply bold or italics, and click OK.
Delete WordArt:
-
Select the WordArt object.
-
Press Delete.
WordArt Tools tab
The WordArt Tools tab enables you to format the WordArt’s text and effects, arrange the WordArt in relation to other objects on the page, and change the size of the WordArt object.

Text group
The Text group gives you access to tools for changing the text content, spacing, height, switching between horizontal and vertical, and the text alignment within the WordArt object.

Edit Text
To change the text in the WordArt object click on Edit Text and edit your text in the Edit WordArt Text box.
Spacing
Spacing enables you to adjust the space between characters in your WordArt by using one of the five pre-set formats and using or not using kerning pairs.
-
Very Tight: Increases the width of the text to eliminate the space between characters in each word.
-
Tight : Increases the width of the text to minimize the space between characters in each word.
-
Normal : This is the default selection and allows a normal amount of space between the characters with the text width at normal for the font.
-
Loose : Decreases the width of the text to increase the space between the characters.
-
Very Loose : Decreases the width of the text to maximize the space between the characters.
-
Kern Character Pairs: Kerning deals with pairs of characters that when next to each other appear to be farther apart than other pairs. To see this, create a WordArt object with the text "WordArt test" and turn on and off the kerning to see the difference.
Even Height
This selection will make all letters the same height, both upper and lower case.
WordArt Vertical Text
This tool toggles your WordArt between vertical and horizontal format.
Align Text
Here you can change the alignment of the text in the WordArt object.
-
Left Align: Aligns the text with the left side of the WordArt object.
-
Center: Centers the text in the WordArt object.
-
Right Align: Aligns the text with the right side of the WordArt object.
-
Word Justify: Aligns the text with both the right and left sides of the WordArt objects by moving the words in the text.
-
Letter Justify: Aligns the text with both the right and left sides of the WordArt objects by moving the letters in the text.
-
Stretch Justify: Aligns the text with both the right and left sides of the WordArt objects by stretching the characters.
WordArt Styles group
The WordArt Styles group enables you to change the style of your WordArt, change the color of the fill and lines, and change the shape of the WordArt object. You can preview each of these effects by hovering your mouse cursor over the selection and Publisher will preview the selection in your Publication.

WordArt Styles
Select the style you want from the gallery, to see all the available styles click the More button. 
Shape Fill
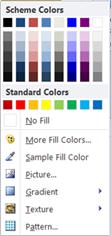
You can change the color that fills your WordArt text. You can also replace the fill with a picture and adjust the gradient, texture, and pattern of the fill.

In the Shape Styles group, click Shape Fill, and do one of the following:
-
To use a color that you have used recently, click one of the colors that is displayed.
-
To see more color choices, click More Fill Colors, and then select the color that you want.
-
To use a color from anywhere in your workspace, click Sample Fill Color and then click the eyedropper on the color you want to use.
-
To use a Picture, Gradient, Texture, or Pattern, select the appropriate menu item.
Shape Outline
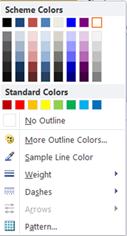
You can change the color of the outline of your WordArt text. You can also change the weight of the outline, make the outline dashed, or use a pattern.

In the Shape Styles group, click Shape Outline, and do one of the following:
-
To use a color that you have used recently, click one of the colors that is displayed.
-
To see more color choices, click More Outline Colors, and then select the color that you want.
-
To adjust the Weight, Dashes, or Pattern of the outline, select the appropriate menu item.
Change Shape
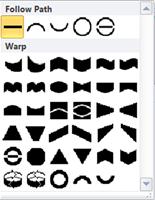
Your WordArt text will follow a defined shape.

For example you can change the default straight shape to curve upwards by selecting the first Warp option from the gallery:


Note: Some of the shapes have yellow diamond shaped handle that you can drag to change the characteristics of the shape you choose.
Shadow Effects group
The Shadow Effects group enables you to format a shadow to your WordArt.

-
Click Shadow Effects, and then select the effect you want from the gallery of shadow effect styles.
-
To change the color of the shadow, select Shadow Color and select the color options you want.
-
To nudge the shadow distance, click the appropriate directional buttons.

-
To turn the shadow effect on and off, click the center button.
3-D Effects group
The 3-D Effects group gives you the ability to make your WordArt appear to be three-dimensional.

3-D Effects
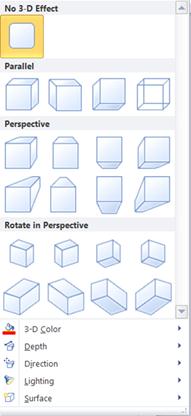
You can apply a 3-D effect from a gallery of effects. You can also adjust the color, depth, direction, lighting, and surface of the effect. If you hover your mouse over the 3-D effect selection your WordArt will preview the effect.

3-D effects gallery
Hover over the gallery selections to see the effect previewed on your WordArt. Click to select the effect. To remove all 3-D effects, click No 3-D Effect.
3-D Color
-
To use a color that you have used recently, click one of the colors that is displayed.
-
To see more color choices, click More 3-D Colors, and then select the color that you want.
-
To use choose color from your publication, perhaps in an image on the page, select Sample 3-D Color, move the sample cursor

Depth
Select the depth of the 3-D effect, from Infinity to 0 pt.
Direction
Each effect in the gallery has a default direction, but you can use this tool to configure the direction the effect uses to simulate three dimensions.
Lighting
Like Direction, you can use the Lighting tool to change the direction of the apparent light source on your 3-D WordArt.
Surface
You can change the surface of your WordArt from Matte to Plastic, Metal, or Wire Frame.
3-D Tilt
The 3-D tilting tool enables you to exert a fine control over the direction of the 3-D effect by rotating the WorArt left, right, up, or down. The center button turns the 3-D effects on or off.

Arrange Group
The Arrange group enables you to set the text wrapping behavior around your WordArt, send the WordArt backwards or forwards relative to other objects on the page, align your WordArt on the page, group or ungroup the WordArt with other objects, and rotate the WordArt. For more information on arranging objects, please see:

Size Group
The Size group gives you control over the Shape Height and Shape Width of your WordArt. You can also manually drag the handles of the WordArt object to change its size.


