
SharePoint Designer 2010 includes new task actions that you can use to model all sorts of human workflows in your organization. For example, if you have a process that routes a document to several people for approval, or if you have a procedure for submitting and approving expense reports, you can automate that process or human workflow by using the new task actions in SharePoint Designer.
The task actions in SharePoint Designer are ready to use with the default settings, but they also offer tremendous flexibility – you can edit and customize almost any aspect of the task process. For example, the default settings in a task process mean that approval must be unanimous by all workflow participants, but you can change this so that approval means a simple majority or even a certain percentage, such as seventy percent.
Whether it’s a formal document review or expense reporting, an approval process involves a series of tasks assigned to individuals in a particular order.
This article describes the task process editor in SharePoint Designer 2010 and how you use it to create and customize approval workflows.
In this article
What are approval workflows?
Workflows usually come in two flavors – those that have application logic and those that are human-centric. An application-like workflow performs a routine set of automated functions that ultimately alters another data source. The workflow might automatically do a calculation, update a list item, and generate sales proposal template, when a given field on a data source changes. All of this is automatic and does not involve people. A human-centric workflow, on the other hand, is one that involves people, usually a group of people who need to complete a series of tasks in order for a business process to be complete. The two flavors of workflows may exist as separate workflows or together in the same workflow.
Approval workflows are designed for the human processes in an organization. Participants in the workflow will likely accept, approve, or give feedback on a set of business data. Approval workflows can be used to manage new hires, track expense reporting, do a document review, and much more. In an approval workflow, one user starts the workflow that might be a simple request to review a document. The approval workflow then assigns a task to each participant in the workflow, who must perform an action on the task. When all the tasks are complete, the overall task process is complete.
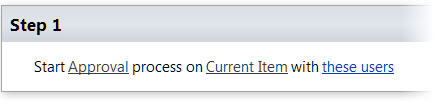
Here’s a simple illustration of a workflow started by one user and assigned to four participants before the workflow ends.

Approval workflows included in SharePoint 2010
Many organizations have to develop these workflows from scratch to manage human processes, but in SharePoint Server 2010, there are several such workflows already available. They include:
-
Approval
-
Collect Feedback
-
Collect Signatures
-
Publishing
-
Three-state
-
Disposition Approval
You can very quickly associate and configure these workflows for a list, library, or content type. Once you do that, users of the associated list or library can start the workflow on a list item or document, set a few basic initiation parameters (like who approves it and the due dates), and send it off to the approvers. Learn more about the workflows and how to customize them in the article “Understand approval workflows in SharePoint 2010.”
The task process model in an approval workflow
What is distinctive about a task process is that a task process surfaces all of the key events for each task and for the task process as a whole – a task process is event-driven. Each of the steps on the subpages of a task process has a gray label that represents an event – for example, "When the Task Process Starts”, "When the Item is Deleted”, “When a Task is Pending”, etc. This series of key events creates the structure in which you can modify or insert whatever conditions or actions you want. The entire task process is is an action that is contained within a workflow – in fact, you can think of a task process as a sub-workflow with its own summary page. In SharePoint Designer 2010, you see these task process actions in the Action gallery: the Start Approval Process, Start Feedback Process, and Custom Task Process.
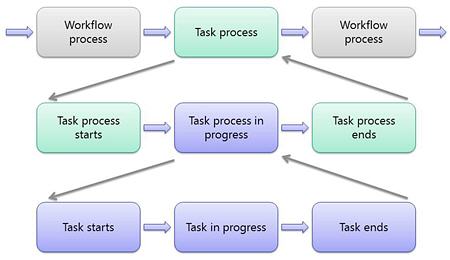
This task process model contains a hierarchy of both tasks processes and tasks, all of which are associated with content on a SharePoint site. The task process contains multiple events that represent the workflow timeline - when it starts, when it’s in progress, and when it ends. Within the task process are individual tasks that also have events in the workflow - when they start, when they’re in progress, and when they end. Each of these task events must be complete before the task process can be complete. When the task process completes, the larger workflow process continues.
A task process is the overall process that is comprised of potentially many individual tasks:
-
The task process contains multiple events that represent the overall process timeline - when it starts, when it’s in progress, and when it ends. Each of these events occurs once for all of the tasks in the process.
-
Within the task process are individual tasks that also have events in the workflow - when they start, when they’re in progress, and when they end. Each of these events occurs once for each task in the process.
All of these tasks must be completed before the overall task process can be completed. When the task process (or sub-workflow) is completed, the larger workflow that contains the task process action resumes.
The resulting task process model looks something like this.
This framework addresses the most common human processes in an organization but it is also customizable so that you can change the behaviors for each task and the overall task process for the approval workflow.
In the next section, you’ll see what the task process model looks like in SharePoint Designer 2010 where you can customize it to meet your business needs.
The task process editor in SharePoint Designer
You see and customize every part of a task process using the task process editor. This is a task process editor within the larger workflow editor of SharePoint Designer 2010. You use it to customize all of the objects related to the approval workflow, and more importantly, every event of every task and task process in the workflow, including completion conditions.
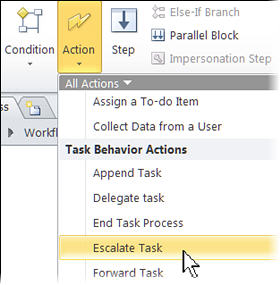
Since it is part of the larger workflow editing environment in SharePoint Designer, you can build your own business or application logic into the task process directly by inserting conditions, actions, else-if statements, logical steps, and more. Within the actions, you can use the Task Behavior Actions, a special group of actions to add task-specific logic. For example, add the append, delegate, escalate, and reassign tasks – or send additional task notification emails, wait for changes in a task process item, or end the overall task process. Learn more about the task behavior actions in the article “Workflow actions in SharePoint Designer 2010.”
In addition to the logic of the workflow, you can use other SharePoint Designer workflow features like customizing workflow forms (association, initiation, and task), change the form parameters, local variables, and associated columns, or change the basic start options and associated task and history lists for the workflow. Learn more in the article “Introduction to workflows in SharePoint Designer 2010.”
Task process action
To get started with a custom task process in an approval workflow, you can edit one of the default approval workflows in SharePoint 2010 or create a new workflow and add one of the task process actions to it - like Start Approval Process, Start Feedback Process, and Start Custom Task Process. Since the custom task process action is the only one that shows just the task process framework without sample workflow logic, we’ll use it to demonstrate. After adding the Custom Task Process action, the workflow now looks something like this.
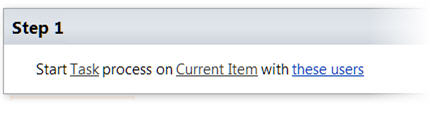
This one action is all that is needed to create the approval workflow because it contains the entire task process framework, including the task process editor. You can add more workflow logic around, but it’s entirely optional and only needed if you want to add more logic outside of the approval process.
Task process summary page
When you click the task process action (the Task link above), you’re taken to a task process summary page. This summary page is similar to the summary page for the workflow, except this one displays all the objects related to the task process. You see, for example, task outcomes, task form fields, and common task settings.
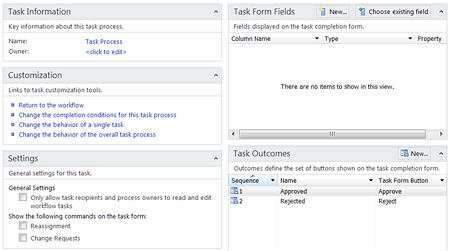
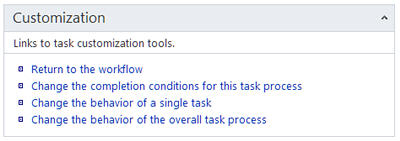
Of particular importance is the Customization area, where you can edit the completion conditions, individual task behavior, and the overall task process behavior.
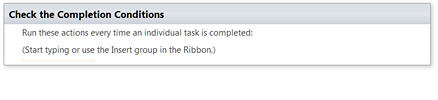
Completion conditions for the task process
When you click the completion conditions, you’re taken to a full-page workflow editor where you can add or change the completion conditions that for the task process. Specifically, these actions will run every time an individual task is completed. You can customize the logic here using the workflow commands in SharePoint Designer, like conditions, actions, and else-if statements. You can also add task behavior actions, like the Set Content Approval Status and End Task Process.
Behavior of a single task
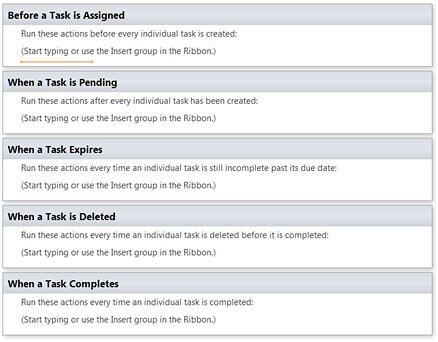
From the summary page, if you change the behavior of a single task, you’re taken to another full-screen workflow editor where you see the individual task events, such as when it’s assigned, pending, expires, and so on. Specifically, there are five events:
-
Before a task is assigned: These actions run before every individual task is created.
-
When a task is pending: These actions run after every individual task has been created.
-
When a task expires: These actions run every time an individual task is incomplete after its due date.
-
When a task is deleted: These actions run every time an individual task is deleted before it’s completed.
-
When a task completes: These actions run every time an individual task is complete.
You can add any of the available conditions and actions, and you can add several more task behavior actions this time, like append, delegate, escalate, and reassign. You can even add task notification emails and wait for changes in a task process item. The available task behavior actions change depending on the event you’ve selected.
Behavior of the overall task process
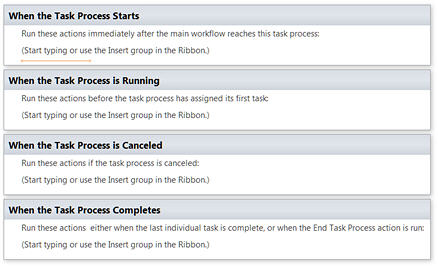
From the summary page, if you change the behaviors of the overall task process, you’re taken to another full-page workflow editor. On this page, you see each stage of the overall task process, such as when it starts, when it’s running, and when it completes. Specifically, there are four stages:
-
When the task process starts: These actions run immediately after the main workflow process and before the task process.
-
When the task process is running: These actions run before the task process assigns its first task.
-
When the task process is canceled: These actions run if the task process is cancelled.
-
When the task process completes: These actions run when the last individual task is complete or when the end task process action is run.
You can add any of the available conditions and actions, and you can add task behavior actions that, for example, set the content approval status, wait for a change in the task process item, or end the task process altogether. Again, these actions change depending on the stage you’ve selected.
Editing an approval workflow
Up to this point, you’ve seen the approval process infrastructure, including the task process model, task events, and completion conditions. You haven’t actually seen a complete approval workflow with conditions, actions, associated forms, and everything that makes up the logic of the workflow. In this section, we’ll look at creating a workflow using the Start Approval Process action, which is more of a pre-built workflow with sample workflow logic you can look at and customize. When you add this action, the workflow editor looks like this.
Similar to the custom task process action (used earlier), the Start approval Process action includes the entire approval framework and in addition, contains pre-built approval process logic, forms, and so forth. This is very similar to editing (or editing a copy of) the default Approval workflow in SharePoint 2010 since both use the approval process action.
Starting a new approval workflow like this is a great way to quickly get started designing the approval process. You can leave much of the existing logic in place, customize the parts you want to change, and add new logic of your own. In the following sections, we’ll perform a few common workflow customizations that touch on each area of the task process editor so that you become familiar with how each area functions.
Change a completion condition for the task process
One of the default behaviors in this approval workflow is to end the task process when the number of people who approved equals the completed task count. Well, let’s say you want to change this completion condition so that the process ends when 70% of the workflow participants approve it.
To do this, you would choose Change the completion conditions for this task process from the summary page. Then click the condition that reads If Task Process Results: Number of Approved. In the Define Workflow Lookup dialog box, change the Field from source to Percentage of Approved and click OK.
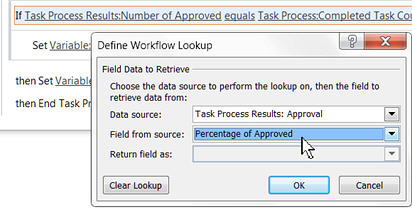
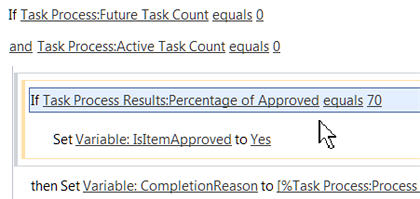
Back in the completion conditions, click value and change it to 70. The new workflow logic looks like this.
Edit an existing behavior for an individual task
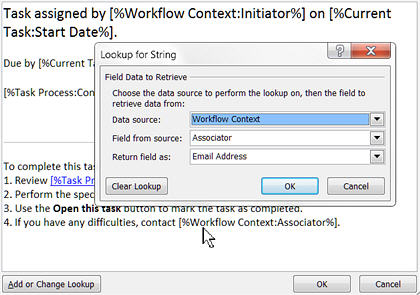
One of the behaviors after a task has been created is to send an email notification to the assigned approvers, telling them to open the task (which is linked), perform the steps, and how to edit the task. It also informs them that if the task isn’t editable, they may not have permissions. Let’s say you want to remove this part and instead instruct them to contact the individual who originally associated the workflow if they have any problems.
To do this, choose Change the behavior of a single task from the summary page. In the When a Task is Pending stage, click in the email task notification, Current Task: Assigned To. In the Define E-mail Message dialog box, remove the part about permissions in step 3 and add a new step instructing participants to contact the person who set up the workflow if they encounter problems. As a value for this person, click Add or Change Lookup, choose Workflow Context as the data source, select Associator as the field, and Email Address as the return field.
This inserts a lookup, [%Workflow Context_Associator%], which is the person who associated the workflow with the list, library, or content type.
Add a new behavior to an individual task
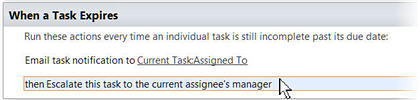
One of the behaviors in the approval workflow is to send emails to workflow participants when the task expires but isn’t complete. This is a useful way to remind participants to complete their tasks and not hold up the approval process. However, if one of the participants is on vacation or out of the office and not checking mail, the task process will expire. In this case, you may want to escalate the task to the participant’s manager who can then complete the task or reassign it.
To do this, you choose Change the behavior of a single task from the summary page. In the When a Task Expires stage, add the task behavior action, Escalate Task, just after the email task notification as follows.
Add a new behavior to the task process
Up to this point, you’ve seen how approval workflows route assigned tasks to a group of participants until the completion conditions for the workflow are met. This does a great job of streamlining human processes in an organization, such as legal document reviews, expense reporting, and managing equipment purchases.
But what if you want the workflow to perform an automated function based on the results of the approval? As you recall, the entire approval workflow is a composite action, or sub-workflow (represented by the Start Approval Process action in this case) that resides in a larger workflow – which is all about automating such tasks. Therefore, you can add this action either to the main workflow or add it to the task process itself, which is what we’ll do here. Specifically, we’ll create a new order in a separate orders list only if the current approval workflow is approved.
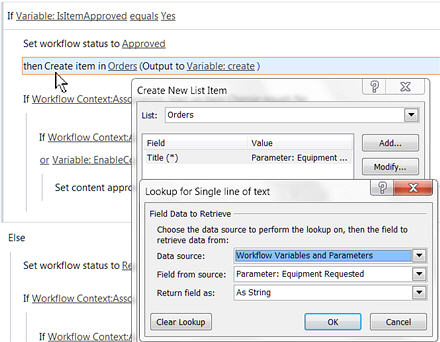
To do this, choose Change the behavior of the overall task process from the summary page. In the When the Task Process Completes stage, after the workflow status is set to approved, add the Create List Item action. Since the action will create a list item based on user-submitted data, you need to specify a list and the data that goes into the list.
Note: To make the rest of this example work, you need to first create a list on your site and in the workflow, add one or more initiation form parameters to hold the field values that will go into that list. For the example below, an Orders list was created on the site and an initiation form parameter called Equipment Requested was added to the workflow.
Click this list to open the Create New List Item dialog box. Choose the list where you want to create a list item, in this case, Orders. Select a field from the list, in this case Title, and then click Modify. In the Value Assignment dialog box, leave the Title field selected and click fx to look up the value you want inserted in the Title field. For data source, choose Workflow Variables and Parameters since a parameter was added to this workflow. For the field from the data source, choose Parameter: Equipment Requested.
The dialog boxes and resulting workflow behavior looks like this.
Next steps
This article described the task process model and the task process editor to create and customize approval workflows. There’s a lot more customization you can do with workflows using SharePoint Designer 2010. Here are examples of workflow customization beyond the task process editor.
-
Enabled and disable workflow start options and task form options
-
Add and remove form fields in the initiation, association, and task forms
-
Design and create powerful form logic using Microsoft InfoPath 2010
-
Create parameters and variables to manage data throughout the workflow
-
Associate site columns that can travel with the workflow
-
Save the customized workflow as a template and share it with others
-
Export and import workflows to and from Microsoft Visio 2010
Learn more about these tasks and workflows in general in the See Also section on this page.


