
Web Analytics Integration is a free app that enables you to connect your Microsoft SharePoint public website to third-party web analytics services, such as Webtrends, Google Analytics, Adobe, and so on. The benefit of this connection is that you can take advantage of the rich data collection and reporting features provided by these services without having to install or maintain server-side code. The Web Analytics Integration app is available in the SharePoint store to all licensed SharePointsubscribers.
Note: The SharePoint Online Public Website information in this article applies only if your organization purchased Microsoft 365 prior to March 9, 2015. Customers who currently use this feature will continue to have access to the feature for a minimum of two years after the changeover date of March 9, 2015. New customers who subscribed to Microsoft 365 after the changeover date don't have access to this feature. Moving forward, Microsoft 365 customers have access to industry-leading third-party offerings that enable them to have a public website that provides a complete online solution and presence. For more information about this change, see Information about changes to the SharePoint Online Public Website feature in Microsoft 365.
How it works
Once you download the app from the SharePoint store, you’ll be asked to trust it. This is a typical scenario that’s required for all app downloads. Next, you’ll add the JavaScript or HTML tracking script to enable page view and visit tracking. The app will ensure the script is injected into all pages being served from your public site. The tracking script should be provided to you by your third-party analytics service along with instructions as to where to place the script—either in the Head or Body section of the master page. Once the script is in place, all site pages will inherit the script from the master page and your web analytics service can begin collecting site statistics.
Download the app from the SharePoint store
-
From any page on your public website, click Settings

-
In the Quick Launch navigation on the left side of the page, click SharePoint Store.
-
Under Categories, click Public-facing Websites.
-
Click Web Analytics Integration.
-
Click ADD IT.
-
If asked, follow the steps to log on with your Microsoft account.
-
Review the permissions information and click Trust It.
You’ll be redirected to the Site Contents page where your new app is installed. This is where you’ll go anytime you want to launch the app.
Enable web analytics services integration
Before you can start using the Web Analytics Integration app, you must first enable it. Enabling it makes the app active so that once configured, it can connect with the web analytics service to facilitate data collection.
-
From any page on your public website, click Settings
-
Click the Web Analytics Integration tile.
-
On the right side of the screen, click Enable.
Disable web analytics services integration
You can disable the Web Analytics Integration app at any time. When the app is disabled the JavaScript or HTML tracking code will no longer be injected into all public site pages and no more usage data will be sent to your analytics service provider.
-
From any page on your public website, click Settings
-
Click the Web Analytics Integration tile.
-
On the right side of the screen, click Disable.
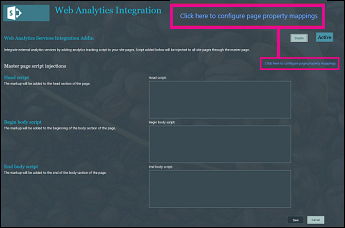
Add the tracking script in the Web Analytics Integration app
The tracking script is provided by your web analytics service. It’s usually found on the company’s web site and might require a username and password for access. Insert the script by following these steps:
-
From any page on your public website, click Settings
-
Click the Web Analytics Integration tile.
-
Paste the script into one of the three boxes (Head script, Begin body script, or End body script) as directed by your web analytics service. This information is probably included on their web site. For example:
Copy and paste it into your web page, just before the closing </head> tag*.
-
Click Save. Once you save the script, the app will add it to all pages in your public web site. It will also add the script to any new pages you publish on your site.
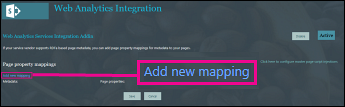
Page property mappings
If your service vendor supports Resource Description Framework attribute-based (RDFa) page metadata, you can add page property mappings for metadata to your pages. Adding this metadata allows you to classify sets of pages so you can analyze data for the set rather than individually. For example, you could set up a page property mapping to track the number of impressions for all product pages.
Add new mapping
-
From any page on your public website, click Settings
-
Click the Web Analytics Integration tile.
-
Browse to the Page property mappings page (from the Master page script injections page, click Click here to configure page property mappings).
-
Click Add new mapping.
-
In Metadata, type the data to associate with the page property. For example, if you want to track clicks to the phone number posted on your site, you would enter that phone number.
-
In Page properties, select the property that you want to associate with the metadata. For the phone number example, you would choose WorkPhone.
-
Click Save.
Remove a mapping
-
From any page on your public website, click Settings
-
Click the Web Analytics Integration tile.
-
Browse to the Page property mappings page (from the Master page script injections page, click Click here to configure page property mappings).
-
Locate the metadata property you want to remove and click Remove.
-
Click Save.


