
In Duet Enterprise for Microsoft SharePoint and SAP, if you have appropriate permissions and authorizations, you can customize the report settings that the SAP backend uses to run the report. For example, you might want to run a Profit and Loss Statement for a single posting period, rather than the standard fiscal year of an existing published report, or you might want to have a report delivered in Excel instead of HTML.
You can change the report title, and choose the output format (Excel, .PDF, or HTML) of the report. Depending on the design of the individual report, you might also be able to change report parameters and the report schedule. In addition, you can save your changes as a new report query, so that it is available in the future.
Important: To modify the report settings for a report, you must have appropriate permissions for that report.
In this article
View and modify settings for a report
The Report Settings page contains a list of reports that you have authorization to run by request. If you have appropriate permissions, in addition, you can modify the report settings for some reports.
To view and modify report settings:
-
From the site that contains your reports, click the Reports Center tab. Sometimes, site designers also place a link to the Reports page in the Quick Launch panel.
-
On the Reports page, in the Quick Launch panel, select Report Settings to open the Report Settings page.
-
Point to the report whose settings you want to change to make the down arrow appear, and then click the down arrow to open the shortcut menu.
-
From the shortcut menu, select Edit Properties to display the properties page.
-
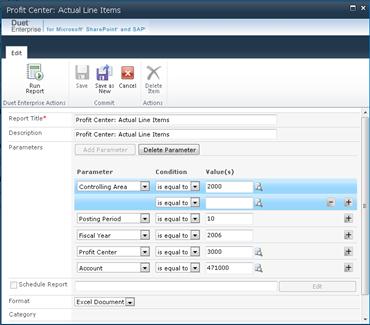
On the properties page, make the changes that you want to make. You can change only the items that you are authorized to change; items that you are not authorized to change are hidden or inactive (grayed out).
For example, in the following illustration, the user has permission to change multiple parameters. As you can see, for each parameter, the user can select a parameter from a drop-down menu, and then set one or more boundary values for the parameter. However, notice that the Edit button in the Schedule row is inactive (grayed out). This user does not have permission to change the report schedule.
-
(Optional) If you want to run the report with the changed settings, click Run Report.
Set a report schedule
If you have appropriate permissions, you can specify a regular, recurring schedule for a report run. For example, you might want to receive a certain report each week, or on the first day of each month. When you set a regular schedule, the report runs automatically at the time that you specify. You can also configure settings so that you receive notification when the data for a certain report changes.
In both cases, when the report runs, you receive a notification by e-mail.
To set a report schedule:
-
From the site that contains your reports, open the Reports Center site.
-
In the Quick Launch panel, select Report Settings to open the Report Settings page.
-
Point to the report that you want to schedule to make the down arrow appear, and then click the down arrow to open the shortcut menu.
-
From the shortcut menu, select Edit Properties to open the report properties page.
-
Check the box next to Schedule Report, and then click Edit to open the Manage Schedules dialog box.
-
In the Type section, check the radio button next to the type of schedule recurrence that you want to set (Pre-defined frequency, or When data changes in the SAP system).
-
In the Settings section, check the radio button next to the setting relevant to your report.
-
Click OK to copy the schedule information that you specified to the properties page, and close the dialog.
Save report settings
After you change the report settings for a report option, you can save the changes.
-
To save your changes as a new report option, click Save as New. This saves the collection of settings. When you use this option, you can change the title of the report so that the modified report settings are saved separately. The next time that you view the Report Settings page, the new option appears next to the original version in the list of reports.


