
SharePoint Server includes a set of approval workflows that you can use to manage business processes in your organization. These workflows make business processes more efficient by managing and tracking the human tasks involved with a process and then providing a record of that process when it completes. You can use an approval workflow to manage document creation, expense reporting, employee vacations, and more.
To set up the workflows, you simply apply one of them to a list, library, or content type. When doing so, you can change the attributes of the workflow, such as who will approve it, due dates for each task, and the message shown in the workflow. When finished with these settings, you can start using the approval workflow right away. To further customize the workflows, you can edit them directly in SharePoint Designer 2010 or 2013. With SharePoint Designer, you can customize the workflow forms, task outcomes, completion conditions, and every stage of the task process. It’s a powerful way to model an approval workflow for any business process.
In this article, we’ll take a look at the approval workflows that you can use as is or customize in SharePoint Designer 2010 or 2013.
About approval workflows
An approval workflow routes items in a SharePoint site to specified people for approval. It manages and tracks all of the human tasks involved with the process and provides a record of the process when it completes. Approval workflows support any business process that requires sending documents or items to colleagues or managers for approval.
Once an approval workflow is configured for a list or content type, business users can start the workflow at any time (unless the workflow was configured to automatically start when the document is created or changed). They can start the workflow from SharePoint Server or from Office application used to author the document. When they start the workflow, they can choose who to send it to (the approvers), due dates, relevant instructions, and more. When the workflow starts, it automatically assigns a task to the first participant in the workflow. If e-mail alerts are enabled, an email message will be sent to the participants.
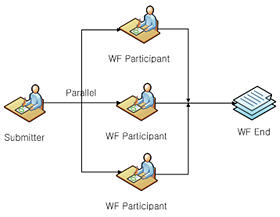
If the workflow has multiple participants, it can be sent one at a time (serial) or multiple participants at the same time (parallel), going through every participant until the workflow ends. You specify serial or parallel tasks when setting up or starting the workflow. You can even set up the workflow in stages, with a series of serial tasks and parallel tasks containing different participants.

When participants receive the task email or go to the Tasks list directly, they can view the item or document and then approve, reject, request changes, or reassign it. Participants can work with these tasks directly in SharePoint or from an Office application, like Word, Excel, and Outlook.
While the workflow is running, the participants and owner of the workflow can view where it’s at in the approval process using the Workflow Status page. When the participants complete their tasks, the workflow ends, and the owner is notified that the workflow is complete.
Default approval workflows
Microsoft SharePoint Server 2010 includes several approval workflows that you can begin using right away to manage human workflows in your organization. Each workflow can be added to a list, library, or content type and then used by your business users to manage the items or documents in the associated lists or libraries.
You can use the workflows to run document approvals, collect feedback, collect signatures, manage publishing of assets, manage dispositions, and create three-state approvals. When you associate and initiate the workflow, you can change the basic behaviors of the workflow, like who approves it, how the tasks are assigned, duration, due dates, workflow messages, and so on. For most of the workflows, you can also customize them in SharePoint Designer 2010 or 2013.
Each workflow is described below, including the main differences between the workflows, and whether they’re supported for customization in SharePoint Designer 2010 or 2013.
|
Workflow |
Description |
In SharePoint Designer |
|
Approval |
The Approval workflow routes a document or item to a group of people for approval. It supports staged approvals whereby the first set of approvers can review and approve, then the next set of approvers can review and approve, and so on. Each stage of approvers can do review in serial order (one at a time), parallel order (all at once), and normal serial or parallel task assignments. The duration and due dates of the task can be specified in days, weeks, and months, as well as a final due date for all of the tasks in the workflow. You can individuals to the CC (carbon copy) field. The workflow can be set up to end when the first approver rejects it. It can end if the document being review is changed. And, the workflow can enable content approval, if you like. The tasks and emails in the workflow request content approval, so the task form includes buttons for Approve, Reject, Request Change, and Reassign. For approvers, comments support a consolidated comment that shows the entire list of previous approvers’ comments. Approval workflows can also be used to set content approval status at the end. The Approval workflow is by default associated with the Document content type so it is available to document libraries. NOTE: This workflow is only available in SharePoint Server. |
Yes |
|
Collect Feedback |
The Collect Feedback workflow is very similar to the Approval workflow. It routes items or documents to a group of people, but in this case, the workflow is designed to get feedback from the approvers. The feedback is compiled and sent back to the person who initiated the workflow. Like the Approval workflow, this workflow supports staged approvals and lets you specify duration and due dates in days, weeks, and months, as well as the final due date. The workflow can also be set up to end if the document is changed, and you can add individuals to the CC (carbon copy) field. Unlike the Approval workflow, there is no option to end the workflow on first rejection since that doesn’t apply here, and there is no option to enable content approval. Since the tasks and emails in the workflow request content approval, the task form includes buttons for Send Feedback, Request Change, and Reassign. The Collect Feedback workflow is associated with the Document content type so it is available in document libraries. NOTE: This workflow is only available in SharePoint Server. |
Yes |
|
Collect Signatures |
The Collect Signatures workflow routes documents created in a Microsoft application to a group of people to collect their digital signatures. You can add signers in serial or parallel order, and you can add them in stages. You can also add individuals to the CC (carbon copy) field. There are no other fields or behaviors for this workflow (unlike the Approval and Collect Feedback workflows). When the signers of the workflow receive the task, they can sign it from the Task list in SharePoint or from within the host document, such as Microsoft Word, Excel, and PowerPoint. The task form includes buttons for Sign or Reassign the task only. The signing mechanism uses the Microsoft Office Signature Line control. The signature image can be provided by the user or applied automatically using logic in the form (specifically, rule and action in the InfoPath form). The Collect Signatures workflow is associated with the Document content type so it is available in document libraries However, the workflow will only appear in the library if that document contains one or more Microsoft Office Signature Lines. NOTE: This workflow is only available in SharePoint Server. |
Yes |
|
Publishing |
The Publishing workflow routes content for approval in the same the Approval workflow does this except that it’s designed for Enterprise Content Management sites with publishing features enabled. Another difference is in the workflow forms. The association and initiation forms hide the option to add approvers, end workflow on first rejection, end workflow if document changes, and enable content approval. NOTE: The Publishing workflow is only available in SharePoint Server where the Publishing feature is enabled. |
Yes |
|
Three-state |
The Three-state workflow tracks the status of an issue or item through three states and two transitions between the states, which help track high volume issues. The workflow is designed to work with the Issue Tracking list template but can be used with any list that has a Choice column with three or more values that serve as the state of the workflow. Participants in the workflow may be working with the list directly or outside projects related to the list. The workflow updates the status of the list and creates a new task for the next participant, and this process continues. Workflow participants can change the complete their task or change the status of the workflow item. NOTE: This workflow is available in both SharePoint Foundation 2010 and SharePoint Server. |
No |
|
Disposition Approval |
The Disposition Approval workflow tracks content that has expired or is out-of-date and needs to be evaluated or deleted. This workflow is especially useful on a Records Center site or a site that supports records management document retention policies. The workflow can be configured to start automatically when documents or items expire or started manually by participants. The workflow uses Disposition Approval workflow tasks for specific documents and items in the tasks list rather than assigning them to specific participants. Only those who have permissions to this tasks list can complete the task by approving or rejecting items for deletion. The workflow also includes bulk task completion so that individuals can process large numbers of items for deletion in one step. This is commonly needed because of the high volume of tasks generated by the workflow. NOTE: This workflow is only available in SharePoint Server. |
No |
Using the workflows in SharePoint Server
To use the workflows in SharePoint Server, you first add the workflow to a list, library, or content type. Once you do that, the workflow is available to users of the list or library - whether you associated the workflow with them directly or associated the workflow with a content type used by the list or library. When associating a workflow with a content type, you can associate it with a site content type or list content type (an instance of a site content type that was added to a specific list or library). Site content types are beneficial in that the workflow becomes widely available across lists or libraries in a site collection for items of a specific content type.
If you have Manage Lists permissions, you have the option to add a workflow to a list, library, or content type. Follow the steps below set up the initial workflow.
-
Browse to the list or library where you want to add the workflow.
-
Click the List tab if it’s a list, or the Library tab if it’s a library.
-
In the Settings group, click Workflow Settings.
-
On the Workflow Settings page, click Add a workflow.
-
Browse to the list or library containing an instance of the list content type you want to modify.
-
Click the List tab if it’s a list, or the Library tab if it’s a library.
-
Click List Settings if it’s a list or Library Settings if it’s a library.
-
Under Content Types, click the name of the content type you want to associate the workflow with.
If you don’t see Content Types on the page, you may need to choose Advanced Settings and then Allow management of content types. -
Under Settings, choose Workflow settings.
-
Click Add a workflow.
-
From the home page for the site collection, choose Site Actions and then Site Settings.
-
Under Galleries, click Site content types.
-
Click the name of the site content type you want to add or associate the workflow with.
-
Click Workflow Settings.
-
On the Workflow Settings page, click Add a workflow.
Performing any of the steps above brings you to the Add a Workflow page where you choose the type of workflow, name of workflow, task list to use, etc.

On this page, you can configure the following workflow settings:
-
Choose a workflow template, like Approval, Collect Feedback, and Collect Signatures.
-
Specify a name for the workflow.
-
Specify the Task list to use for the tasks in this workflow.
-
Specify the History list to use for this workflow.
-
Allow the workflow to be manually started by users.
-
Require the Manage Lists Permissions to start the workflow.
-
Start the workflow to approve publishing a major version of an item.
-
Start the workflow when a new item is created.
-
Start the workflow when an item is changed.
The next page shows the workflow behaviors that you can change, like the approvers, workflow message, and due dates. The values you choose become the default values when users start the workflow – in other words, you fill out the association form exactly once, when you add the workflow to a list, library, or content type, and those values are used in all subsequent instances of the workflow.
The association form is different for each of the workflows included with SharePoint. This is what you see when associating Approval workflows.
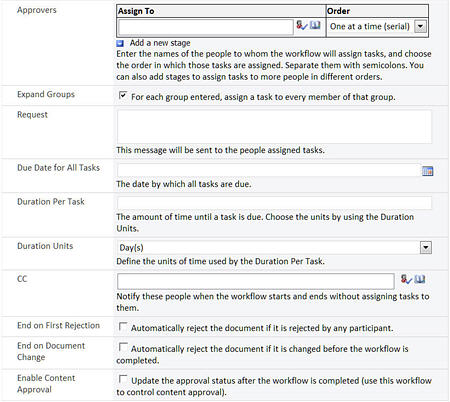
On this page, you can specify the following workflow behaviors:
-
Approvers for the workflow.
-
Order of approvers: serial or parallel
-
Stages of approval.
-
Expand groups by assigning tasks to every member of the group.
-
Request message that appears in the workflow.
-
Due date for all tasks.
-
Duration per task.
-
Duration units: days, weeks, or months.
-
CC, who to carbon copy the assigned tasks.
-
End the workflow on first rejection.
-
End the workflow if the document changes.
-
Enable content approval by updating the approval status when the workflow completes.
Once the workflow has been associated with a list, library, or content type, you and others are ready to start using the workflow. If you chose to start the workflow when items are created or changed (on the Add a Workflow page), users won’t see a difference or even know a workflow has started when creating and updating documents or list items on the site. When these options are not selected, users start the workflow on their own, manually.
They do this by choosing the Workflows option from within the Office 2010 application used to create the document, or they can choose the Workflows options from the list or library where the item is stored, such as the pull-down menu beside the list item.
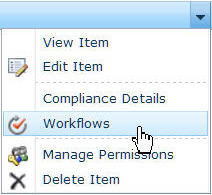
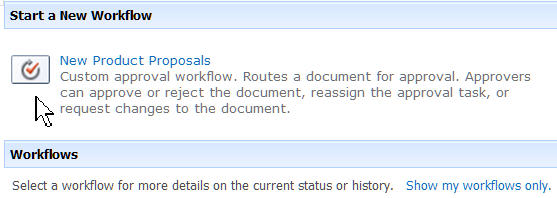
Clicking here, takes the user to the Start a New Workflow page, which shows the available workflows that can be started plus the status of other workflows that are running and have completed.
Lastly, they see the workflow initiation form where they can specify the core behaviors of the workflow. In contrast with the association form, which is completed exactly once when the workflow is first added to a list, library, or content type, the initiation form is completed once each time the workflow is started manually – so each instance of the workflow can use different initiation form values, but they all use the same association form values.
The form is different for each of the workflows included with SharePoint, and default values will appear in the form if they were added to the association form (as described earlier). The Approval workflow initiation form, without any default values, looks like this.

The person starting the workflow can add new values or leave the defaults and then choose Start. This creates a task and assigns it to the first approver listed.
For the approvers listed in the workflow, they receive a task assigned to them, and they receive an email notification. They can approve or reject the task directly from within certain Office 2010 applications, like Outlook – or they can go directly to the Tasks list, where they will see the new task assigned to them.
When they open the task, they see the task form that they can use to approve, reject, request a change, or reassign the task. The task form for the Approval workflow looks like this.
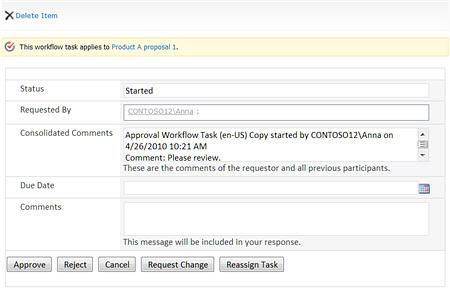
Depending on the approver’s actions, the task might be assigned to the next approver, sent back to the author with requested changes, or approved, which completes the workflow.
Editing the workflows in SharePoint Designer 2010 or 2013
When setting up workflows in SharePoint, you can change some of the basic behaviors, like who the approvers are, due dates for tasks, and the messages in the workflow. This is a useful way to quickly get started with the approval workflows and for the most part, they address many common business process needs.
In addition to using the workflows this way, you can open many of the workflows in SharePoint Designer 2010 or 2013 and completely customize the appearance, behavior, and results of the workflow. You can customize the forms that users see, completion conditions, and every stage of the tasks and task processes in the workflow.
In the following table you see a comparison of the types of customization you can do in the browser with the types of customization you can do in SharePoint Designer2010. This based is based on the approval workflow in SharePoint Server 2010.
|
Workflow customization in SharePoint |
Workflow customization in SharePoint Designer |
|
|
|
When you open SharePoint Designer 2010 or 2013 and then open Workflows from the navigation pane, you see all of the workflows available to your site. You see list workflows, site workflows, and reusable workflows. In addition to these, you see the globally reusable workflows, which is where the default approval workflows in SharePoint Server show up.
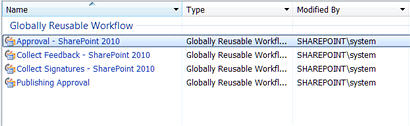
You’ll notice that only the Approval, Collect Feedback, Collect Signatures, and Publishing workflows display here. This is because these workflows were all built using features supported in SharePoint Designer 2010 or 2013. For example, they use the OfficeTask workflow action, integrated InfoPath forms, and support for Visio-based workflows. The Three-state workflow and the Disposition Approval workflow, however, are not supported because these are compiled workflows that would require a development application like Microsoft Visual Studio to replicate the workflow activities. The remainder of this article will focus on the workflows that are supported in SharePoint Designer 2010 or 2013.
There are two ways to edit the workflows. Edit them directly and make changes to the original workflow, or create a copy of the workflow and customize it. Both options are available to you if you’re a site collection administrator. If you’re a site owner or designer, the workflows are read-only, so you’ll have to create a copy and edit the copy. It’s a good practice anyway to edit a copy of the workflow in case the original workflow is currently in use and serving a business function.
When you open the approval workflow (whether you edit the original or edit a copy), you see the summary page, the first layer of user interface for the workflow. This page shows you the main workflow settings and objects related to the workflow.
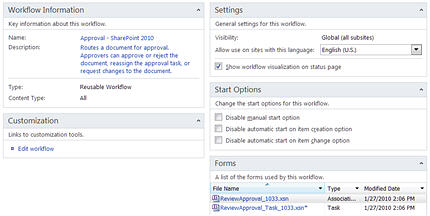
You see, for example, the name and description fields as well as its workflow type and content type. You see some of the common workflow settings, like language and whether to enable workflow visualization, which is the web-based visual display of the workflow status provided by Visio Services in SharePoint Server 2010. You also see the start options, where you can disable the manual start of a workflow, the automatic start of a workflow when new items are created, and the automatic start of a workflow when items are changed. Choosing any of these options will disable the corresponding workflow start option in SharePoint.
You also see the forms associated with the workflow – the association and initiation form (the same form is used for both purposes), and the task form. These are InfoPath 2010 forms that can be opened from here and customized directly in the InfoPath form editor. In the ribbon, you can customize the initiation form parameters, local variables, and associated columns for the workflow - all of which are used to collect, store, and retrieve data throughout the workflow process. Using the ribbon, you can also change the associated lists and content types, as well as export and import the workflow to and from Visio 2010.
To get deeper into the workflow and begin customizing its definition and logic, choose Edit workflow in the Customization group.
On this screen, you’re looking at the standard workflow editor in SharePoint Designer 2010 or 2013. It’s a full-screen workspace where you can create and customize workflows of all kinds. Typically, you use this space to create custom workflows that automate system processes or those that automatically update, change, or move data based on a changing data source.
In the case of the Approval workflow, the workflow contains just one line, which starts the approval process on a given item with a group of approvers (who are specified when the workflow is set up).
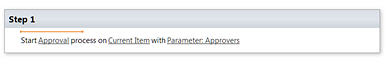
While this might appear relatively simple at first, this one “Start Approval process” action is actually a composite workflow action that holds the task hierarchy and core routing logic of an entire approval process. In effect, it’s a workflow action with multiple layers and behaviors, including task assignments, routing details, and data binding to SharePoint content.
If you were creating a new approval workflow from scratch, you could simply add this “Start Approval process” action from the Action gallery and instantly have the framework and logic for an approval process.
To view and edit the contents of this Approval workflow click the Approval link. This takes you to the task process summary page.
The task process summary page shows all of the objects related to the task process in the same way that the workflow summary page shows all of the objects related to the workflow. You can almost think of the task process as a sub-workflow nested in the main workflow. The task process summary page is one level below the workflow summary page in the hierarchy of objects.
On the summary page, you can change the name and owner. You can specify that only task recipients and process owners can add and edit workflows tasks. You can allow reassignment and change requests for the workflow. You can add and remove individual task completion fields, and you can change the task outcomes, like Approve and Reject.

But the most significant settings are in the Customization group, where you can change the workflow completion conditions, behaviors of individual tasks, and behaviors of the overall task process. (There’s a “Return to the workflow” link as well in this section that simply brings you back to the workflow editor on the previous screen.)
To customize the workflow behaviors and completion conditions, you use the task process editor - which acts like a sub-workflow editor within the larger workflow editor of SharePoint Designer. In the task process editor, you see into the approval workflow framework with its layers of tasks and task processes, while at the time being able to add and customize whatever logic you like using the available workflow commands.
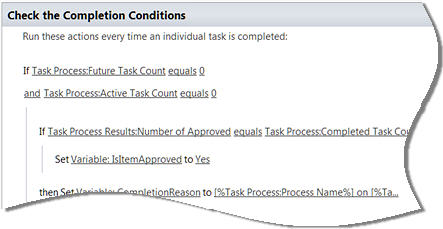
The first option available is to change the completion conditions for the task process. When you open the completion conditions for the Approval workflow, you see all of the conditions that must be met for the workflow to be considered complete. For example, if the number of approved tasks equals the completed task count, then the approved variable is set to Yes. You can add more logic here so that a different set of conditions are required for the workflow to be complete or you can leave the existing conditions in place.
Note: In addition to the default workflow actions, approval workflows include a group of Task Behavior Actions that you can use to add task-specific logic to the workflow. For example, you can insert actions that append, escalate, and send new task notifications.
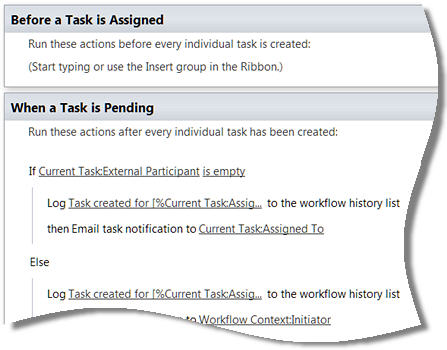
You can change the behavior of each phase of the individual tasks using the task process editor. Specifically, you can change what happens when a task is assigned, when it’s pending, when it expires, when it’s deleted, and when it completes. In the Approval workflow, you see the logic that has been added to each of these phases.
For example, if the task expires - specifically if the task is incomplete after its due date - it sends an email notification to the individual who is assigned the current task.
In addition to changing the behaviors of the individual tasks, you can change the behaviors of the overall task process, which encapsulates the individual tasks. Specifically, you can change what happens when the task process starts, when it’s running (which includes deleted and changed), when it’s canceled, and when it completes. In the Approval workflow, you see a lot more logic has been added to these stages of the workflow.
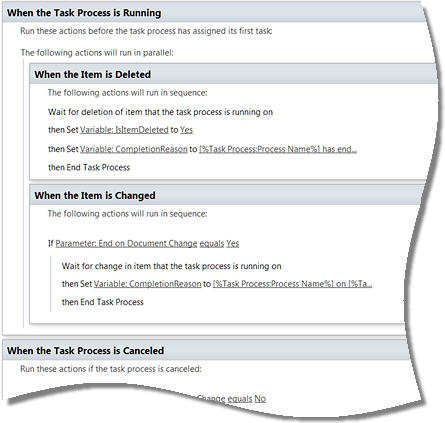
For example, there are a number of things happen when the task process completes. If the approved variable equals yes, then the workflow status is set to approved. If the enable content approval parameter is Yes, then content approval for the workflow item is set to approved. These are just a small sample of the logic that has been added to the overall task process.
Again, you can change this logic or add your own logic to this stage or any of the stages in the task process. Just examining the existing logic is a great way to learn how to create and apply workflow designs.
Next steps
The approval workflows in SharePoint Server can be used for a wide variety of business processes from informal content reviews to structured expense reporting because they follow similar routing patterns. As such, you can use the default workflows as they are to address these needs, changing only the type of workflow, the approvers, due dates, and so on.
Where businesses and departments may differ is in the behaviors specific to each stage in the workflow process. And this is where you can use SharePoint Designer 2010 or 2013 and its workflow editors to add and customize new logic in each phase of the process while preserving the common behaviors of the overall business workflow.
The best way to get started with the approval workflows is to apply them to your site using a small group of approvers, observe the forms and emails, the document or items being approved, and the associated task and history lists. Then start making changes using first SharePoint in the browser and then SharePoint Designer 2010 or 2013.


