
When you make a recording of a presentation, all its elements (narration, animation, pointer movements, timings, and so on) are saved in the presentation itself. In essence, the presentation becomes a video that your audience can watch in PowerPoint.
So you have two options for turning your presentation into a video that's ready to view:
-
Save/export your presentation to a video file format (.mp4 or .wmv).
-
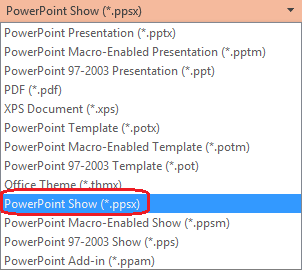
Save your presentation as a PowerPoint Show (.ppsx) file. (A PowerPoint Show appears full-screen in Slide Show, ready to view immediately.)
Save as a video file
After you've created your slides and recorded any timing and narrations and laser pointer gestures that you want to include, you're ready to create a video file.

51 seconds
-
On the File menu, select Save to ensure all your recent work has been saved in PowerPoint presentation format (.pptx).
-
Select File > Export > Create a Video. (Or, on the Recording tab of the ribbon, select Export to Video.)
-
In the first drop-down box under the Create a Video heading, select the video quality you want, which pertains to the resolution of the finished video. The higher the video quality, the larger the file size. (You may want to test them to determine which one meets your needs.)
Option
Resolution
For displaying on
Ultra HD (4K)*
3840 x 2160, largest file size
Large monitors
Full HD (1080p)
1920 x 1080, large file size
Computer and HD screens
HD (720p)
1280 x 720, medium file size
Internet and DVD
Standard (480p)
852 x 480, smallest file size
Portable devices
* The Ultra HD (4K) option is only available if you're using Windows 10 or later.
-
The second drop-down box under the Create a Video heading tells whether your presentation includes narration and timings. (You may switch this setting if you like.)
-
If you haven't recorded timed narration, by default the value is Don't Use Recorded Timings and Narrations.
The default time spent on each slide is 5 seconds. You can change that timing in the Seconds to spend on each slide box. To the right of the box, select the up arrow to increase the duration, or select the down arrow to decrease the duration.
-
If you have recorded a timed narration, by default the value is Use Recorded Timings and Narrations.
-
-
Select Create Video.
-
In the File name box, enter a file name for the video, browse for the folder that will contain this file, and then select Save.
-
In the Save as type box, choose either MPEG-4 Video or Windows Media Video.
You can track the progress of the video creation by looking at the status bar at the bottom of your screen. The video creation process can take up to several hours depending on the length of the video and the complexity of the presentation.
Tip: For a long video, you can set it up to be created overnight. That way, it’ll be ready for you the following morning.
-
To play your newly-created video, go to the designated folder location, and then double-click the file.
Save as a PowerPoint Show
When someone opens a PowerPoint Show file, it appears full-screen in Slide Show, rather than in edit mode. The viewer begins watching the presentation immediately.
-
On the File menu, select Save to ensure all your recent work has been saved in PowerPoint presentation format (.pptx).
-
On the File menu, select Save As.
-
Choose the folder location where you want to store your PowerPoint Show file.
-
In the Save as type box, choose PowerPoint Show (*.ppsx).
-
Select Save.
Why turn your presentation into a video?
When you want to give a high-fidelity version of your presentation to colleagues or customers (either as an e-mail attachment, published to the web, on a CD or DVD), save it and let it play as a video.
You can save your presentation as either an MPEG-4 video file (.mp4) or a .wmv file. Both formats are widely supported and can be streamed over the internet.
Some tips to remember when recording your presentation as a video:
-
You can record and time voice narration and laser pointer movements in your video.
-
You can control the size of the multimedia file and the quality of your video.
-
You can include animations and transitions in your movie.
-
Viewers do not need to have PowerPoint installed on their computers to watch it.
-
If your presentation contains an embedded video, the video will play correctly without your needing to control it.
-
Depending on the content of your presentation, creating a video may take some time. Lengthy presentations and presentations with animations, transitions, and media content will likely take longer to create. Fortunately, you can continue to use PowerPoint while the video is being created
What parts of a presentation won't be included in a video?
The following items won't be included in a video that you create using PowerPoint:
-
Media inserted in previous versions of PowerPoint. To include these, you can convert or upgrade the media object.
For example, if you inserted the media using PowerPoint 2007, it will be linked and it will play in the presentation. However, when you export the file as a video, the linked media will be dropped. You can convert the file to the new file format (select the File tab, and under Info, select Convert), or you can right-click the media object and then select it to upgrade; it will embed the file and export it correctly.
-
QuickTime media (unless you have a third-party QuickTime codec named ffdShow installed and you have optimized for compatibility)
-
Macros
-
OLE/ActiveX controls
What to do with your video after creating it
After you create a video, you can share it with others by using the following methods:
-
Upload it to your organization's Microsoft Stream video-sharing site, as described in the next section, "Save to a video-sharing site."
Save to the Microsoft video-sharing site
After you've created the video file, you can upload it to a video-sharing site. Microsoft Stream is an enterprise video service where people in an organization can upload, view, and share videos. Microsoft 365 business or education subscribers have access to this service from within PowerPoint for Microsoft 365.
-
Select File > Export, and then select Publish to Microsoft Stream.

-
Type a title and a description for the video.
-
Set other options, including whether you want others in your organization to have permission to see the video:

-
Select the Publish button.
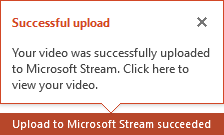
The upload process can take several minutes, depending on the length of the video. A status bar at the bottom of the PowerPoint window tracks the progress, and PowerPoint shows a message when the upload is finished:
-
Select the message to go directly to the video playback page on Microsoft Stream.
For more information about this service, begin reading with What is Microsoft Stream? It includes information about Office 365 Video vs. Microsoft Stream.
Save as a video file
After you've created your slides and recorded any timing and narrations and laser pointer gestures that you want to include, you're ready to create a video file.
51 seconds
-
On the File menu, select Save to ensure all your recent work has been saved in PowerPoint presentation format (.pptx).
-
Select File > Export > Create a Video. (Or, on the Recording tab of the ribbon, select Export to Video.)
-
In the first drop-down box under the Create a Video heading, select the video quality you want, which pertains to the resolution of the finished video. The higher the video quality, the larger the file size. (You may want to test them to determine which one meets your needs.)
Option
Resolution
For displaying on
Ultra HD (4K) 1 2
3840 x 2160, largest file size
Large monitors
Full HD (1080p)
1920 x 1080, large file size
Computer and HD screens
HD (720p)
1280 x 720, medium file size
Internet and DVD
Standard (480p)
852 x 480, smallest file size
Portable devices
1 The Ultra HD (4K) option is only available if you're using Windows 10 or later.
2 In PowerPoint 2016, the Ultra HD (4K) option isn't available in the Volume License edition. -
The second drop-down box under the Create a Video heading tells whether your presentation includes narration and timings. (You may switch this setting if you like.)
-
If you haven't recorded timed narration, by default the value is Don't Use Recorded Timings and Narrations.
The default time spent on each slide is 5 seconds. You can change that timing in the Seconds to spend on each slide box. To the right of the box, select the up arrow to increase the duration, or select the down arrow to decrease the duration.
-
If you have recorded a timed narration, by default the value is Use Recorded Timings and Narrations.
-
-
Select Create Video.
-
In the File name box, enter a file name for the video, browse for the folder that will contain this file, and then select Save.
-
In the Save as type box, choose either MPEG-4 Video or Windows Media Video.
You can track the progress of the video creation by looking at the status bar at the bottom of your screen. The video creation process can take up to several hours depending on the length of the video and the complexity of the presentation.
Tip: For a long video, you can set it up to be created overnight. That way, it’ll be ready for you the following morning.
-
To play your newly-created video, go to the designated folder location, and then double-click the file.
Save as a PowerPoint Show
When someone opens a PowerPoint Show file, it appears full-screen in Slide Show, rather than in edit mode. The viewer begins watching the presentation immediately.
-
On the File menu, select Save to ensure all your recent work has been saved in PowerPoint presentation format (.pptx).
-
On the File menu, select Save As.
-
Choose the folder location where you want to store your PowerPoint Show file.
-
In the Save as type box, choose PowerPoint Show (*.ppsx).
-
Select Save.
Why turn your presentation into a video?
When you want to give a high-fidelity version of your presentation to colleagues or customers (either as an e-mail attachment, published to the web, on a CD or DVD), save it and let it play as a video.
You can save your presentation as either an MPEG-4 video file (.mp4) or a .wmv file. Both formats are widely supported and can be streamed over the internet.
Some tips to remember when recording your presentation as a video:
-
You can record and time voice narration and laser pointer movements in your video.
-
You can control the size of the multimedia file and the quality of your video.
-
You can include animations and transitions in your movie.
-
Viewers do not need to have PowerPoint installed on their computers to watch it.
-
If your presentation contains an embedded video, the video will play correctly without your needing to control it.
-
Depending on the content of your presentation, creating a video may take some time. Lengthy presentations and presentations with animations, transitions, and media content will likely take longer to create. Fortunately, you can continue to use PowerPoint while the video is being created
What parts of a presentation won't be included in a video?
The following items won't be included in a video that you create using PowerPoint:
-
Media inserted in previous versions of PowerPoint. To include these, you can convert or upgrade the media object.
For example, if you inserted the media using PowerPoint 2007, it will be linked and it will play in the presentation. However, when you export the file as a video, the linked media will be dropped. You can convert the file to the new file format (select the File tab, and under Info, select Convert), or you can right-click the media object and then select it to upgrade; it will embed the file and export it correctly.
-
QuickTime media (unless you have a third-party QuickTime codec named ffdShow installed and you have optimized for compatibility)
-
Macros
-
OLE/ActiveX controls
What to do with your video after creating it
After you create a video, you can share it with others by using the following methods:


