
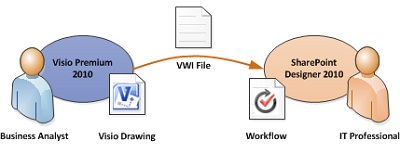
In Microsoft SharePoint Designer 2010, you can import a workflow created in Microsoft Visio Premium 2010 or export a workflow to Visio for viewing. Business analysts and process analysts who are already familiar with flowcharting in Visio can use Visio to design a workflow that represents their business logic, export the workflow, and enable a site owner or IT professional using SharePoint Designer to implement it in a form that can be automated in SharePoint 2010.
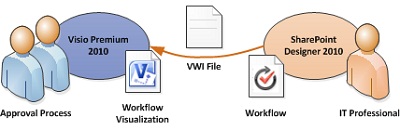
In addition, there are two ways that workflows in SharePoint Designer can be visualized:
-
If Visio Services is installed on the SharePoint 2010 server, you can create a workflow visualization on the workflow status page that displays progress and assignments.
-
You can export the workflow to Visio to create a workflow drawing that can be used for feedback and approval.
What do you want to do?
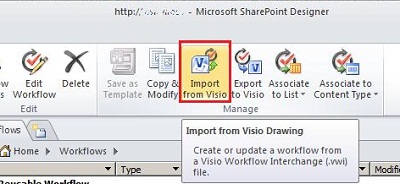
Import a workflow from Visio
To import a SharePoint workflow, do the following:
-
In SharePoint Designer 2010, in the Navigation pane, click Workflows.
-
On the Workflows tab, in the Manage group, click Import from Visio.
-
In the Import Workflow from Visio Drawing dialog box, browse to and select the Visio Workflow Interchange (.vwi) file you want to use, and then click Next.
-
Type a name for the workflow, and then select the type of workflow you want it to be once it has been imported. Your choices are:
-
List workflow – a workflow that is attached to a specific list. If you select this option, you must choose the list to which the workflow will be attached.
-
Reusable workflow – a workflow that is attached to a content type, and is therefore portable. It can be used by different lists on a SharePoint site. If you select this option, you must choose the content type on which the workflow will run.
-
-
Click Finish.
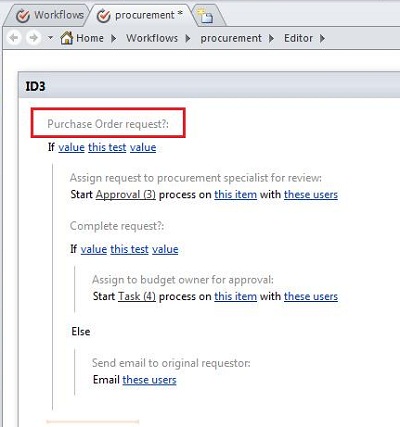
The imported workflow appears in SharePoint Designer’s full-screen workflow editor. All custom shape text in the Visio diagram is imported into SharePoint Designer as activity labels (the gray text in the image below) to clarify the intent of the workflow:
Once imported to SharePoint Designer, the workflow is editable and can be revised to add the necessary conditions, actions, steps, and settings. For more information about editing workflows, see Introduction to designing and customizing workflows
Export a workflow to Visio
Once you have created or edited a workflow in SharePoint Designer 2010, you can export the workflow as a Visio drawing that can be opened in Visio Premium 2010. The ability to import a workflow back to Visio after having been edited in SharePoint Designer, also known as “round-tripping,” enables deeper collaboration between business users and workflow designers. When iterating the workflow design in this way, you can use Visio to define the business requirements, and then use round-tripping as a way to coordinate and approve changes.
Note: Visio Premium 2010 does not support steps. Step information that has been added in SharePoint Designer may be lost when the workflow is viewed in Visio and then re-imported into SharePoint Designer.
To export a workflow, do the following:
-
In SharePoint Designer 2010, click Workflows in the Navigation pane.
-
On the Workflow tab, in the Manage group, click Export to Visio.
-
In the Export Workflow to Visio Drawing dialog box, name the file, select a location, and then click Save. The exported file is saved as a .vwi file that can be opened directly in Visio Premium 2010.
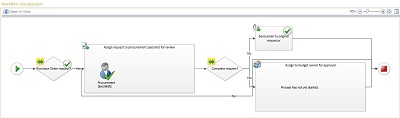
Visualize a workflow in SharePoint 2010 with Visio Services
Using SharePoint Designer 2010, you can enable workflow visualization on the workflow status page. This enables users to track the progress of the workflow visually during its execution. For example, the workflow visualization below shows tasks that are “in progress” and tasks that are “completed.” The people assigned to the tasks are also displayed clearly within the task shapes.
To add a workflow visualization to the workflow status page, do the following:
-
In SharePoint Designer 2010, click Workflows in the Navigation pane, and then click the workflow that you want to visualize.
-
On the summary page for that workflow, under Settings, check the Show workflow visualization on status page box.
Note: Visio Services must be enabled on the SharePoint Server 2010 and Visio Premium 2010 must be installed on the same machine as SharePoint Designer 2010.


