
Cause: Rules run automatically on messages only as you receive or send them.
Solution: Manually apply a rule to messages that you have already received.
-
At the bottom of the navigation pane, click Mail

-
In the folder list, click the folder that you want to apply the rule to.
-
On the Message menu, point to Rules, and then point to Apply, and then click a rule or click Apply All.
Notes:
-
Clicking Apply All includes Mailing List Manager rules.
-
Manually applying rules works only for On My Computer rules. You cannot use Outlook for Mac to manually apply server-based rules. For more information, see Create or edit a rule in Outlook for Mac 2011 or Create a rule in Outlook 2016 for Mac..
-
Cause: The rule is turned off.
Solution: Enable the rule.
-
On the Tools menu, click Rules.
-
In the left pane of the Rules dialog box, click the account type for the rule you want to edit.
If you don't know what type of account you have
-
In the Rules dialog box, click Show All, and then under Personal Settings, click Accounts.
-
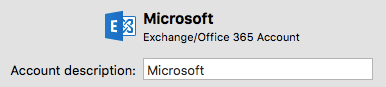
In the left pane of the Accounts dialog box, click the account. The account type appears under the account description. In this example, the account is a Exchange account.
-
To return to the Rules dialog box, click Show All, and then under E-mail, click Rules.
-
-
Select the Enabled check box next to the rule.
Cause: The rule refers to a deleted folder.
Solution: Update the rule to reflect your current folders.
-
On the Tools menu, click Rules.
-
In the left pane of the Rules dialog box, click the account type for the rule you want to edit.
If you don't know what type of account you have
-
In the Rules dialog box, click Show All, and then under Personal Settings, click Accounts.
-
In the left pane of the Accounts dialog box, click the account. The account type appears under the account description. In this example, the account is a Exchange account.
-
To return to the Rules dialog box, click Show All, and then under E-mail, click Rules.
-
-
Double-click the rule that is not working.
-
If any of the criteria or actions reference a deleted folder, choose a different folder.
Cause: A rule can be used on only one account type.
Solution: Create an additional rule for each account type.
For example, if you created a rule for a POP account, you can create a similar rule for an IMAP account.
-
On the Tools menu, click Rules.
-
In the left pane of the Rules dialog box, click the account type for the rule you want to edit.
If you don't know what type of account you have
-
In the Rules dialog box, click Show All, and then under Personal Settings, click Accounts.
-
In the left pane of the Accounts dialog box, click the account. The account type appears under the account description. In this example, the account is a Exchange account.
-
To return to the Rules dialog box, click Show All, and then under E-mail, click Rules.
-
-
Create the rule.
Note: To learn more about how to create rules, see Create or edit a rule in Outlook for Mac 2011 or Create a rule in Outlook 2016 for Mac.
Cause: A different rule is first being applied to messages.
Solution: Change the order in which the rules are applied.
Rules run in the order in which they appear in the list. The rule at the top of the list runs first.
-
On the Tools menu, click Rules.
-
In the left pane of the Rules dialog box, click the account type for the rule you want to edit.
If you don't know what type of account you have
-
In the Rules dialog box, click Show All, and then under Personal Settings, click Accounts.
-
In the left pane of the Accounts dialog box, click the account. The account type appears under the account description. In this example, the account is a Exchange account.
-
To return to the Rules dialog box, click Show All, and then under E-mail, click Rules.
-
-
Click a rule, and then click Move up or Move down

Solution: Apply multiple rules to messages.
By default, only one rule is applied to each message. As soon as a message has met the criteria for a rule, no other rules are applied. However, you can define a rule so that messages that meet its criteria are still available for other rules.
-
On the Tools menu, click Rules.
-
In the left pane of the Rules dialog box, click the account type for the rule you want to edit.
If you don't know what type of account you have
-
In the Rules dialog box, click Show All, and then under Personal Settings, click Accounts.
-
In the left pane of the Accounts dialog box, click the account. The account type appears under the account description. In this example, the account is a Exchange account.
-
To return to the Rules dialog box, click Show All, and then under E-mail, click Rules.
-
-
Double-click the rule you want to change.
-
Under Then, clear the check box labeled Do not apply other rules to messages that meet the same conditions.
Cause: Some rules created in Outlook for Mac are not saved on the Exchange server.
Solution: Create rules with Outlook Web App or Outlook for Windows.
To create or edit server-based rules in Outlook for Mac, you must have a Microsoft Exchange account managed by Microsoft Exchange Server 2010 or later. If you have an account managed by Microsoft Exchange Server 2007, you can create and edit server-based rules by using Outlook Web App or Outlook for Windows.
Rules saved on the Exchange server will run before your messages are downloaded to Outlook for Mac.
See also
Create or edit a rule in Outlook for Mac 2011


