
Visio has several tools to help you lay out shapes and connectors neatly and evenly.
-
Align options make shapes line up straight.
-
Position options make even spacing between shapes.
-
Template-specific layout commands: Some diagram templates come with their own layout commands that are designed specifically for that diagram type, including the Organization Chart and Brainstorming Diagram templates.
-
Align options make shapes line up straight.
-
Position options make even spacing between shapes.
-
Template-specific layout commands: Some diagram templates come with their own layout commands that are designed specifically for that diagram type, including the Organization Chart and Brainstorming Diagram templates.
How to auto-align and evenly space your shapes at the same time
This option is leaves your shapes as close as possible to their current positions, but aligned with each other and evenly spaced.
-
Select the shapes you want to align and space, or click outside the diagram to remove any selection. If nothing is selected, all shapes will be affected.
-
Select Home > Arrange > Position > Auto Align & Space.
Align shapes
The commands in this section align shapes without changing the spacing between the shapes. You can hold the pointer over a command to see a preview of the effect it will have before you commit to the change.
Straighten your connectors
This option adjusts the alignment of the shapes to make the connector lines as straight as possible.
-
Select the shapes you want to align.
-
On the Home tab, in the Arrange group, click Align and then click Auto Align.
Choose an alignment direction
-
Select the primary shape that you want the other shapes align to.
-
Press and hold the Shift key while you select the other shapes you want to align to the primary shape.
-
On the Home tab, in the Arrange group, click Align and select an alignment option.
Position commands
The Position button, on the Home tab in the Arrange group, helps you evenly space shapes or change the orientation of a shape or shapes.
Space shapes evenly
The commands in this section even up the spacing between shapes without changing their alignment. You can hold the pointer over a command to see a preview of the effect it will have before you commit to the change.
-
Select the shapes you want to space, or click a blank area of the page to remove any selection. If nothing is selected, all shapes will be affected.
-
Click Home > Arrange > Position > Auto Space to make even spacing between the shapes.
To set the amount of spacing precisely, click Spacing Options and then set the distance you want.
For another spacing method, select the heading below to open it and see the detailed instructions.
The spacing commands from earlier versions of Visio are still available, which present different spacing options.
-
Select three or more shapes by holding down Shift or Ctrl while clicking shapes.
Note: If you don’t select three or more shapes, the commands for distributing shapes are unavailable.
-
On the Home tab, in the Arrange group, click Position, and then select a Distribute option.
-
For other distribution options, select More Distribute Options. In the dialog box:
-
For vertical distribution, the boundaries are defined by the top and bottom shapes in the selection.
-
For horizontal distribution, the boundaries are defined by the leftmost and rightmost shapes in the selection.
-
To add guides and glue the shapes to them, select the Create guides and glue shapes to them check box. If you choose this option, you can move an outermost guide to redistribute all the shapes.
-
Keep shapes away from printed page breaks
If a diagram is going to be printed, you can make sure that no shapes are divided at page breaks.
-
Select shapes that you want to move off page breaks, or click outside the diagram to remove any selection. If nothing is selected, all shapes will be affected.
-
Select Home > Arrange > Position, and then select Move off Page Breaks.
Another option is to set Auto Align and Auto Space options so these commands are prevented from placing shapes on page breaks:
-
Select Home > Arrange > Position and check whether Avoid Page Breaks is turned on. If not, click to select it.
A check mark appears on the menu next to the command when it's turned on.
Re-orient shapes
The options on the Rotate Shapes submenu rotate or flip a selected shape.
-
Select a shape, and then click the appropriate command.
-
On the Home tab, in the Arrange group, click Position, and then click Rotate Shapes, and select an option.
If more than one shape is selected, these commands rotate or flip them while maintaining their relative positions to each other, as though the page were turned.
In contrast, the commands on the Rotate Diagram submenu rotate or flip the diagram orientation, but leave the shape orientation as it is.
Manually position shapes
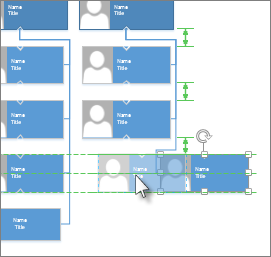
When you drag a shape, green positioning guides help you place it exactly where you want it. In the illustration below, the distribution arrows appear when the shape is dragged to match the distribution of other nearby shapes. Dashed lines appear to help you align horizontally or vertically with other shapes.
Template-specific layout commands
If the template you’re using for a diagram has a tab devoted to that specific diagram type, like the Organization Chart and Brainstorming Diagram templates do, check whether it has a layout command designed for that diagram. If so, try it and see if you like the results.
-
You can align selected shapes on the same vertical or horizontal axis.
-
You can position shapes evenly by making the spacing between them consistent.
Align shapes
-
Open the diagram for editing.
-
Select two or more shapes.
-
Select Home > Align Shapes

-
Align Left, Align Center, and Align Right work best when you're starting with a vertically oriented set of shapes.
-
Align Top, Align Middle, and Align Bottom work best when you're starting with a horizontally oriented set of shapes.
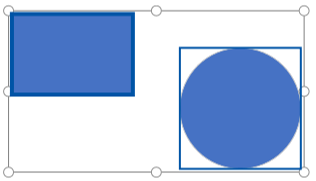
In this illustration, we've selected Align Top:

-
Position shapes
-
Select three or more shapes.
-
Select Home > Position Shapes

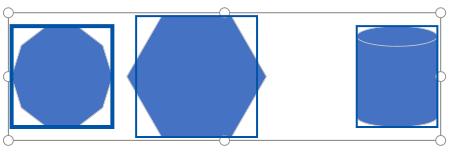
You can distribute shapes horizontally or vertically.
See Also
Select, copy, and move shapes in Visio for the web
View, create, and edit a diagram in Visio for the web
Change the size, rotation, and order of a shape in Visio for the web


