
Set up a library to require check out of files
One way to control document collaboration is to require check out of files, especially when multiple users have access to the library. If a library check out is required, other people cannot overwrite it. However, you run the risk of preventing other people from seeing the latest changes or making changes themselves. If others need to work on the document, it is important that files are checked back in quickly.
Note: Don’t configure your library to require check out if users plan to co-author documents in the library. Users cannot work simultaneously on documents when required check out is turned on.
Require check out of files for editing
Note: Only users who have Full Control or Design permissions can set up libraries to require check out of files.
-
Go to the library you plan to work in.
-
Select Settings

If you don't see these menu items, on the ribbon, select Library, and in the Settings group, select Library settings.
-
On the Settings page, under General Settings, select Versioning settings.
-
In the Require Check Out section, under Require documents to be checked out before they can be edited?, select Yes.
-
To save your settings and return to the Library Settings page, select OK.
|
If you do this ... |
This is what happens… |
|---|---|
|
Create or add a file to a library |
The file is initially checked out to you. You must check it into the library before others can see it and work with it. |
|
Open a file for editing |
The file is automatically checked out to you when you select Edit. A message dialog alerts you that you are about to check out the file, and offers you the opportunity to edit it in your local drafts folder. After check out, the file icon is covered with a green, downward-pointing arrow, indicating that the file is now checked out. No one else can change the file, and no one else can see your changes, while you have it checked out. |
|
Make changes to the info about the file (properties) |
If the file is not already checked out to you, you must check it out before you can make changes to its properties, such as its title, author name, due date, word count, and so on. Your changes will not take effect until you check the file back in. |
|
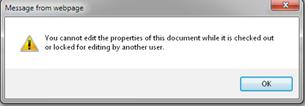
Try to open a file that is checked out to someone else |
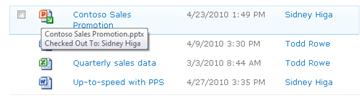
The Check Out and Check In options are unavailable. You cannot check out a file that someone else has checked out. If you attempt to do so, a message dialog appears informing you that the file is checked out by someone else. To find out who has the file checked out, hover over the file icon. The name of the person who has it checked out appears in a tooltip. You can contact that individual to request check in of the file if you need it quickly. |
|
Check in the file |
You are prompted to enter a comment about the changes you made. If your library tracks versions, your comment becomes part of the version history. If both major and minor versions are tracked, you are prompted to choose which type of version you are checking in. For more info about versioning, see See Also. |
|
Keep the file checked out for a long time |
No one else can see your changes or edit the file while you have it checked out. While this is helpful during the time you are making changes, it may also prevent others from performing their assigned tasks. It is both good business practice and common courtesy to check the file back in as quickly as possible after you check it out. In some circumstances, an administrator may have to force a check in of the file. |
How do I configure a site library to require check out?
Only people who have Full Control or Design permissions can set up libraries to require check out of files.
To require check out of files
Note: If this info doesn’t match what you’re seeing, you may be using Microsoft 365 after the service upgrade. To find the info that applies to you, select the Online, 2016, 2013 tab.
-
Navigate to the library you plan to work in. If the library name does not appear in the Quick Launch pane, select All Site Content, and then select the name of your library.
-
On the ribbon, in the Library Tools group, select the Library tab.
-
Select Library Settings

-
On the Library Settings page, under General Settings, select Versioning settings.
-
In the Require Check Out section, under the Require documents to be checked out before they can be edited? question, select Yes.
-
To close the dialog and return to the Library Settings page, select OK.
How do I remove the check out requirement from a site library?
If, after a while, your organization decides that required check-out is not really necessary, you can remove the requirement if you have either Full Control or Design permissions.
To remove the requirement to check out files
Note: If this info doesn’t match what you’re seeing, you may be using Microsoft 365 after the service upgrade. To find the info that applies to you, select the Online, 2016, 2013 tab.
-
Navigate to the library you plan to work in. If the library name does not appear in the Quick Launch pane, select All Site Content, and then select the name of your library.
-
On the ribbon, in the Library Tools group, select the Library tab.
-
Select Library Settings
-
On the Library Settings page, under General Settings, select Versioning settings.
-
In the Require Check Out section, under the Require documents to be checked out before they can be edited? question, select No.
-
To close the dialog and return to the Library Settings page, select OK.
What happens when a site library has a check out requirement?
One way to control document collaboration is to require check-out of files, especially when multiple users have access to the library. If you have a file checked out, you can be sure that other people cannot overwrite it. However, you are also preventing other people from seeing the latest changes or making changes themselves, so it is important that you check files back in promptly.
Important: Do not configure your site library to require check out if people plan to co-author documents in the library. Users cannot work simultaneously on documents when required check out is in effect.
When you work in a library that requires check out of files, it is helpful if you understand the impact of your actions.
|
If you do this… |
This is what happens… |
|---|---|
|
Create or add a file to a site library |
The file is initially checked out to you. You must check it into the library before others can see it and work with it. |
|
Open a file for editing |
The file is automatically checked out to you when you select Edit in <application name>. A message dialog alerts you that you are about to check out the file, and offers you the opportunity to edit it in your local drafts folder.
After check out, the file icon is covered with a green, downward-pointing arrow |
|
Make changes to the info about the file (properties) |
If the file is not already checked out to you, you must check it out before you can make changes to its properties, such as its title, author name, due date, word count, and so on. Your changes will not take effect until you check the file back in. |
|
Try to open a file that is checked out to someone else |
The Check Out and Check In options are unavailable. You cannot check out a file that someone else has checked out. If you attempt to do so, a message dialog informs you know that the file is checked out by someone else.
To find out who has the file checked out, hover over the file icon. The name of the person who has checked it out appears in a tooltip.
You can contact that individual to request check-in of the file if you need it quickly. |
|
Check in the file |
You are prompted to enter a comment about the changes you made. If your library tracks versions, your comment becomes part of the version history. If both major and minor versions are tracked, you are prompted to choose which type of version you are checking in. For more info about versioning, see See Also. |
|
Keep the file checked out for a long time |
No one else can see your changes or edit the file while you have it checked out. While this is helpful during the time you are making changes, it may also prevent others from performing their assigned tasks. It is both good business practice and common courtesy to check the file back in as quickly as possible after you check it out. In some circumstances, an administrator may have to force a check in of the file. |


Need more help?
Want more options?
Explore subscription benefits, browse training courses, learn how to secure your device, and more.


Communities help you ask and answer questions, give feedback, and hear from experts with rich knowledge.


