
Let's say you've set up an Microsoft 365 group called "Leadership Team" and you've been tasked with managing the calendar and correspondence for that group. Occasionally, you'll need to send mail or schedule a meeting and recipients would see that you have sent the mail on behalf of the group.
Alternatively, when sending mail to customers or external users, you might to obscure your name and email address for privacy or other reasons. In this case you replace your name with the Microsoft 365 group name (this is known as send as), and the recipient would only know that the mail came from a company address (such as LeadershipTeam@contoso.com)
A tenant admin must enable group members to have Send on Behalf or Send As permissions before they can send mail using these features. The admin enables these permissions in the Exchange Admin Center.
Here's a summary of how the process works.
-
Tenant admin grants "send on behalf of" and "send as" permissions to members of the group.
-
User goes to Outlook inbox or the group space where they have "send on behalf of" and "send as" permissions to send mail.
-
Recipient sees the following:
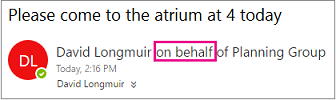
Send on Behalf
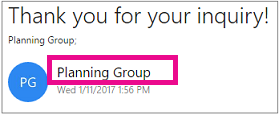
Send As
Note: This article applies to Outlook on the web. For information about how to send email from another person or group using Outlook, see Manage another person's mail and calendar items.
-
Open Outlook on the web.
-
To create a new message, click

-
Select the More Actions menu > Show From.

-
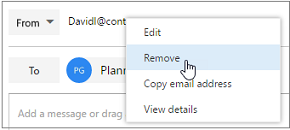
Right-click the email address in the From field and select Remove. (You'll only need to do this once.)
-
Type the name of the group you're sending the mail on behalf of. (Outlook on the web will remember all the names you use in the From field for future use.)
-
Add recipients, a subject, and the contents of the message as you typically do, and then click

-
Open Outlook on the web.
-
To create a new message, click
-
Select More Actions > Show From.
-
Right-click the email address in the From field and select Remove. (You'll only need to do this once.)
-
Type the name of the group you're sending mail as. (Outlook on the web will remember all the names you use in the From field for future use.)
-
Add recipients, a subject, and the contents of the message, and then click


