
How you organize your files in a SharePoint library depends on the needs of your group and on how you prefer to store and search for your information. Some planning can help you set up the structure that works best for your organization.
Ways to organize files
Libraries have several features that help you work with multiple files in the same library. However, multiple libraries may suit your organization better.
You may want one large library to serve diverse needs. For example, you might have several projects within the same group, or multiple groups working on the same project.
Use a single library when:
-
Your group needs to see summary information about the files or different views of the same set of files. For example, a manager may want to see all files grouped by department or due date.
-
People want to search for the files in the same location on a site.
-
You want to apply the same settings to files, such as tracking versions of files or requiring approval.
-
The groups that are working with the library share similar characteristics, such as the same levels of permission.
Note: Unique permission can be applied to specific files, but if the levels of permission vary greatly, consider using multiple libraries.
-
You want to analyze information about files in a spreadsheet or receive consolidated updates about the files.
Note: You can receive alerts when files change or you can view any changes to a library by using RSS technology. RSS feeds enable members of your workgroup to see a consolidated list of files that have changed. See Create or subscribe to an RSS Feed or Create an alert to get notified when a file or folder changes in SharePoint for more info.
The following are some of the ways that you can view and manage files in the same library:
-
Add columns To help your group to pinpoint the data that is most important and to view the data in different ways, you can add columns to your library. Columns appear at the top of the library page as headings, such as department name or due date. You can use the column headings to sort and filter the files in a library. See Add, remove, or modify SharePoint library columns or site columns for more info.
-
Create views You can use views if the people in your group frequently need to see the data in a certain way. In views, columns are used to sort, group, filter, and display the data. See Create, change, or delete a view for more info.
-
Create folders For many files that can be grouped in a particular way, folders are an option. Folders can help people to scan and manage files in a familiar way. SharePoint provides a tree view that people can use to navigate sites and folders, similar to the way that they work with folders on a hard disk. See Create a folder in a document library for more info.
-
Set up multiple templates If multiple content types are set up in a library, you can create different types of default templates — such as sales contracts, marketing presentations, and budget worksheets — within the same library. Content types add flexibility and consistency across multiple libraries. See Set a file template for a document or form library for more info.
You may want multiple libraries when there are distinct differences among the sets of files that you want to store and manage, or among the groups of people who will work with the files.
Use multiple libraries when:
-
The types of files that you want to store and manage are distinct, and you don't expect people to frequently view summaries of the files or to search the files together.
-
The groups of people who are using the files are distinct and have distinctly different permission levels.
-
You need to apply different settings, such as versioning or approval, to multiple sets of files.
-
You do not need to analyze the files together or receive consolidated updates about the files.
-
You want to either provide different sets of options for creating new files or change the order of the options on the New menu of a library.
The following are some ways that you can work efficiently with multiple libraries:
-
Set up site templates and columns If your organization wants to establish some consistent settings across its libraries, it can set up site templates and site columns. You can share the settings across multiple libraries so that you don't have to recreate the settings each time.
-
Send files to another location If you want a file to be available in multiple libraries, you can store it in one library and then send a copy to other libraries. When you update the original document, you can choose to be reminded to update the document in the other locations.
-
Create library templates If you want to establish some uniform settings for libraries or reuse characteristics across libraries, you can save a library as a template. Library templates are available as an option in your site when you click Create on the Site Actions menu.
Note: If you are adding new files to a library that contains files from an earlier project, it may be difficult to decide whether to create a new library or to add to the existing one. Each situation is different, but if you think you will need to analyze or manage all the files together at some point, consider adding the files to the existing library. You can use columns, filters, and views so that only the most recent files appear in the default view.
By default, libraries track the name of a file, as well as information about the status of a file, such as whether it is checked in. You can specify additional columns that help your group to categorize and track files, such as the department name or project number. Adding columns helps you to make the most of multiple views for your library.
You have several options for the type of column that you create, including a single line of text, a drop-down list of options, a number that is calculated from other columns, or even the name and picture of a person on your site.
Note: The following procedure begins from the library page for the library that you want to add the column to. If the library is not already open, click its name on the Quick Launch. If the name of your library does not appear, click Settings 
-
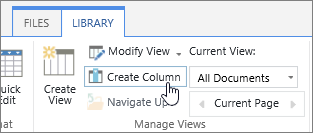
In the ribbon, click the List or Library tab.
-
In the Manage Views group, click Create Column.
-
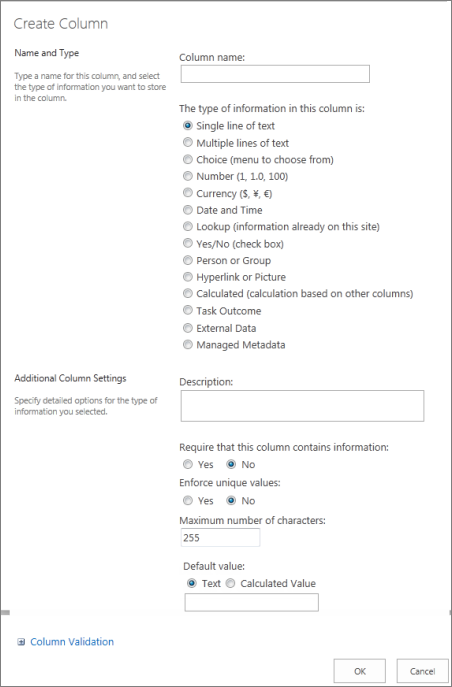
In the Name and Type section, type the name that you want for the column in the Column name box.
-
Under The type of information in this column is, select the type of information that you want to appear in the column.
-
In the Additional Column Settings section, type a description in the Description box to help people understand the purpose of the column and what data it should contain. This description is optional.
-
Click OK.
You can use views to see the files that are most important to you or that best fit a purpose. For example, you can create views of the files that were created most recently, files from a specific department, or files that were created by a particular person. After you create a view, it is always available when you look at a library.
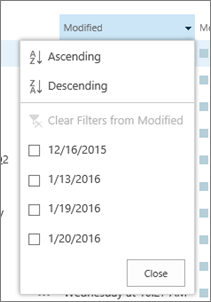
When you look at files in a library, you can temporarily sort or filter the files by pointing to the name of a column and then clicking the down arrow beside the name. This is helpful if you need to see the files in a certain way, but you have to repeat the steps the next time you view the library.
If you expect to view the files in a certain way frequently, you can create a view. You can use this view any time that you work with the library. When you create a view, it is added to the View menu of the library.
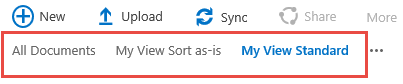
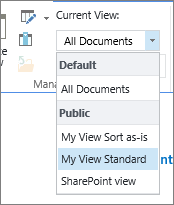
Libraries can have personal views and public views. Anyone can create a personal view to see the files in a certain way or to filter for only the files that they want to see. If you have permission to design a site, you can create a public view that anyone can use when viewing the library. You can also make any public view the default view, so that people automatically see that view of the library.
Additionally, when you design a site, you can link to different views or design pages with Web Parts that use the different views.
If members of your group will view the libraries on a mobile device, you can create mobile views that provide limits, such as number of items displayed in a view, that are optimal for the bandwidth and limitations of the devices. Find links to more information about creating views in the See also section.
The following procedure is for creating a standard type of view. The options you can choose vary for some of the other types of views, but the basic steps for creating a view are similar.
-
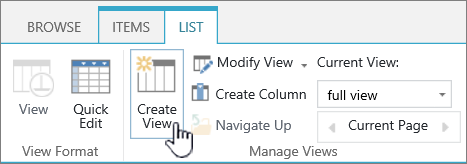
In the list or library where you want to create a view, click the List or Library tab, and then click Create View.
Note: If Create View is disabled, you don’t have the permissions to create a view. Check with your site administrator.
-
Click the format, such as Standard View, or an existing view that you want to base your view on.
-
In the View Name box, type the name for your view. Select Make this the default view if you want to make this the default view for the list or library. Only a public view can be the default view for a list or library.
-
In the Audience section, under View Audience, select Create a Personal view or Create a Public view.
Note: If Create a Public View is disabled, you don’t have the permissions to create a public view for this list or library.
In the Columns section, select the columns that you want in the view and clear the columns that you don’t want to appear. Next to the column numbers, select the order that you want to columns to appear in the view. See Create a column in a list or libraryfor more on columns.
-
In the Sort section, select options for whether and how you want to sort the files. You can use two columns for the sort. For example, you can sort first by author and then by file name for each author.
-
In the Filter section, select options for whether and how you want to filter the files. A filtered view shows you a smaller selection of the files, such as only the files created by a specific department or only the files with an approved status.
-
In the Group By section, you can group items with the same value in a section, such as a section for documents by each author that you can expand or collapse.
-
In the Totals section, you can count the number of items in a column, such as the total number of issues. In some cases, you can summarize or distill additional information, such as averages.
-
In the Style section, select the style that you want for the view, such as a shaded list in which every other row is shaded.
-
If your library has folders, you can create a view that doesn't include the folders. This is sometimes called a flat view. To view all of your files at the same level, click Show all items without folders in the Folders section.
-
You can limit how many files can be viewed in the library or how many files can be viewed on the same page. These settings are particularly important if you are creating a view for a mobile device. In the Item Limit section, select the options that you want.
-
If you plan to view the library on a mobile device, select the options that you want in the Mobile section.
-
Click OK.
If you have several types of documents or diverse content within a library, you can create folders to help you organize the content.
-
If the library is not already open, click its name on the Quick Launch.
If the name of your library does not appear, click Settings menu
-
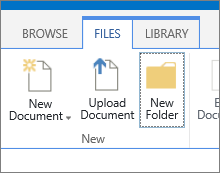
Click the Files tab, , click New Folder.
Note: The person who created your library may have specified that folders cannot be created in the library. If this is the case, the New Folder command is not available.
-
Type a Name for the folder, and then click Save or OK.
Tip: If you have multiple libraries with folders and the people in your group like to browse a library as they would browse their hard disk, your group may want to enable your site to use the tree view. You can use the tree view to expand, collapse, and easily navigate folders.
Enable Tree view
-
click Settings menu
-
Click Tree view under the Look and Feel section.
-
On the Tree view page, you can set whether the Quick Launch or the Tree view are enabled. Since the Tree view will appear in the Quick Launch, you probably want to enable both.
-
Click OK.


