
Note: This article has done its job, and will be retiring soon. To prevent "Page not found" woes, we're removing links we know about. If you've created links to this page, please remove them, and together we'll keep the web connected.
To modify view column properties:
-
Enter the Designer.
-
Click the list view you want to update.
-
Click the Columns tab.
-
Check the fields to be included in the view.
-
Click the column field you want to update.
-
Set properties as described in the sections below.
What do you want to do?
Changing column header labels
The initial column header use the name of the referenced form field. If the field name is long, you may want to enter a shorter label for the column label.
-
Click the field for which you want to edit the column label.
-
Type a new name in the Header Label text box.
Setting the column width
You can allow the Lists tool to set a standard, automatic width, or you can manually set custom column widths, either as a percentage of the total view width, in pixels, or in points.
If all columns are set to Automatic, the width of any column is equal to the full width of the view divided by the number of columns. If one or more columns are set to a specific width, then the width of a column set to Automatic is equal to the remaining measure of the view (after custom-width columns are totaled), divided by the number of remaining columns.
-
Click the field for which you want to set the column width.
-
Click the Column width drop-down menu, and then click the setting you want.
-
If you select Fixed, select the custom measure type you want from the drop-down menu, and then enter a corresponding custom measure.
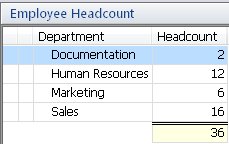
Totaling values for numeric columns
For any field type that uses numeric values, such as Number or Integer, you can enable a column property to total the values in the column and display the total value in the data view.
-
Click the field for which you want to total values.
-
Check Total values in this column (numeric columns only).
The example below shows a column that totals values:
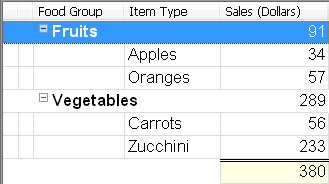
Setting up a column to show subtotals
You can use grouped sorting to set up a view column to show subtotals and a summary total. The example below shows a view that groups all items according to a "Food Group" field, totals the values for each individual group and calculates the summary total of all groups.
Showing a twisty in the column when rows are expandable
This setting applies to views that contain response hierachies. The view must contain at least one form that is set up to create responses to the selected item.
-
Click the field for which you want to show a twisty when rows are expandable.
-
Check Show a twisty in this column when row is expandable.
Changing the position of columns in the view
You can change the order in which field columns are listed across a view by clicking the navigation buttons in the view design window.
-
To move a field column to the first, or leftmost, position, click

-
To move a field column to the last, or rightmost, position, click

-
To move a field column up (left), click

-
To move a field column down (right), click

Adding or removing field columns
You add or remove field columns in a list by checking or unchecking them in the field list.
-
To check all fields in the list, click

-
To uncheck all fields in the list, click

Note: Attachment fields do not appear in this list. However, you can check the Show attachments column option on the Properties tab to add a column to the list view that displays a file attachment icon when an item contains a file attachment.
Setting style options
You can set style options for the text that displays in a view column, or in all view columns.
-
Click the field for which you want to set style options.
-
Click Select... next to the Font box.
-
Set the style options you want in the Font dialog box and click OK.
The Font box displays a sample of your selected style options, and the field list shows your selected style options in the Font column.
Note: The Lists tool does not supporting setting the Strikeout effect to a column.
-
If you want all view columns to adopt these style options, click Apply to all columns.


