You can change the direction of text within a text box or shape so that it flows vertically instead of horizontally. You can also use WordArt to create a vertical line of text in which letters are stacked on top of each other from top to bottom.
Make text flow vertically within a text box or shape
You can change the direction of text within a text box or shape so that it flows vertically instead of horizontally.
-
In the text box or shape, select the text that you want to flow vertically.
-
On the Text Box Tools Format tab, click Text Direction.
-
If you want your text to go the other direction (bottom to top, instead of top to bottom), drag the rotation handle for the text box or shape until the text direction is reversed.
You may need to change the shape of your text box or shape to achieve the effect you want.
Note: If you want to start with an empty vertical text box, click Insert > Draw Vertical Text Box, and then type your text.
Stack text vertically by using WordArt
You can use WordArt to create a vertical line of text in which words or letters are stacked on top of each other from top to bottom.
-
On the Insert tab, click WordArt.
-
Select a style from the gallery, and then click OK.
-
In the Edit WordArt Text dialog box, type the text that you want, stacked the way you want it (press Enter after each word or letter), and then click OK.
Tip: If you want to create a stacked text effect with ordinary text, you can create text boxes that are as narrow as the width of a single character.
In this article
Make text flow vertically within a text box or AutoShape
You can change the direction of text within a text box or AutoShape so that it flows vertically instead of horizontally.
-
In the text box or AutoShape, select the text that you want to flow vertically.
-
On the Format menu, click Text Box or AutoShape, and then click the Text Box tab.
-
Select the Rotate text within AutoShape by 90° check box.
-
If you want your text to go the other direction (bottom to top, instead of top to bottom), drag the rotation handle for the text box or shape until the text direction is reversed.
You may need to change the shape of your text box or shape to achieve the effect you want.
Stack text vertically by using WordArt
You can use WordArt to create a vertical line of text in which letters are stacked on top of each other from top to bottom.
-
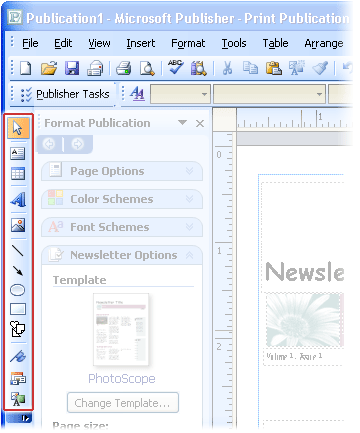
On the Objects toolbar, click Insert WordArt

-
In the WordArt Gallery, under Select a WordArt style, click one of the vertical WordArt effects, and then click OK.
-
In the Edit WordArt Text dialog box, type the text that you want, and then click OK.
Tip: If you want to create a stacked text effect with ordinary text, you can create text boxes that are as narrow as the width of a single character.
Open the Objects toolbar
-
On the View menu, click Toolbars, and then click Objects.
The default location of the Objects toolbar is next to the task pane.

Note: You can move the Objects toolbar by pointing to the Undock button 


