
When you open Outlook Web App, your Inbox is the first thing you see. Your inbox is where messages sent to you arrive, and where you’ll probably spend the most time reading and responding to messages.
|
This article is for Outlook Web App, which is used by organizations that manage email servers running Exchange Server 2013 or 2010. If you're using Microsoft 365, or Exchange Server 2016 or 2019, your email program is Outlook on the web. For help with Outlook on the web, see Get help with Outlook on the web. |
-
In a web browser, sign in to Outlook Web App using the URL provided by the person who manages email for your organization. Enter your user name and password, and then select Sign in.
Note: If you want to use the light version of Outlook Web App, see Options>Outlook Web App version. The light version of Outlook Web App is designed for use with older web browsers that are not supported by the standard version of Outlook Web App, for use over slow connections, and to meet accessibility needs by providing a simplified interface that’s easier to use with screen readers.
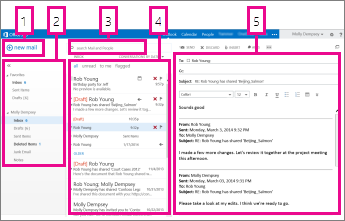
When you open Mail, you get a quick view of your standard and any custom folders, a list of received messages, and a reading pane that lets you quickly review the content of any message you choose.
|
Block |
Description |
Actions |
|
1 |
Message |
Create a new message by choosing New mail. |
|
2 |
Folders list |
The list includes the folders in your mailbox. It might include other folders, such as Favorites and Archive folders.
See Working with message folders in Outlook on the web to learn more about available options. |
|
3 |
Search box |
In the Search mail and people box, type what you want to search for. For example, type the name of a person you want to find messages from, or enter text that you want to search for to find a particular message. |
|
4 |
Message list |
Messages in the current folder are listed. |
|
5 |
Reading pane |
The conversation or message that you chose appears in the reading pane. You can respond to any message in the conversation by using |
For more information, see:
A theme, which changes the background color, highlight colors, and images, is a quick and easy way to give a different look to your email.
On the nav bar, select Settings 
Create a new message
-
Choose New mail above the Folders list. A new message form opens in the reading pane.
-
Do one of the following to add a recipient:
-
Type the name of anyone who is in your contacts folder or organization’s address list.
or
-
Type the email address in the To or Cc box.
Note: The first time you enter a person’s name, Outlook Web App searches for that person’s address. Then, the name is cached so in the future the search is resolved quickly.
-
-
Type a subject.
-
Type the message you want to send.
-
When your message is ready to go, choose Send

As you create a new email message (or respond to an existing one), Outlook Web App automatically saves it in your Drafts folder. This default action is useful, particularly if a situation arises that requires you to suspend creation of a new message. You can finish composing the message when you choose.
Finish a draft message
-
Choose Drafts in the Folders list.
-
Choose the message you were working on to see it in the reading pane, and then continue writing the message. Or, choose Discard

-
When you're done writing the message, choose Send
Add an attachment to a message
-
Choose Insert

Embed a picture in a message
You can embed a picture in a message so that it appears without the recipient having to open the message.
-
Choose Insert
Attach a message to a new message
-
In the list view, choose the message you want to attach and press Ctrl+C to copy it.
-
Open a new message, or reply or forward an existing one.
-
With the new message open in the reading pane and the cursor in the message body, press Ctrl+V to attach the message you copied.
Add an existing signature
If you haven't created a signature, see Create and add an email signature in Outlook Web App. You can choose to manually add your signature or to automatically add it to all messages or to individual messages.
-
Choose Insert
By default, you read and create messages in the reading pane, but that isn’t always what you need. Sometimes you need to be able to view a message in a separate window.
When you’re composing a new message or replying to or forwarding a message you received, you can choose the pop-out window 
-
In the message list, choose the message you want to view in a separate window.
-
Choose More actions

When you delete a message, it's sent to the Deleted Items folder. Messages in the Deleted Items folder might be permanently deleted by an automated policy set by the administrator for your organization, by you selecting them while in the folder and deleting them, or by you emptying the Deleted Items folder. For information about recovering deleted messages, see Recover deleted items or email in Outlook Web App.
Empty the Deleted Items folder
-
Right-click (or tap and hold) the Deleted Items folder.
-
Choose Empty folder.
-
Choose OK to confirm that you want to permanently delete the items.
When you open Mail, the message list is in the center pane, flanked on the left by the Folder list, and on the right by the reading pane. By default, the message list shows the messages in your Inbox, the current folder. This default setting doesn't limit you to which messages are displayed. You can manage the displayed messages by choosing a filter or by using search. There also are other tools available with the message list to let you take care of some tasks.
-
Choose Expand


-
Choose icons at the right of the message list to delete a message or conversation or to add a flag. Other icons show you which messages have attachments, importance of (high or low), and how many unread items there are in a conversation.
-
Right-click a message to see a menu of options. There are options such as mark a message as read or unread, move it to another folder, or create a rule based on that message. On a touch screen, use tap and hold to view the message options.
-
Choose

-
Use the label at the top of the message list to switch between viewing Conversations by date and Items by date.
The reading pane is where messages are displayed. You can read and respond to a message in the reading pane. Or, you can open a message in a separate (new) window.
-
To respond to a message, choose


-
To change the read status of a message, use Mark as read or Mark as unread.
-
To view more options, choose More actions
Change the location of the reading pane
-
On the nav bar, choose Settings
-
Choose one of the following:
-
Show reading pane on the right, the default setting.
-
Show reading pane at bottom
-
Hide reading pane
-
-
Choose OK to save your selection and to close Display settings.
You’ll find a search box and built-in filters at the top of the message list.
-
To search, in the Search box start typing what you want to look for. A list of suggestions appears underneath, and you can select one of those suggestions to search for that item. Or you can finish entering your own search text and then press Enter to start your search. To clear your search, choose the icon
-
The built-in filters—All, Unread, To me, and Flagged—are a way to quickly choose what to display in the message list. All shows all messages, Unread shows messages that haven’t been marked as read, To me shows all messages where your name appears in the To or Cc list, and Flagged shows all messages marked for further action.
The Folders list shows the default folders that are created for all mailboxes and any folder that you create. Depending on the setup in your organization, you might also see Favorites and Archive folders.
You can choose Expand 

You can right-click any item in the Folders list to see a menu of things you can do, such as create a new folder, delete an existing folder, or empty a folder. On a touch screen, tap and hold an item to the menu for that item.
Create a new folder
-
Right-click (or tap and hold) any folder in the Folders list and then choose Create new folder. A new unnamed folder is added as a subfolder to the folder you selected.
To create a folder that's not a subfolder, right-click (or tap and hold) your name above your Inbox folder and then choose Create new folder.
-
Type a name for the new folder, and then press Enter.
Junk Email folder
Mail identified as possible junk email is automatically moved to the Junk Email folder. Potentially dangerous content within the message, for example, links or executable code, is disabled.
You can manage junk email reporting and other settings under the Options menu. Specifically, go to Settings > Options > Options > Block or allow. See the topics below to learn more about Junk mail, and how to manage the settings.
-
Outlook Web App uses your browser's spell checker. This happens automatically when you start typing, and can be configured using your web browser's settings.
-
You can find links to settings by choosing Settings
-
Your account settings, including your password
-
A theme
-
And you can learn more about:


