
You can save a file to a folder on your hard disk drive, a network location, the cloud, a DVD, the desktop, or a flash drive. While you must identify the destination, if it is different than the default folder, the saving process is the same regardless of what destination you choose. By default, Microsoft 365 programs save files in the default working folder.
Additionally you can save a file in a different file format, such as RTF, CSV, or PDF.
Saving a file to OneDrive or SharePoint allows you to access it on any device and enables features such as AutoSave and Version History, which can help prevent data loss if your file closes unexpectedly.
To save your file:
-
Press CTRL+S or select File > Save.
Tip: You can also select Save

-
You must enter a name for the file if you are saving it for the first time.
Tip: Save your file to a cloud location, such as OneDrive or SharePoint, to be able to access it anywhere, collaborate with others in real-time, and access Version History.
By default, if you're signed in, files are saved to your OneDrive. If you want to save the current file somewhere else, click the Location drop-down to see additional recently-used locations. If the location you want isn't there, you can open the full Save As window by selecting More save options.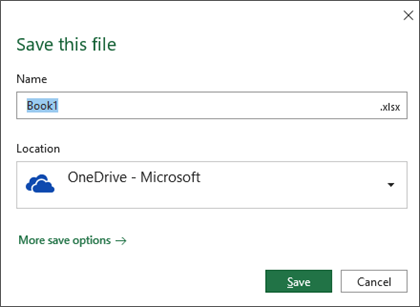
Tip: If you save your file to OneDrive or SharePoint, AutoSave will be enabled by default, so you don't have to remember to save as you go.
If you'd like to change the default location for these saves to one of your other recently-used folders, select the Location drop-down, right-click the folder location you want to set as the default and select Set as Default Location.
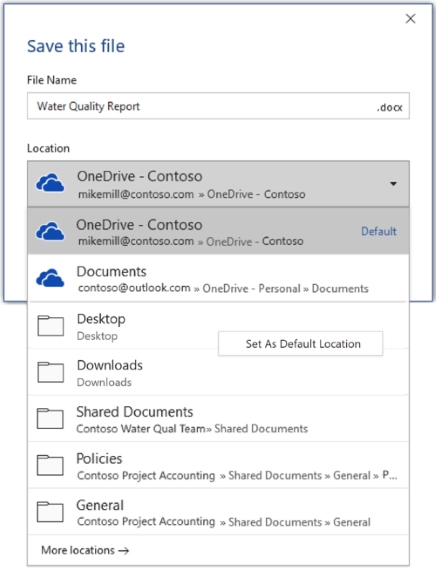
If you want to save to a location other than your recently-used folders, select More locations. If you haven't received this update yet, your Office applications will continue to use the File menu for saving.
Tips:
-
You can also press F12 or select File > Save As to open the File menu.
-
If you're used to using keyboard shortcuts when closing your document, such as ALT+F4, you can quickly choose to "Don't Save" the file by using the keyboard accelerator key for that button (ALT+N).
Save a copy as a new file (Save As)
Tip: If you're going to create a new file based on an existing file, but only want your changes saved in the new file, it's a good idea to Save a Copy before you've made any changes. That way your original file will remain unchanged and all your edits will be in the new copy. You can also right-click the original file and select Open a copy.
-
Press F12 or click File > Save a Copy
-
By default Office will save the copy in the same location as the original. If you're happy with the existing location go on to step 3. If you want to save the new copy in a different location choose it at this point.
Location
Description
Sites – [Your Company Name]
SharePoint or Office 365 Groups document libraries
OneDrive – [Your Company Name]
OneDrive for Business
OneDrive – Personal
OneDrive for consumers via your Microsoft account
This PC
Your local device, including any connected hard drives or flash drives
Browse
Opens the File Explorer so you can navigate to any location on your computer.
-
Give your new copy a name and click Save.
Your original file will be closed and you'll now be working in the new copy you just created.
Tip: If you find yourself creating new files based on existing files often, you may want to use templates to make the process easier and safer. See Create a template for more information.
Save as a different format
You might want to save your file in another format so that you, or somebody else, can open the file in a different program or older version. For example, you might want to save your Word document as a Rich Text File (RTF) or your Excel workbook as a Comma-Separated Values (CSV) file.
Important: If you save an Office file in a format other than the Open XML format (such as .DOCX, .XLSX, or .PPTX) some connected experiences and modern features like AutoSave or Accessibility Checker won't work on that file.
-
Click the File tab.
-
Click Save As.
-
Choose a file location, such as OneDrive or This PC to store your file.
-
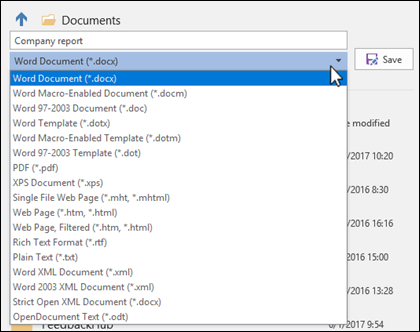
In the File name box, enter a new name for the file.
-
In the Save as type list, click the file format that you want to save the file in. For example, click Rich Text Format (.rtf), Word 97-2003 (.doc), Web Page (.htm or .html), or Comma Delimited (.csv).
For more information about how to save files in PDF (.pdf) or XPS (.xps) formats, see Save or convert to PDF or XPS.
-
Click Save.
Back up and recover your files
How you back up and recover your files depends on where and when you saved it. To learn more about a feature, including which versions of Office support it, select the name of the feature in the table below.
Saved to OneDrive
|
Features |
|
AutoSave saves your file automatically when a file is stored in OneDrive or SharePoint in Microsoft 365. |
|
Version History lets you view and restore previous versions of files stored in OneDrive or SharePoint in Microsoft 365. |
|
On your Windows PC, you can back up your Desktop, Documents, and Pictures folders using OneDrive PC folder backup. Also see Files save to OneDrive by default in Windows 10. |
|
Restore your OneDrive (subscription only) You can restore your entire OneDrive to a previous time if your OneDrive files are deleted, overwritten, corrupted, or infected by malware. |
|
Restore deleted files or folders in OneDrive You can restore files and folders you deleted from your OneDrive. |
Saved to your device
If AutoRecover is turned on and your file closes unexpectedly, Document Recovery opens the next time you open the Office app. You can also recover an earlier version of an Office file.
Important: Even if AutoRecover is turned on, you should save the file frequently while you're working on it to avoid losing data because of an unexpected power failure or other problem.
You can save a copy as a new file, or in a different format, or to a different location in Office 2016.
Save a copy as a new file (Save As)
Tip: If you're going to create a new file, based on an existing file, but only want your changes saved in the new file it's a good idea to do the Save a Copy process first thing; before you've made any changes. That way your original file will remain unchanged and all your edits will be in the new copy.
-
Press F12 or click File > Save a Copy
-
By default Office will save the copy in the same location as the original. If you want to save the new copy in a different location choose it at this point. If you're happy with the existing location go on to step 3.
-
Give your new copy a name and click Save.
Your original file will be closed and you'll now be working in the new copy you just created.
Tip: If you find yourself creating new files based on existing files often, you may want to use templates to make the process easier and safer. See Create a template for more information.
Choose a different location to save your file
During the Save, or Save a Copy, process described above you can choose a different location to save your file.
-
Select the cloud, web site, or device location where you want to save the file.
Location
Description
Sites – [Your Company Name]
SharePoint or Office 365 Groups document libraries
OneDrive – [Your Company Name]
OneDrive for Business
OneDrive – Personal
OneDrive for consumers via your Microsoft account
This PC
Your local device, including any connected hard drives or flash drives
Browse
Opens the File Explorer so you can navigate to any location on your computer.
-
Select a folder from the Recent Folders list, or click Browse if you don't see the location you want listed there.
-
Confirm the filename you want to use and click Save.
Save as a different, or older, format
You might want to save your file in another format so that you, or somebody else, can open the file in a different program or older version. For example, you might want to save your Word 2016 document as a Rich Text File (RTF) or your Excel workbook as a Comma-Separated Values (CSV) file.
-
Click the File tab.
-
Click Save As.
-
Choose a file location, such as OneDrive or This PC to store your file.
-
In the File name box, enter a new name for the file.
-
In the Save as type list, click the file format that you want to save the file in. For example, click Rich Text Format (.rtf), Word 97-2003 (.doc), Web Page (.htm or .html), or Comma Delimited (.csv).
Note: For more information about how to save files in PDF (.pdf) or XPS (.xps) formats, see Save or convert to PDF or XPS.
-
Click Save.
We're listening
This article was updated January 29, 2020 as a result of your comments. If you found it helpful, and especially if you didn't, please use the feedback controls below to let us know how we can make it better.


