
Add your out of office event to the Outlook calendar of others
You can easily mark time as Busy or Out of office in your Outlook calendar. But what if you don’t use Microsoft 365 and you don’t have calendar sharing enabled, but you do need to make your time away from more visible to your colleagues? This article explains how to add customized all-day meeting requests to coworkers' calendars, without affecting the available free time on their calendars.
-
To learn about the variety of ways in which you can share your calendar with others, see Share an Outlook calendar with other people.
-
To learn how to send out of office replies, see Send automatic Out of Office replies from Outlook.
Scheduling vacation time with a meeting request is a two-step process. You need to block out your vacation on your own calendar, and also let your coworkers know that you'll be absent by adding your vacation time to their calendars.
Note: If the steps under this New Outlook tab aren't working for you, you may not be using new Outlook for Windows yet. Select Classic Outlook and follow those steps instead.
Create an "out of office event" on your calendar
-
In Calendar, on the Home tab, select New Event.
-
Add a title for the event, then select the start and end dates.
-
To block out an entire day (or days), slide the All day toggle to the right.
-
In the Options group, select

-
Select Save.
Send this "out of office event" to others
If you followed the steps in the previous section, the event you created show you marked as Out of office. This means if someone tries to schedule a meeting with you, they'll see that you're unavailable.
A common mistake when sending your out of office event to others is to open the original event and change
-
In your Calendar, right-click the out of office event you created earlier and select Duplicate event.
-
Add a new title for the event. For example, you might want to include your name in the title so anyone looking at this in their own calendar will know immediately what it's about.
-
In the Attendees group, select Response Options, and clear Request Responses on the drop-down.

-
In the Options group, select
-
In Invite attendees, add the intended recipients.
-
Type any information that you want to share with the recipients.
-
If you are alerting people to a series of recurring times that you will be away from the office, in the Don't repeat drop-down, select the recurrence pattern, and then select Save.
-
Select Send.
When you send this meeting request with
Manage your availability in your calendar
By default, when you add an item to your calendar or accept an invitation from someone else, the item is marked as Busy on your calendar:
-
This affects the free/busy time others see on your calendar when they try to schedule a meeting with you.
-
If you use Teams, it also affects your status indicator and will show you as busy when you have meetings or appointments scheduled.
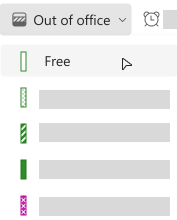
When you look at your calendar, the left edge of each item is color coded to indicate its status: A white edge indicates free, and a darker color indicates busy.
You can adjust any calendar item to show as Busy, Free, Out of Office, and so on:
-
On your calendar, right-click the item you want to change.
-
On the menu that appears, point at Show As, then select the option you want.
Want to adjust your status in Teams? See Change your status in Microsoft Teams.
Step 1: Add your vacation time to coworkers' calendars
When you mark time as "out of office" on your calendar, your coworkers see it when they attempt to schedule a meeting with you. But wouldn't it be great if you could alert everyone at once in advance of your time away without affecting their free/busy status or cluttering their calendars? You can do this by setting your information to appear on their calendars as an all-day event, but unlike a normal all-day event, which usually is set to "busy," this all-day event is displayed as free time. Your coworkers' free/busy availability is not affected.
Note: Meeting requests are designed to be sent between Outlook users. The ability to see other people's schedules while composing meeting requests in Outlook requires your organization to be using Microsoft Exchange Server.
-
In Calendar, on the Home tab, select New Meeting.
Keyboard shortcut To create a new meeting request, press CTRL+SHIFT+Q.
-
Type a description in the Subject box, and if desired, enter a location in the Location box.
-
In the Start time and End time lists, select the start and end time for your time away from the office. For vacations, this usually involves full days. If this is the case, select the All day event check box.
Note: By default, Outlook uses the current time zone setting on your computer for scheduling. If you want to schedule your time away from the office based on a different time zone, in the Options group, click Time Zones.
-
In the Attendees group, for Response Options, clear Request Responses in the drop-down button.
-
In the Options group, for Show As, click Free in the drop-down list. If you have already specified that this is an all-day event, Show As is set automatically to Free.
Important:
-
Make sure the Show As setting is set to Free. This allows the meeting request recipients to accept the meeting request and add your vacation time to their calendar, but not block out any time on their calendar. The recipient's calendar will still show free availability for scheduling during your vacation time.
-
When choosing an all-day event, the start time of the event is at midnight. To avoid your coworkers receiving alerts at odd times, set the Reminder setting to None.
-
-
Type any information that you want to share with the recipients.
-
Add the intended recipients to the To line.
-
If you are alerting people to a series of recurring times that you will be away from the office, in the Options group, select Recurrence, select the recurrence pattern, and then select OK.
-
Select Send.
When you send this meeting request with Show As set to Free, the event appears at the top of each day in your coworkers' Outlook calendars — a visual reminder that does not block out any work time.
Note: If you did not select All day event, the event shows within the time grid; it does not appear at the top of the day. It is still marked as free time, however.
Step 2: Block out vacation time on your calendar
If you followed the steps in the previous section, the meeting request you sent was marked as free time to prevent blocking out time on other people's calendars. However, the time is also marked as free on your own calendar. You now need to create an additional appointment for yourself so that others can see that you are not available during the time you specify.
A common mistake is to open the meeting request item on your calendar and change the Show As setting from Free to Out of office after you have sent the original request. However, when you do this an update is sent to everyone you sent the meeting request to, changing Free to Out of office and defeating the steps you took to avoid doing that. You must create a duplicate appointment on your calendar with the Show As setting set to Out of office.
When people use the Outlook calendar to schedule meetings and other events, they can see your availability unless you have changed the permissions for your calendar to prevent this. Normally, appointments, meetings, and events have a Show As setting of Busy. You can also create items with a Show As setting of Out of office. Items set to Out of office are regarded as similar to items set to Busy — someone should not expect you to be available at that time. Visually, the two types differ — items set to Out of office appear with a purple color, items set to Busy are identified by a blue color theme. This difference in appearance helps emphasize why you are not available. For example, you might be able to move a conflicting Busy item, but you're probably not able or willing to change an Out of office item such as your vacation.
-
In Calendar, on the Home tab, select New Appointment.
-
In the Subject box, type a name for your time away.
-
In Start time and End time, select the dates when your time away starts and ends.
-
Select the All day event check box.
-
Change the Show As setting to Out of office.
-
Select Save & Close.
Note: You might consider deleting (from your calendar only) the initial meeting request that you sent to other people. Or you can leave it in your calendar so you can use it to easily send an update or a cancellation if your plans change.
See also


Need more help?
Want more options?
Explore subscription benefits, browse training courses, learn how to secure your device, and more.


Communities help you ask and answer questions, give feedback, and hear from experts with rich knowledge.


