
Across your enterprise, teams use Microsoft SharePoint sites to collaborate on documents and share information. You want to build SharePoint solutions that improve the productivity and efficiency of your organization, but you don’t want to write code. Where do you start?
With Microsoft SharePoint Designer 2010, you can design no-code workflow solutions that manage simple to more complex business processes in an organization. Workflows add logic to both system and human processes. Workflows for system processes might update one data source when another data source changes. Workflows for human processes might send a document, such as an expense report, to an employee's manager for approval and, if approved, on to the accounting department for processing.
This is made possible by the powerful yet intuitive workflow editor in SharePoint Designer 2010 that allows nested logic, substeps, and more. For example, if your workflow is associated to a document library or if it is filtered to the Document content type, a group of contextual Document Set actions appear. A document set is a new feature in SharePoint Server 2010 whereby a group of documents are treated as a single unit, so a workflow action for a document set will iterate on all items in that document set.
Other new workflow actions include actions that form the basis of the three most popular workflows in SharePoint Server — the Approval, Collect Feedback, and Collect Signatures workflows, utility actions to manipulate strings and dates; a new relational action that uses the SharePoint User Profile Store to look up a person’s manager; and new list actions that a workflow can use to set permissions on a list item.
You can also design and share workflows using Microsoft Visio with its flowchart templates that can be exported to SharePoint Designer 2010.
This article introduces the basics of workflows. When you understand the types and basic building blocks of workflows — actions, conditions, and steps — you can quickly add workflows to automate processes and help improve your organization’s productivity and efficiency.
In this article
What is a workflow?
Workflows are the way an organization functions, a series of actions that correspond to a work process, such as the process for purchase orders. SharePoint 2010 helps you automate these workflows, thereby increasing the efficiency and productivity of the organization. This occurs because the automated workflows drive the processes so that the organization can focus on doing work, rather than on managing the processes.
Workflows can control most aspects of a SharePoint 2010 site, list, library, content type, or list item, including the life cycle of that item. The workflow can include both actions performed by people (or workflow participants) and actions performed by the workflow. Workflow participants can interact with the workflow through the designated Tasks list, where a workflow can create a task for someone and remain paused until the task is marked complete.
Workflows can be as simple or as complex as your business processes require. You can create a workflow that the user initiates, or a workflow that is initiated automatically based on an event, such as when a list item is created or changed.
In general, when you use SharePoint Designer 2010 to design a workflow, you follow these basic steps:
-
Chose the type of workflows you want to create: list, reusable list, or site.
-
Use the workflow editor to choose and assemble the conditions and actions that define the steps of the workflow, so that it represents the business process you are automating.
-
Save and publish the workflow.
-
Customize the workflow forms that were automatically generated, if necessary.
You can think of a workflow as a flowchart of actions with a beginning, an end, and a sequential flow from start to finish. Workflows can incorporate parallel branches, but ultimately they progress from the initial action to the final action.
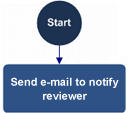
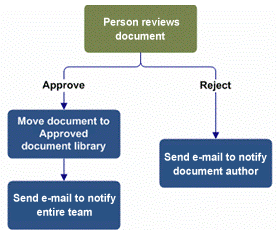
For example, suppose you were to chart the workflow that routes a document in SharePoint 2010 for approval. When the workflow starts, it automatically notifies the specified reviewer by e-mail that they have a document to review. The reviewer then reviews the document, and changes the status of the document to indicate that they have completed their task, and whether they have approved or rejected the document. Based on the reviewer response, the workflow proceeds down one of two parallel branches. If the reviewer approves the document, the workflow moves the approved document to a specific document library, and then sends an e-mail message to the entire team notifying them of the approved document. If the reviewer rejects the document, the workflow notifies the document author of this. In either case, the workflow then reaches its end and the process is completed.
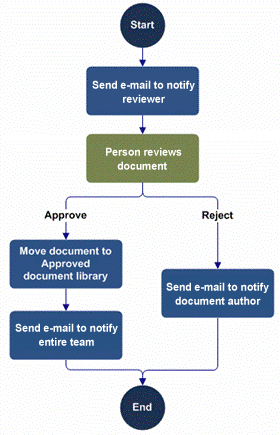
Diagram 1: Example approval workflow
What type of workflows should I design?
There are three types of workflows in SharePoint 2010:
-
List
-
Reusable List
-
Site
List Workflows
A list workflow is the type of workflow that was available in SharePoint 2007. Because it has the context of the list for which it was created, list workflows automatically have access to the values of the custom fields for the list item on which they will run, such as the custom Notes field for a document library. List workflows cannot be made available to other lists or libraries on this or other sites. To have the same workflow functionality for multiple lists you must manually recreate the workflows in all locations.
If you know that you will only need the workflows you are designing for a specific list, the list workflow has the advantage of automatically making available the custom fields of the lists.
Reusable List Workflows
You can create a reusable list workflow (reusable workflow) in the top-level site in the site collection, and that workflow can be made globally reusable — meaning that the workflow can be associated to any list, library, or content type in the site collection. You can also create a reusable workflow in any subsite in the site collection; this workflow is available for reuse in that particular subsite.
You can also export a reusable workflow from one site and then upload and activate that workflow in a different site. For example, you can create a reusable workflow in a test environment, test it, and then export it to a production environment. SharePoint Designer 2010 supports exporting a workflow as a template.
Reusable workflows, by default, don’t have the context of a specific list or library. Therefore, by default, they provide only the columns that are common across lists and libraries, such as Created and Created By.
If your reusable workflow requires certain columns to be present in the list or library that you associated it to, you can add those columns as association columns. Association columns get added automatically to a list or library when a reusable workflow is associated to that list or library.
When you create a reusable workflow, you can alternatively choose to filter your reusable workflow to a specific content type. This enables you to work with the fields of the content type in SharePoint Designer 2010. For example, if a reusable list workflows is associated with the Document content type, you view and use in your workflow fields that are specific to the content type, such as Document ID. Then, in the browser, you can associate your reusable workflow either to a specific content type or to any content type that inherits from that content type. If you associate a workflow to a site content type, you make that workflow available for all items of that content type in every list and library on the site to which that content type has been added. You can even make it available for sites in a collection if the workflow is configured to be a Globally Reusable Workflow.
If you want users to be able to use the workflows you are designing on multiple sites, lists, libraries, and content types, a reusable workflow will probably best meets your needs. We expect that most workflows for SharePoint 2010 will use reusable workflows.
Site workflows
A site workflow is associated to a site — not to a list, library, or content type. So unlike most workflows, a site workflow is not running on a specific list item. Because of this, many of the actions that are available for items not available for site workflows.
In the browser, you start a site workflow or view the status of running site workflows by clicking the Site Actions menu, click View All Site Content, and then clicking Site Workflows.
If you want to create a workflow, but don’t need a list, library, or content type for the workflows, a site workflow will probably best meet your needs. For example, you can create a site workflow as a way for people to provide feedback about your site.
Customize the workflows in SharePoint Server 2010
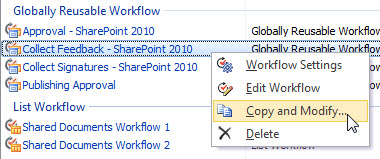
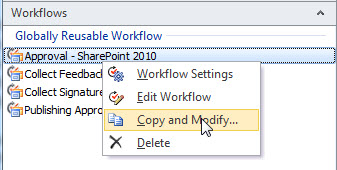
You don’t need to start from scratch to design workflows that match the processes of your organization. The four most popular workflows in SharePoint Server 2007 — the Approval, Collect Feedback, Collect Signatures, Publishing Approval workflows — have been completely rebuilt as declarative reusable workflows, meaning that they are now fully customizable in SharePoint Designer 2010. You can copy and modify (recommended) or edit these workflows, as well as custom reusable workflows, to meet the needs of your organization.
Note: There are additional workflows in SharePoint 2010, such as the Three State workflow, but they are not declarative workflows, and therefore cannot be modified.
These workflows are event-driven, and all of the important events in the workflow are surfaced in the workflow editor, both for each task in the process and for the process as a whole. For example, you can easily add conditions and actions to define what happens when each task is assigned, expired, or completed.
What are events, actions, conditions and steps?
These are the building blocks of a workflow. A workflow consists of one or more steps, and each step consists of actions and any associated conditions. Each workflow is initiated by an event.
What are events?
An event is what starts or initiates a workflow. Events can also be used to manage the timing of actions within a workflow, such as waiting for the status of an item to change. There are three events that can start a workflow:
-
An item is created.
-
An item is changed.
-
A workflow participant clicks a start button on the SharePoint site.
Note: Site workflows can only be started manually.
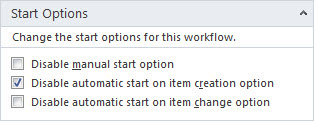
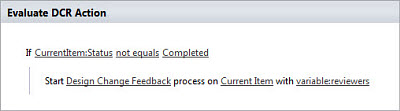
You can create a workflow that a participant starts manually, or a workflow that is started automatically when a list item is created or changed. For example, you want to configure your custom Design change request approval workflow so that it can be started manually and when an item changes, but not when an item is initially created. On the settings page for the workflow, in Start Options, select Disable automatic start on item creation.
When a workflow participant starts a workflow manually, that person first browses to the list or library that the workflow is attached to. Any person with at least the Contribute permission level can initiate a workflow that is designed to start manually. To start the workflows manually, the participant clicks an item, clicks Workflows on the menu, and then chooses a workflow from a page that displays all workflows available for that item. The participant fills out a workflow initiation form, if necessary, and then initiates the workflow by clicking the start button on the form. Initiating a workflow creates a new instance of that workflow for that specific item.
Note: The Workflows command is available only when the item is in a list, library, or is of a content type that has at least one workflow attached to it.
For a workflow that is started manually, the initiation form can be as simple as the image on the left, or more complex, such as the image on the right.
Simple form
More complex form
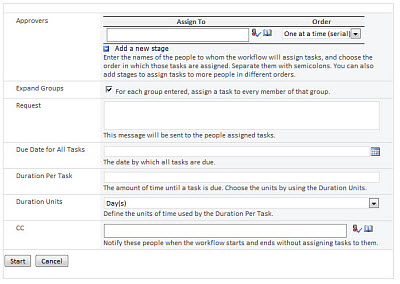
You can also add custom fields to an initiation form when you design the workflow. Workflow participants can then provide information to the workflow by filling out this form, and those settings are passed to the workflow. A new workflow instance starts, and that workflow can then look up and use the information provided through the form at any point in the workflow. You can also specify the fields that will be used in an association form for reusable workflows.
What are actions?
An action is the most basic unit of work in a workflow. SharePoint Designer 2010 provides a set of ready-made, reusable actions for you to incorporate into your workflow. For example, your workflow can:
-
Create, copy, change, or delete list items (including documents).
-
Check items in or out.
-
Send an e-mail message.
-
Create a task for someone on the Tasks list of your team site.
-
Collect data from a participant that can be referenced later in the workflow.
-
Pause or stop the workflow.
-
Log workflow information to a History list to use for repudiation or workflow debugging.
-
Set workflow variables or perform calculations.
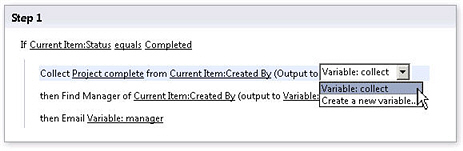
SharePoint Server 2010 includes three new task actions: Start Approval Process, Start Feedback Process, and Start Custom Task Process. The “big three” workflows included in SharePoint Server 2010 — the Approval, Collect Feedback, and Collect Signatures workflows — are built with these actions. The approval actions surface all of the important events in an approval process, making it easy for you to design a human workflow process where many people interact or collaborate on a specific document.
A workflow can contain any number of actions. The actions just listed are performed by the workflow, but other actions might be performed by workflow participants. For example, in an approval workflow the act of actually reviewing and approving the document is done by a workflow participant. Actions done by a workflow participant are represented by tasks assigned to that person in the designated Tasks list. The five actions in Diagram1: Example diagram workflow, near the beginning of this article, are:
-
Send an e-mail message to notify the reviewer
-
Review the document (a task assigned to a workflow participant)
-
Move the document to the Approved document library
-
Send an e-mail message to notify the team
-
Send an e-mail message to notify the document author
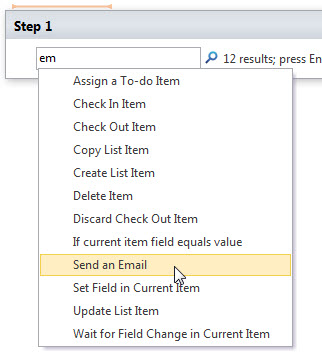
In the most basic sense, when you design a workflow, you identify the necessary sequence of actions, and then you assemble that sequence of actions by using the workflow editor. For example, in Diagram 1: Example approval workflow, the first action that you want is to send an e-mail message to notify the reviewer.
So in the workflow editor, you click the first step, type some or all of email and choose Send an Email.
What are conditions?
When you design a workflow, you can use the workflow editor to create rules that apply conditional logic to SharePoint sites, lists, items and content types. A rule establishes a condition where the workflow performs the associated action only if that condition is true. For example, you can create a rule where the workflow sends a reviewer an e-mail message only if an item is created by a specific person. You can also add multiple conditions per branch. For example, you can create a rule where a reviewer is sent an e-mail message only if an item is both (1) created by a specific person and (2) the document title contains specific keywords. Finally, you can associate multiple actions with one condition. For example, you can create a rule where if an item is created by a specific person, then (1) the reviewer is sent an e-mail and (2) workflow information is logged to the History list.
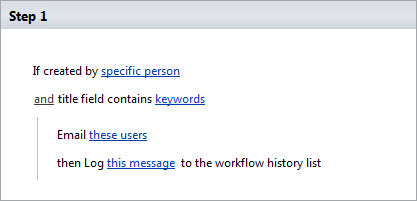
To sum up, a rule is one or more conditions associated with one or more actions: If all clauses in the condition are true, do all the associated actions.
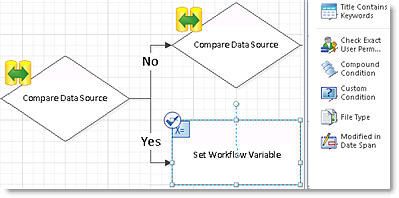
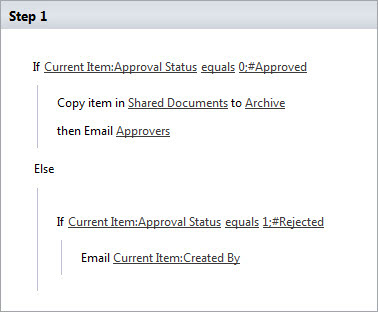
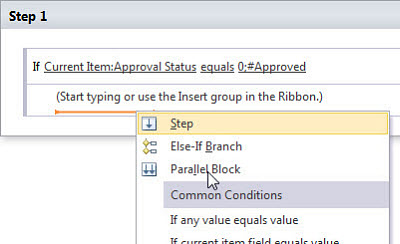
In the previous example, the user specified a set of two conditions and a set of two actions for the workflow. However, you can create multiple branches in the workflow: If condition A is true, do one action; if condition B is true, do a different action. To add a branch to a step, click Insert Else-If Branch. For example, in the approval workflow, if the reviewer approves a document, the workflow performs one a series of actions; if the reviewer rejects a document, the same workflow performs a different action. This is a conditional branch.
In the workflow editor, this step has two branches and looks like the following.
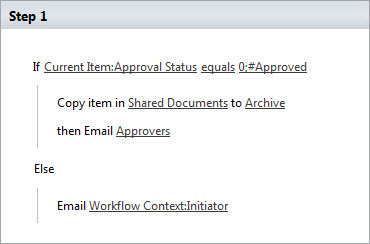
You can also create a branch that does not have a condition. This way, the workflow performs one action if a condition or set of conditions is true and a different action if they are false. For example, the following step in a workflow sends a message to the Approvers only if the condition is true; else, the workflow sends a message just to the workflow initiator. By adding a branch without a condition, the workflow performs the action in that branch in any case where the condition in the first branch is false.
Note: To have a branch without a condition, it must be the last branch in the conditional block and not the only branch in the in the conditional block.
Note: Branching in a workflow cannot extend from one step to another. A set of 'Else If' branches, also referred to as a conditional block, is always contained in a single step. You can, however, nest steps as substeps.
SharePoint Designer 2010 provides several ready-made, reusable conditions for you to incorporate into your workflow. For example, you can specify that the workflow performs the associated actions only if an item:
-
Is created or modified in a specific time span.
-
Is created or modified by a specific person.
-
Has a title field that contains specified keywords.
-
Is a file of a specific type or has a file size in a specific range. (This condition is available only when the workflow is attached to a document library.)
For more information about the conditions available in SharePoint Designer 2010, see Workflow conditions in SharePoint Designer 2010: A quick reference guide.
In addition, you can create custom conditions and advanced conditions in SharePoint Designer 2010 where you can specify a wide range of parameters. With custom conditions, you can compare a field in the current list with a value. For example, you can create a custom condition where if the Approval Status field equals Approved, do the associated action. With advanced conditions, you can compare one value to another value. This allows you to create a comparison between a field in any list and a value from another list. For example, you can create an advanced condition for the Shared Documents library where if the value of the Status field in the Tasks list equals Pending, do the associated action.
Note: An action does not require a condition. For example, the first step in Diagram 1: Example approval workflow, near the beginning of this article, sends an e-mail to notify the reviewer. This action does not have a condition associated with it. A parallel block of actions also does not require a condition.
Parallel vs. serial actions
When you have more than one action associated with a condition, the actions can be set up to run at the same time (parallel) or one after another (serial), the default.
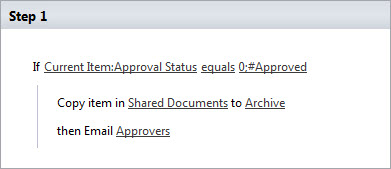
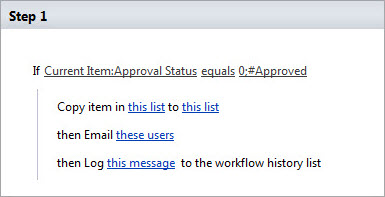
Serial actions For example, in the following workflow, you can set up two actions so that when a document is approved, the document is copied to the Archive document library and then (afterwards) a message is sent. In the workflow editor, then indicates that the second action occurs after the first.
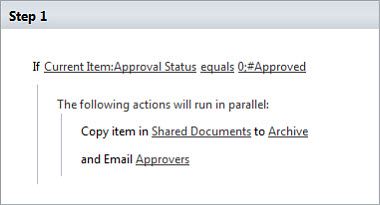
Parallel actions For example, in following workflow, you can set up two actions so that when a document is approved, a message is sent and (at the same time) the document is copied to the Approved document library. In the workflow editor and indicates that the second action occurs at the same time as the first. This is particularly helpful with tasks and actions that take significant time. For example, in the case of tasks, it can be used to control when tasks are assigned.
Note: Parallel actions are not absolutely simultaneous; the exact order cannot be specified and may vary each time the workflow runs.
Notes:
-
In a rule (conditions and actions), actions can occur in series, in parallel, or in a combination of series and parallel.
-
A set of serial or parallel actions must be contained within a single step.
What are steps?
A workflow is comprised of one or more steps. Each step can contain numerous actions and associated conditions. You can even nest steps within other steps. You might do this to help organize your workflow. You can think of steps as blocks of functionality in the workflow editor. For example, the following workflow has two steps, as shown in the workflow editor.
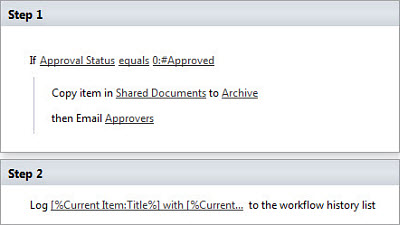
Steps allow you to group conditions and actions so that one set of rules (conditions and actions) can be evaluated and performed before a second set.
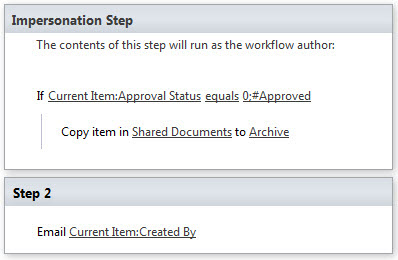
Configure actions in a workflow to run using the permissions of the workflow author. In SharePoint Designer 2010 you can use impersonation steps to have the workflow perform actions by impersonating the workflow author instead of the workflow initiator. Impersonation steps are especially useful in approval and publishing scenarios, where the people submitting content for approval and the people approving content have different permissions.
The workflow author is the last person who published the workflow. When a workflow is republished by a different user, the workflow author doesn’t change for in-progress instances of the workflow. Instances of the workflows that are started after the workflow is re-published will use the updated workflow author.
Note: Impersonation steps can only be added to the root of a workflow and cannot be nested in another step.
In the following scenario the person initiating the workflows does not have the permissions to add a file to the Archive library, but the workflow author does. When the person initiates the workflow, if the condition evaluates as true in the impersonation step, then the document is copied to the Archive library using the permissions of the workflow author. Step 2 is not an impersonation step, therefore it runs as the workflow initiator. It is a best practice to only use impersonation steps for minimal set of actions that require the permissions of the workflow author to succeed.
One step or many? Some workflows can be designed either as a sequence of actions within one step or as a sequence of steps. For example, the actions in the following step could be broken out into separate steps or nested with the conditional block as separate steps
Following is an example of the process using nested steps in a conditional block.

Steps are a way to organize your workflow. Exactly how you use steps in your workflows is, to a great degree, up to personal preference. For example, a workflow might have many actions in a step that doesn't use conditions. In this case, you might want to separate the actions into steps just to better organize them. The rules in one step are processed to conclusion before going on to the next step, so you want to group in the same step rules necessary to effect the specific action or actions that you want.
What are workflow forms?
To make your workflow more dynamic and flexible, you can add a form to the workflow. With a form, you can collect information from workflow participants at predefined times in the workflow, and make it possible for participants to interact with the tasks for that workflow, and help ensure data is available for reusable workflows regardless of what list, library, or content type it is associated with.
With SharePoint Designer 2010, you can create three types of workflow forms:
-
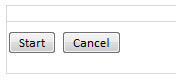
An initiation form gathers information from the workflow participant when they start the workflow. It is automatically generated when you create the workflow in SharePoint Designer 2010. Initiation forms are displayed to users when they manually start a workflow on a given SharePoint item. With an initiation form, users can specify additional parameters or information about the workflow as it applies to the given SharePoint item. For example, you might use an initiation form to ask who should review a document and by when the review should be completed. SharePoint Designer 2010 automatically generates an InfoPath or ASP.NET initiation form according to your initiation specifications. If no initiations parameters are required, the form will only have Start and Cancel buttons
-
A custom task form allows workflow participants to interact with tasks in the Tasks list specified for the workflow. With the Custom Task Wizard, you can easily create custom form fields and add them to a custom task form. When you finish designing the workflow, SharePoint Designer 2010 automatically generates the InfoPath or ASP.NET forms for your custom tasks. Then, when the workflow runs and tasks are created, the user browses to the Tasks list specified for the workflow, marks the task as completed, and enters any optional or required information specific to the workflow. The workflow can then respond to those changes as specified in the workflow, or look up and evaluate that information in later steps of the workflow.
-
A reusable workflow, by default, only provides the fields common to all items, such as Created and Modified by. This is because a reusable workflow isn’t by default associated with a list, library, or content type. An association form enables you to associate fields with a reusable workflow so that the fields will be available when you design and run the workflow.
After SharePoint Designer 2010 automatically generates the forms, you can customize them by going to the settings page for the workflow, in the Forms section, click the form you want to customize. Workflow forms are either InfoPath or ASP.NET pages. They are stored on the SharePoint site with the workflow source files.
Enhanced functionality with InfoPath 2010 forms on SharePoint Server 2010
If your server is running SharePoint Server 2010 (not SharePoint Foundation 2010 alone), the workflow forms — the association, initiation, and task — are now InfoPath 2010 forms. It is easy to change the appearance and layout of InfoPath forms, and you can add validation rules to an InfoPath form. To edit a workflow form in InfoPath 2010, just click the form and InfoPath opens the form directly from SharePoint Designer 2010.InfoPath forms are available for lists, libraries and workflows.
Where are workflows stored?
Workflows are stored in a site-level document library called Workflows. This document library is created automatically by SharePoint Designer 2010. By default, the Workflows document library is hidden from the browser and has no List Views, such as AllItems.aspx or EditForm.aspx. To view the contents of the workflows library, in SharePoint Designer 2010, in the Navigation pane, click All Files, and then click Workflows in the main pane.
Notes:
-
You may not be able to view workflows using All Files, It depends on how the server is configured.
-
The primary way to access and design workflows in SharePoint Designer 2010 is to click Workflows in the Navigation pane.
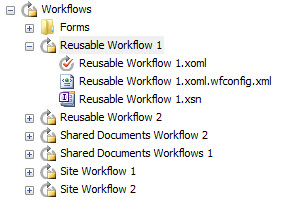
The workflows document library contains a folder for each workflow created with SharePoint Designer 2010. The folder contains the source files necessary for the workflow, such as:
-
The workflow markup (.xoml) file.
-
The workflow configuration file.
-
InfoPath xsn or ASP.NET aspx forms needed for the workflows, such as initiation forms (for workflows that are started manually) or custom task forms.
To edit an existing workflow in SharePoint Designer 2010, in the Navigation pane, click Workflows. In the main pane, right-click the desired workflow, and click Edit Workflow.
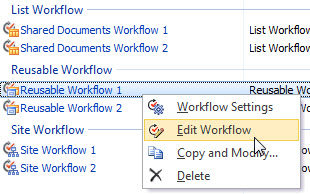
To copy and modify a reusable workflow in SharePoint Designer 2010, in the Navigation pane, click Workflows. In the main pane, right-click the desired reusable workflow, and click Copy and Modify.
Both of the preceding procedures open the workflow in the workflow editor. You can click on the ribbon or the breadcrumb navigation to edit the workflow, manage settings, and define the task process for the workflow.
The workflow editor provides an action called Log to History List. It is a best practice to use this action in your workflows to keep a record of the workflow history. Workflows history is invaluable for investigating errors or for tracking and repudiation purposes.
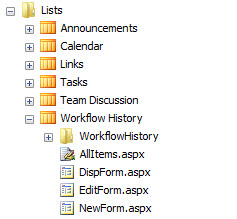
When you create a workflow that uses the action Log to History List, SharePoint Designer 2010 automatically creates a list called Workflow History. The list is by default created at http://<sitename>/Lists/Workflow%20History. You can specify to create a different history list when you design a list or site workflows and when you associate a reusable list workflow. This list has columns for such information as user ID, date, event, and error description. Like the Workflows document library, by default the History list is hidden from the browser but can be seen in SharePoint Designer 2010, in the Navigation pane, by click All Files.
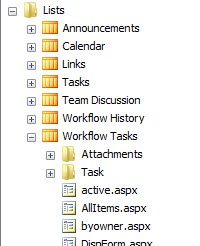
The workflow editor provides six actions that interact with the Tasks list, including Assign a To-Do Item, Collect Data from a User, and Assign a form to a Group. Workflows use the Tasks list by default, but can be configured to use a custom Tasks list. You might use a custom Tasks list to separate workflows tasks from other types of task or for permissions related issues. You can use one custom Tasks list for all workflows on the site or a custom Tasks list for each workflow. It depends on the technical and organizational requirements for the workflows.
When you create a workflow that uses any of preceding three actions, SharePoint Designer 2010 automatically creates the form, the content type for the task, and the Tasks list, if necessary. By default, the Tasks list can be viewed in the browser, unlike the Workflows document library and Workflow History list.
Where can I check the status of a workflow?
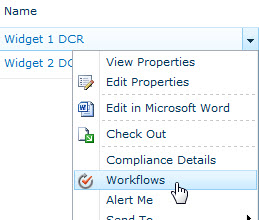
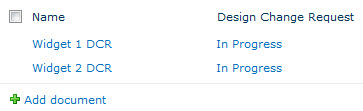
You can easily view the progress of workflows on a selected item through the browser. The All Items view of a list or document library displays, by default, the current status of workflows running on an item. In the following example, the Design Change Request workflow is In Progress for the Widget 1 DCR.
Notes:
-
There will be multiple columns if multiple workflows are associated with the list or library.
-
The columns can be removed from the All Items view without affecting the functionality of the workflow.
-
The status column will not be added to the view if there are already six or more lookup\status columns in the view.
Clicking the status of the workflow for an item, such as In Progress or Completed, will take you to the Workflow Status page for the workflow for the specific item. To see the status for site workflows, click the Site Actions menu, click View All Site Content, and then clicking Site Workflows. The workflow status page provides you with information about:
-
Who initiated the workflows and when for the item
-
Tasks associated with the workflow for the item
-
History for the workflow for the item, such as when the workflows was initiated and when it was completed
Workflow Visualization
You will also see a workflow visualization for the status of the workflow if the:
-
Show workflow visualization on status page option was selected in SharePoint Designer 2010 when the workflow was published
-
Computer from which the workflows was published had Visio Premium 2010 installed
-
Workflow is running on SharePoint Server 2010
-
Visio Graphics Services is running on the server
Note: Visio does not need to be installed to on the local computer to view the workflow visualization.
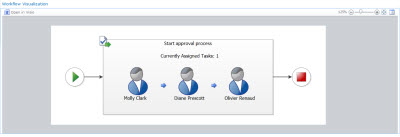
With workflow visualization, a Visio diagram of your workflow is automatically created and displayed in a Visio Web Part on the Workflow Status page. The workflow visualization shows a “live” view of where a specific workflow is at.
To view the Workflows page for an item you can also click the item in the list, and then click Workflows on the menu.
Note: The Workflows command is available only when the item is in a list or library that has at least one workflow attached to it.
When a user starts a workflow on an item SharePoint Foundation 2010 or SharePoint Server 2010 adds a new column to that list or library the item is in. By default, the column name matches the name of the workflow. This read-only column displays the current status of the item within that workflow. This status column is added automatically for each workflow the first time it is run.
In each column, the workflow status is a link. When you click In Progress, for example, you see the Workflow Status page for that instance of the workflow.
Suggested next steps
Workflows are a powerful way to add application logic to your SharePoint sites and applications. Now that you understand workflow basics, you might want to get started by creating a workflow. Find more information about designing and customizing workflows in the See Also section.
Top of Page


