
Install Skype for Business
Skype for Business is part of the Microsoft 365 suite of products. What's Skype for Business?
Some Office 365 plans do not include the full Skype for Business client. For these plans, Skype for Business Basic is available without additional cost.
You get the Skype for Business download from the Microsoft 365 portal, and then install it on your computer. These steps usually take 10-15 minutes to do. Choose from the instructions below.
Install Skype for Business on Windows
The Skype for Business Basic client is designed to be used on systems that need only basic functionality. It provides instant messaging (IM), audio and video calls, online meetings, availability (presence) information, and sharing capabilities.
You will need an active account to use the Skype for Business Basic client.
-
Download and install Skype for Business Basic
When you click the Download button on the page, you will be prompted to choose the download that matches the edition of your other Office applications (32-bit edition or 64-bit edition). If you don't know, choose 32. The installer will check the edition for you.
-
If you want to deploy Skype for Business Basic to a large number of people in your business, see Deploy the Skype for Business client in Microsoft 365 for information about deployment tools you can use.
These instructions explain how to get to the Skype for Business download, and install it.
Tip: If you don't see the Skype for Business download in your portal, make sure the Microsoft 365 for business plan you purchased includes it. Also, ask the person in your business who purchased it whether they assigned a license to you.
-
Sign in to Microsoft 365 at https://admin.microsoft.com/.
-
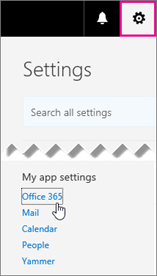
At the top of your Microsoft 365 page, choose

-
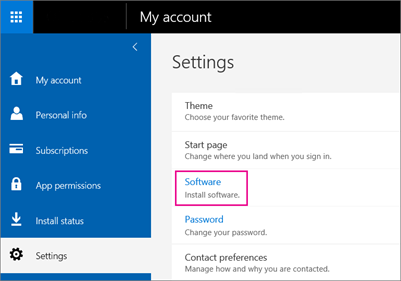
Choose Software.
-
Depending on your Microsoft 365 plan:
-
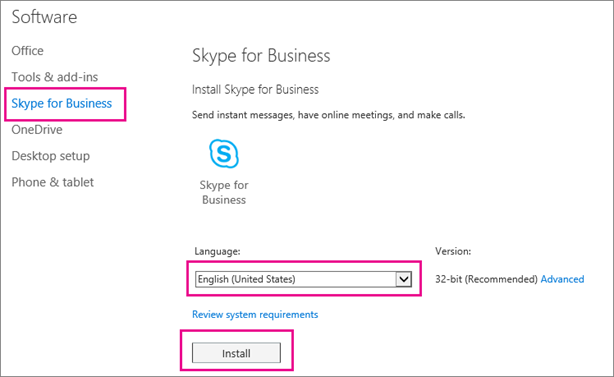
If you see the following page, choose Skype for Business, choose your language, the edition that matches your other Office applications (32 bit or 64 bit - if you don't know, choose the default) and choose Install. Then go to step 5.
-
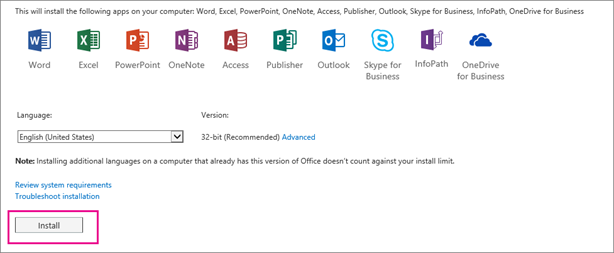
If Skype for Business is bundled with other Microsoft 365 applications, you'll see the following page. Choose Install to install the Microsoft 365 suite of applications, including Skype for Business. When you're done, go to Sign in for the first time at the end of these steps.
-
If you don't see Skype for Business listed at all, then it's not included in your Microsoft 365 business plan -OR- your admin hasn't assigned a license to you. Ask your admin (the person who gave you sign-in information) for help.
-
-
At the bottom of your screen, choose Save as to download the setupskypeforbusinessentryretail.exe file to your computer.

Important: Note where you saved the setupskypeforbusinessentryretail.exe file on your computer. If Skype for Business stops during setup, this is where you go to re-run it.
-
After the setupskypeforbusinessentryretail.exe file has downloaded, choose Run.

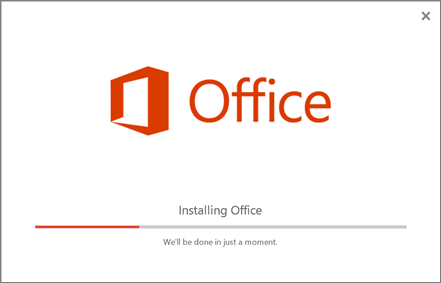
The Office installer starts, and displays a message that it's installing Office. However, it's only installing Skype for Business. It is not installing all of Office.
-
When the Office installer is finished, it displays a message that Office was installed on your computer. However, only Skype for Business was installed. Choose Close.
-
Launch Skype for Business. At the First things first box, if you accept the licensing agreement, choose Accept.
You can install Skype for Business on up to 5 PCs. To install Skype for Business on another PC:
-
Log on to your next PC.
-
Sign in to Microsoft 365 at https://admin.microsoft.com/.
-
Repeat the steps listed in the above procedure to download and install Skype for Business.
Congratulations! You're done installing Skype for Business. Now you're ready to sign in to Skype for Business for the first time.
Sign in for the first time
-
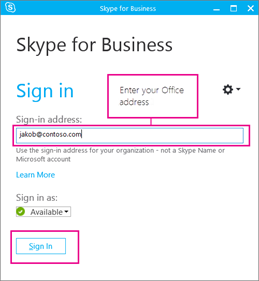
At the Skype for Business sign in page, enter your Microsoft 365 user ID and password, and then choose Sign in.
For example, if you use jakob@contoso.com to sign in to Microsoft 365, that's what you'll enter to sign in to Skype for Business.
-
Enter your password for Microsoft 365.
-
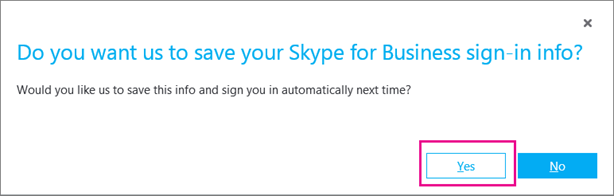
At the next page, if you want to save your password for signing in next time, choose Yes.
-
At the Help Make Skype for Business Better box, choose whether to allow us to collect error logs and device configuration info.
Congratulations! Now you're ready to take the Skype for Business video training.
If you have Office 2007, 2010, or 2013, you can safely install and use Skype for Business 2016. It won't overwrite your existing Office programs UNLESS YOU ARE INSTALLING MICROSOFT 365 PROPLUS. Please read all the information below before installing.
What happens when I install Skype for Business 2016 on a computer that has Office 2007, 2010, or 2013?
-
Use the instructions to install Skype for Business for the plan you have:
-
Download and install Skype for Business with Microsoft 365 (in this article)
-
Install Skype for Business Online: choose if you purchased the standalone version of the product.
-
-
When you go to install Skype for Business 2016, you'll see this page, which indicates that you're only going to install Skype for Business:
-
When you choose Install, the Office installer will start. It looks like all of Office is being installed, but it's only installing Skype for Business.
-
If you have Office 2007, Skype for Business 2016 won't be fully integrated with your Office programs. For example, you won't see the presence of your co-workers when you type an email in Outlook (by "presence" I mean you won't see whether they're available, busy, or away), and you won't have a few other features. But you will have chat (IM) and conferencing with your co-workers.
IMPORTANT: IF YOU PURCHASED MICROSOFT 365 PROPLUS YOU WILL HAVE TO UPGRADE TO THE ENTIRE OFFICE 2016 PACKAGE IN ORDER TO GET SKYPE FOR BUSINESS. IT WILL OVERWRITE PREVIOUS VERSIONS OF OFFICE. When you go to install Skype for Business, you'll know you have Microsoft 365 Apps for enterprise because you won't see an option to install Skype for Business by itself; you'll see this instead:
If you don't want to upgrade to Office 2016, talk to the person who purchased your Microsoft 365 Apps for enterprise plan to see about getting a standalone Skype for Business Online Plan subscription.
Don't see what you need in this article? Check out the following install instructions:
-
Install Skype for Business with Microsoft 365 ProPlus - With Microsoft 365 Apps for enterprise, the entire Office 2016 suite is installed. There's no option to only install Skype for Business by itself.
-
Deploy the Skype for Business client in Microsoft 365 - Choose this option if you want to deploy Skype for Business in a large enterprise.
|
Important: If you upgrade from the Microsoft 365 Mid-size or Microsoft 365 Small Business Premium plans to Microsoft 365 Apps for business or Microsoft 365 Business Standard plans, Skype for Business will be removed from your computer. You have to install Skype for Business Basic to get the functionality back. Learn more. |
Install Skype for Business on Mac
These instructions explain how to download and install Skype for Business on Mac from the Microsoft 365 portal. Before you begin, we recommend that you view the system requirements.
-
Sign in to Microsoft 365 at https://admin.microsoft.com/.
-
Under Software, choose Skype for Business.

Note: If you don't see the Skype for Business download in your portal, make sure the Microsoft 365 for business plan you purchased includes it. Also, ask the person in your business who purchased it whether they assigned a license to you.
-
On the Install Skype for Business on Mac page, click Install. Skype for Business will be downloaded to your computer.

-
On you Dock, click Downloads > Open Finder.
-
Choose SkypeForBusinessInstaller_<nn.n.n.nnn>.pkg.
-
Follow the prompts in the Skype for Business Installer.
You're done installing Skype for Business on Mac. Now you're ready to sign in to Skype for Business on Mac.
These instructions explain how to download and install Skype for Business on Mac from the Microsoft Download Center. Before you begin, we recommend that you view the system requirements.
-
Go to the download page for Skype for Business on Mac.
-
Click the Download button.

-
Save the installer package file (.pkg) to your computer.
-
On your computer, double-click the .pkg file to launch the Skype for Business Installer.
-
Follow the prompts in the Skype for Business Installer.
You're done installing Skype for Business on Mac. Now you're ready to sign in to Skype for Business on Mac.
Related topics


Need more help?
Want more options?
Explore subscription benefits, browse training courses, learn how to secure your device, and more.


Communities help you ask and answer questions, give feedback, and hear from experts with rich knowledge.


Find solutions to common problems or get help from a support agent.
