
If you want Tablet PC users to be able to draw and write on top of a picture or in a blank space on a Microsoft Office InfoPath form, you can use an ink picture control on your form template.
In this article
When to use an ink picture control
Use an ink picture control when you want to:
-
Provide Tablet PC users with a dedicated field on the form where they can write or draw. This can be useful when you want users to be able to sketch something that is fairly complicated or technical, such as a mathematical formula or a diagram of a particular business process.
-
Store the user's ink as strokes — that is, as binary data that is encoded in the user's form (.xml) file. By preserving the ink, you enable the user to edit it again later. Also, because the encoded data is saved as a valid GIF image, it can be repurposed in a database or other environment.
In the following example, an ink picture control is used to collect a sketch of an automobile accident on an insurance claim form template.
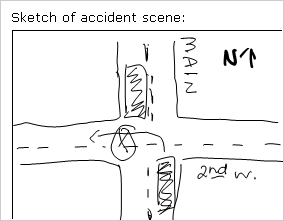
When you add an ink picture control to your form template, InfoPath inserts an empty ink picture control by default. Users can draw or write in the empty ink picture control when they fill out forms that are based on your form template. Depending on your needs, you can add a picture to the background of this control. This allows users to draw directly on top of the picture with their tablet pen. For example, on an insurance claim form template, an insurance adjuster can circle areas of damage on a picture of a car.
Security Note: Ink picture controls are not a secure method of collecting and storing user signatures. If you want to collect and store signatures from users, we recommend that you use digital signatures to do so.
Related controls
InfoPath includes controls that are similar to ink picture controls but that serve different purposes. To decide which of these controls works best on your form template, refer to the following list:
Picture control A picture control looks and acts like an ink picture control. However, a picture control allows users to insert digital images onto a form. Users cannot create drawings with a tablet pen in a picture control. Both ink picture controls and picture controls store base64 encoded data, which is the technology for storing and viewing binary XML data.
Rich text box If your form template contains rich text box controls, and those rich text box controls support the full range of rich-text formatting options, Tablet PC users can tap Insert Ink Drawing and Writing 
The user experience
By default, when you insert an ink picture control on your form template, users see an empty box where they can draw or write. Generally, you use label text to provide instructions to users about what they can do inside the ink picture control.
If you insert a default picture inside the ink picture control, users see the picture on the form area when they open a form based on your form template. They can use the tablet pen to draw or write on the picture.
Compatibility considerations
When you design a form template in InfoPath, you can choose to design a browser-compatible form template. When you design a browser-compatible form template, ink picture controls are unavailable in the Controls task pane because they cannot be displayed in a Web browser.
Insert an ink picture control
The procedure for inserting an ink picture control differs slightly depending on whether you are designing a new, blank form template or basing the design of your form template on a database or other external data source.
The following illustration shows how an empty ink picture control looks when it is selected in design mode.
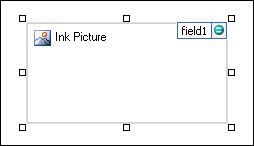
Controls can be bound or unbound. When a control is bound, it is connected to a field or group in the data source so that data entered into the control is saved in the underlying form (.xml) file. When a control is unbound, it is not connected to a field or group, and data entered into the control is not saved. When you select or move your pointer over a control, text and a binding icon appear in the upper-right corner of the control. The text indicates the group or field to which the control is bound in the data source. The icon indicates whether the control is correctly bound to that group or field. When the binding is correct, a green icon appears. If there's something wrong with the binding, you'll see a blue or red icon instead.
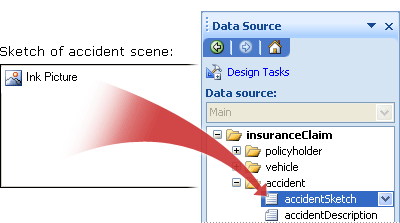
The data source for the form template consists of fields and groups that appear in a hierarchical view in the Data Source task pane. Ink picture controls are always bound to fields. In the following example, the Sketch of accident scene control on the form template is bound to the accidentSketch field in the Data Source task pane.
Insert an ink picture control on a new, blank form template
When you design a new, blank form template, the Automatically create data source check box in the Controls task pane is selected by default. This enables InfoPath to automatically create fields and groups in the data source as you add controls to the form template. These fields and groups are represented by folder and file icons in the Data Source task pane.
-
On the form template, place the cursor where you want to insert the control.
-
If the Controls task pane is not visible, click More Controls on the Insert menu, or press ALT+I, C.
-
Under Insert controls, click Ink Picture.
By default, an empty ink picture control is inserted onto the form template.
-
To add a background picture that users can draw directly on top of with their tablet pen, do the following:
-
Double-click the ink picture control.
-
Click the Data tab.
-
Under Binding, select the Use a background picture check box.
-
In the Insert Picture dialog box, click the picture that you want.
-
-
To add a label to the control, type text above or to the left of the control, followed by a colon (:).
Insert an ink picture control on a form template that is based on an existing data source
If you base the design of your form template on an existing Extensible Markup Language (XML) file, database, or Web service, InfoPath derives the fields and groups in the Data Source task pane from that existing data source. In this scenario, you can insert an ink picture control by dragging a field from the Data Source task pane onto the form template or by inserting an ink picture control from the Controls task pane instead, as described in the following procedure:
-
On the form template, place the cursor where you want to insert the control.
-
If the Controls task pane is not visible, click More Controls on the Insert menu, or press ALT+I, C.
-
Under Insert controls, click Ink Picture.
-
In the Ink Picture Binding dialog box, select the field where you want to store ink picture control data, and then click OK.
By default, an empty ink picture control is inserted onto the form template.
-
To add a background picture that users can draw directly on top of with their tablet pen, do the following:
-
Double-click the ink picture control.
-
Click the Data tab.
-
Under Binding, select the Use a background picture check box.
-
In the Insert Picture dialog box, click the picture that you want.
-
-
To add a label to the control, type text above or to the left of the control, followed by a colon (:).
Layout tips
Use the following tips to help you refine the appearance, size, and other aspects of an ink picture control:
-
Using a layout table for arrangement purposes is always a good idea, no matter what type of control you happen to be working with.
-
If you expect users to draw large pictures, change the size of the ink picture control accordingly.
-
Inserting an ink picture control inside a scrolling region can be useful when you want a fixed region on your form template that will scroll to accommodate large drawings or photos.
-
To change the width of several ink picture controls at once, select the controls whose size you want to change, press ALT+ENTER, click the Size tab, and then in the Width box, type a new number.
-
To change the border or color of an ink picture control, select it on the form template, on the Format menu, click Borders and Shading, and then make the necessary adjustments.
-
You cannot type text inside an ink picture control. If you want to add instructional text for your users, such as "Circle areas of damage on the car," add a label to the control on the form template.


