
The project site template is designed to help you plan the work that needs to be done, collaborate with teammates, and collect project files and documents.
Create a project site
-
Click Settings


-
Under Subsites, click New Subsite.
-
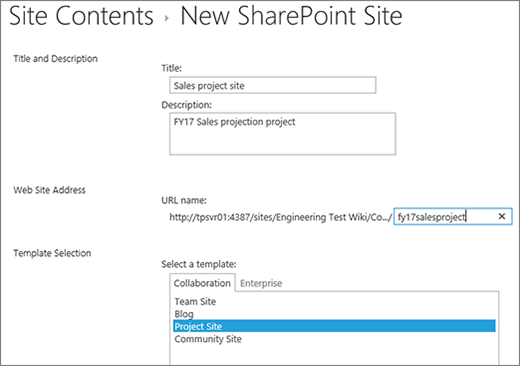
Under Title and Description, give the new project site a Title that corresponds with the name of the project, and provide a brief Description of the site.
-
Under Web Site Address, provide the portion of the URL that will be used to access your project site, such as "Contoso_sales_project"
-
Under Template Selection, select Project Site.
-
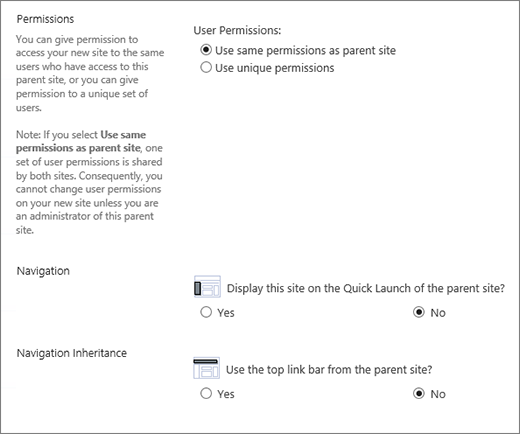
Under Permissions, choose whether you want the new site to use the same permissions as the parent site, or use its own, unique permissions.
Tip: When you make this decision, think about who can access the parent site, and whether you want those people to also be able to view and/or make changes to your project site. You may find it more appropriate to use unique permissions for your project site, if your project information needs tighter security. See Introduction: Control user access with permissions for more info.
-
Depending on the version of SharePoint, you may see Navigation, where you can choose to display the project subsite on the Quick Launch panel.
-
Under Navigation Inheritance, choose whether you want to use the top link bar from the parent site on your project site.
-
Click Create to create your new project site.
Your project subsite will come with basic Web Parts, such as Project summary timeline, a document library, and a Newsfeed to communicate with your team on the main page. You also have a notebook, tasks and a calendar to work with. The rest of these sections can help you plan, work with, and share your project with others.
With a project site in place, now you can start using it to plan and manage your project. These links can help you get the basic tasks, people, and structure into your project:
As you are working on your project, these links to articles on several SharePoint features that are helpful to having a successful project.:
-
Set up the timeline: Add tasks to the timeline and .
-
Change the look of the timeline: change the appearance of the timeline
-
Add structure to your task list: Indent, outdent, move, and delete tasks.
-
Work with your task list in Microsoft Project or Microsoft Excel: Open a task list in Project or Excel.
-
Add files to your project: Upload, view, and remove project files or documents.
After your project site is set up and you've started using it, you may decide you want to share your project information with others. These topics can help you can get the word about your project out.


