
Master pages provide the look and feel for all of the pages in your site. By changing the styles or content of the master page, you can quickly change the appearance of an entire site.
This article shows you how to create and modify a copy of the existing primary master page and then apply the new or modified master page to all of the pages in your site that are attached to the primary master.
Learn more about master pages in Introduction to SharePoint master pages.
Note: To follow the procedures in this topic, you must have appropriate permissions. By default, you must be a member of the Site Owners group, the Designer group, or a Site Collection Administrator to open a SharePoint site with SharePoint Designer 2010 and customize the master pages. If you are a member of one of those groups but cannot see the options mentioned in this topic, your implementation of SharePoint might be customized to restrict who can use SharePoint Designer. Check with your site administrator to find out.
In this article
Overview: Master pages define page layout
Master pages define the common layout and interface for SharePoint pages.
The primary master page displays the persistent elements that you see when you navigate from page to page on a site, such as a company logo, title, navigation menu, search box, and the colors or graphics associated with the business or organization.
Other typical persistent elements include a sign-in link, the Site Actions menu, and the Ribbon commands in the same place on every subsite.
These elements are all stored in the primary master page.
The individual pages on a SharePoint site – the home page, a wiki page, a list view – are all handled as content pages on the site. When these pages are viewed in a browser, they are combined with the master page to produce a single, continuous web page.
The master page displays the persistent elements and layout, while the content pages display the unique, page-specific content.
View the primary master page
-
Open your site in SharePoint Designer, and then click Master Pages in the Navigation pane.
-
Click v4.master to see summary information in the Master Page Gallery.
-
Click Edit File in the ribbon to open the master page.
This opens the master page in the SharePoint Designer 2010 full-screen page editor.
Here, you can edit the page in Design view, Split view, or Code view. With design-time support, you can see what the master page looks like as you customize it. There are also tools you can use to customize tags, styles, scripts, and content regions, as shown below:
A number of features make it easier to create and customize master pages in SharePoint Designer 2010 than it has been in the past:
-
The navigation menu includes a Master Pages category that takes you directly to the Master Page Gallery on your site.
-
When editing master pages, you can use page editing tools to insert and manage layers, or position DIV tags; and you can quickly locate those layers and other elements using the Skewer Click option, which navigates through overlapping layers for you.
-
When you create a new site and Web Part Pages, they’re automatically associated with the primary master page, so you don’t have to manually associate them each time.
Customize or start from scratch?
To use a custom primary master page in your SharePoint 2010 sites, you can:
-
Customize a copy of the default primary master page (v4.master), or
-
Create a new custom master page from scratch, and make it the primary master page for your site.
This article focuses on the first approach: customizing a copy of the default primary master page.
There are advantages and disadvantages to both approaches.
When you customize a copy of v4.master, you’re using the existing SharePoint look and feel, with its features, brand, and design elements, and customizing it to meet your needs. While it can be challenging as you try to understand how everything works in the v4.master page, this approach is useful for minimal branding or customization efforts, like changing the header of your SharePoint pages.
When you create a blank custom master page or develop your own starter master page as the basis of your page, you’re creating a design from scratch. While this approach can be challenging because you need to know how to implement a design in SharePoint, it’s also more flexible when you know the design you’re trying to create and you’re working off existing plans and prototypes. The mostly empty page acts like a canvas for you to first build your design and then add the required SharePoint components.
Default master pages in SharePoint 2010
The v4.master page is the default primary master page in SharePoint 2010. It provides the SharePoint 2010 look and feel, interface, and functionality, including the ribbon – a new interface with menus, buttons, and commands similar to Microsoft Office applications. The primary master page is used for both content pages and application pages in SharePoint 2010.
Here are all the master pages that come with SharePoint 2010.
|
Name / default file name |
Description |
Uses on a SharePoint site |
|
Primary master page v4.master |
Used for content and administration pages. Provides the interface and layout for SharePoint 2010. |
Team Site home page, list and library pages, and site settings page. |
|
Minimal master page minimal.master |
Contains minimal SharePoint content, used for full-screen functionality or embedded applications. |
The home and search results pages on a Search Center, pages that host Word or Excel web applications. |
|
Publishing master page nightandday.master |
Used for pages on a SharePoint Server publishing-enabled site. |
The home page, about us, or press release page on a publishing intranet, extranet, or Internet-facing site. |
|
2007 default master page default.master |
Used to support legacy SharePoint sites, which haven’t been visually upgraded to SharePoint 2010. |
Home page, site pages, and list pages on a SharePoint 2007 site before visual upgrade. |
Note: There is one more master page, simplev4.master, which is used for SharePoint-specific screens, like Login.aspx, Error.aspx, and Confirmation.aspx. This master page, however, is located on the server and cannot be customized in SharePoint Designer 2010.
Tip: In addition to these master pages, you can download the Starter Master Page from MSDN. This master page contains the minimum required components, scripts, and placeholders to render a page in SharePoint. You might use this master page to create a whole new design from scratch. The page serves a similar purpose as the “minimal.master” page that was available in SharePoint 2007.
Customize the primary master page
To customize master pages in SharePoint Designer 2010, you first open SharePoint Designer 2010 from the site itself or from your Start menu. With your site open in SharePoint Designer 2010, click Master Pages in the Navigation pane.
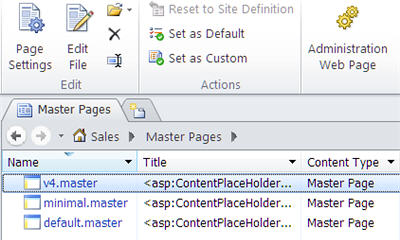
For most sites, you see three master pages, v4.master, minimal.master, and default.master, in the Master Page Gallery as shown here.
Create a copy of the primary master page
-
Open your site in SharePoint Designer, and then click Master Pages in the Navigation Pane.
-
Right-click v4.master and then press Ctrl+P to paste a copy into the Master Page Gallery.
-
Click v4_copy(1).master to see summary information in the Master Page Gallery.
-
Click Edit File in the ribbon to display the master page.
This opens the master page in the SharePoint Designer 2010 full-screen page editor where you can edit the page in Design view, Split view, or Code view. With design-time support, you can see what the master page looks like as you customize it. There are also tools available for you to navigate and customize tags, styles, scripts, and content regions as shown here.
Work with content placeholder controls
Master pages and content pages work together using a set of replaceable regions, or content placeholder controls. Each content placeholder (which appears as ContentPlaceHolder in the page code) represents content that can be overridden on the master page. Any page on the site can replace whatever is contained within the content placeholder by supplying a matching content control. That content control can even be empty, which would remove the element entirely from the rendered page.
Important: When you customize master pages, avoid deleting content placeholders. Doing so might break some pages and even sites associated with the master page. It’s a good practice to simply hide instead of delete these controls..
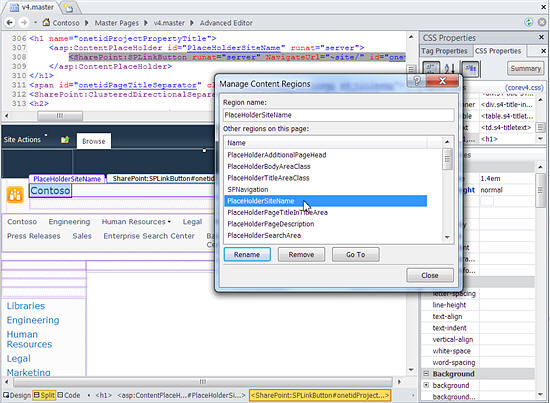
You can use the Manage Content Regions feature to locate each content placeholder control on the page. You can view the control in both code view and the WYSIWYG editor.
Here you can see the PlaceHolderSiteName control that is used to display the name of the site.
Another content placeholder that is particularly important is PlaceHolderMain because this is what gets replaced by each content page when that page is viewed in a web browser.
You can change the layout of content on a SharePoint site by changing the location of the content placeholder controls.
For more information about working with content placeholders, see Working with content placeholder controls.
A content placeholder control is a piece of code on a master page that works together with a content control on a content page. The content placeholder control displays default content (which can be no content, if the control is empty) for that region on the page but can be overridden by unique content from a content control on a content page.
Note:
Locate and modify a content placeholder control
Follow these steps to locate the PlaceHolderSiteName content placeholder control on a SharePoint 2010 primary master page.
-
Open your site in SharePoint Designer 2010 and in the navigation pane, click Master Pages.
Note: If you don’t see Master Pages in the navigation pane, they may have been disabled in SharePoint. Contact your site administrator for details. Learn more in Managing SharePoint Designer 2010.
-
In the master page gallery, click v4.master.
-
On the master page summary page, click Edit file.
-
If you are prompted to check out the file, click Yes.
-
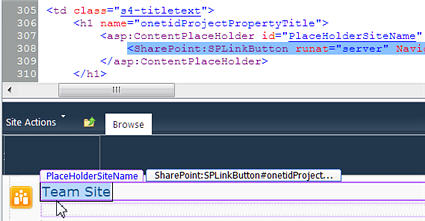
If you’re viewing the page in Design view, you can simply click an area on the page to see the content placeholder control that serves up that content.
-
Alternatively, you can browse the available content placeholder controls by clicking the Style tab and in the Master Page group, click Manage Content Regions. Using this feature, you can quickly and easily locate the content placeholder controls on the master page.
-
In the list of content regions, select PlaceHolderSiteName and then click Go To. Then click Close. The content placeholder control is selected on the page like this.
-
From here, you might change its settings, change the location, apply different styles, and so forth. When finished, save the master page.
-
If you’re warned that the changes will customize the page from its site definition, choose Yes.
Note: SharePoint pages are, by default, associated with site definition files. When a master page is customized in SharePoint Designer 2010, it is no longer associated with the site definition. This can result in additional administrative work following future updates or upgrades to SharePoint, which is why you see this message. You can always reset the master page to its site definition, if necessary.
Your changes will appear on every page attached to this master page unless those pages were customized directly.
Work with styles
The easiest and quickest way to change the styles in your master page is to apply a predesigned theme to the page. You can see and apply available themes by clicking the Change site theme link under Customization on the Site Settings tab in SharePoint Designer.
But if you’re matching corporate colors, graphics, text formatting, or other style attributes, you’ll probably want to either create your own custom styles and add them to the master page directly, or place them in external Cascading Style Sheets (CSS) that you attach to the master page.
DIV tags streamline working with CSS
The default primary master page in SharePoint 2010 uses DIV tags to define block-line elements and sections on the page. DIV tags offer a number of advantages over table tags, which were used in previous versions. With DIV tags, there is:
-
More flexibility in how you style the page with CSS
-
Less markup
-
Faster downloads
-
Improved search engine optimization,
-
Improved accessibility support, and
-
Improved browser support.
HTML tables are still used, for example, when you or your users insert Web Parts and other SharePoint content on the page. But for customizing master pages, you can work primarily with the DIV tags to structure the content.
Edit styles in the master page or create a custom CSS
To edit styles, click the Style menu and then choose from among the options on the ribbon to work with CSS the way you want.
You can create new styles and apply then, or attach a style sheet using commands on the ribbon. Use the Manage Styles command to categorize styles by element, order or type; to show only styles in use on the page or element, and to see previews of styles.
Set your new master page as the primary master page
After you create a new master page in SharePoint Designer 2010, you can quickly make the new master page the primary master page for the entire site.
Note: When you set a new master page as the primary master page, all of the pages that are attached to the default primary master page, including the pages that already exist in your site and any new pages that you create, are attached to the new master page..
-
Open SharePoint Designer 2010 and open the SharePoint site.
-
Under Site Objects, in the Navigation Pane, click Master Pages.
-
In the Master Pages list in the Navigation Pane, right-click the master page you want to make the default primary master, and then click Set As Default Master Page.
-
Return to your SharePoint site and note that the primary default master has changed.


