
If you'd like to create a custom page size for your publication, you can use the options in the Custom Page Size dialog box.
Note: If you're creating a page size for a publication type that Publisher doesn't contain, like a 2"x4" ticket, start with a publication type that is a similar size, like a business card, and then create a custom page size from there.
To create a custom page size:
-
On the Page Design tab, in the Page Setup group, click Size.
-
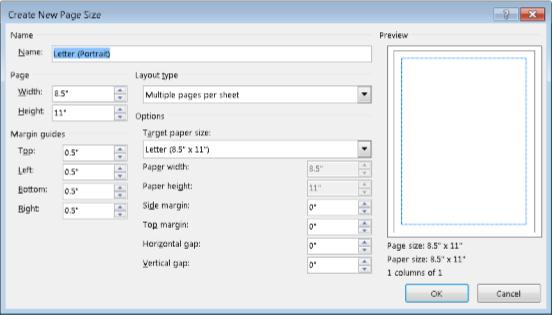
Select Create New Page Size.
-
Once you’ve created a custom page size it will appear under Custom in the Size menu.
Name
Name Type a name for the custom page size that you are creating.
Page
-
Width Enter the width of the page.
-
Height Enter the height of the page.
Layout type
Click the page layout type that you want to print. Layout type determines which page layout options are available to you.
-
One page per sheet Click to print one page of your publication per sheet of paper. This is a good option for advertisements, award certificates, banners, brochures, business forms, calendars, flyers, letterhead, menus, programs, paper folding projects, quick publications, résumés, and signs.
-
Booklet This will set your publication to a booklet design. The margin guide labels will change so that Left becomes Outside, and Right becomes Inside to reflect their positions in the booklet. Booklets are typically printed of sheets of paper that are then folded to create the booklet.
-
E-mail This is best for publications that you plan to sent in email.
-
Envelope Use this option for envelopes.
-
Folded card Use this if you're making greeting cards or invitations.
-
Multiple pages per sheet This option prints multiple copies of your publication per sheet of paper. Use it for business cards, gift certificates, labels, and postcards.
-
Web page Use this to print a single webpage.
Margin guides
Margin guides set the amount of space between the edges of your publication and the edge of the page.
Note: There's a limit to the printable area of a sheet of paper. Many printers do not print to the edge of the paper, regardless of how you wide you set your margins. When you set your margins and create your page, make sure the content remains within the printable area for your specific printer.
-
Top Enter the amount of space that you want between the top edge of the page and the publication.
-
Left Enter the amount of space that you want between the left edge of the page and the publication.
Note: If you select Booklet as the layout type, the name changes to Outside.
-
Bottom Enter the amount of space you want between the bottom edge of the page and the publication.
-
Right Enter the amount of space you want between the right edge of the page and the publication.
Note: If you select Booklet as the layout type, the name changes to Inside.
Options
If you select Folded card as the layout type, sheet fold options are displayed. Select an option in the list to specify how you will fold your publication.
-
Quarter-page side fold Each page of your publication will be printed on the same sheet of paper. The finished card will have a fold along one side.
-
Quarter-page top fold Each page of your publication will be printed on the same sheet of paper. The finished card will have a fold along the top.
-
Half-page side fold Two pages of your publication will be printed vertically on the same side of a sheet of paper.
-
Half-page top fold Two pages of your publication will be printed horizontally on the same side of a sheet of paper.
If you select Multiple pages per sheet as the layout type, target sheet options are displayed.
-
Target sheet size Click one of the following options: Letter or A4. If you are printing on a different size of paper, click Custom, and then enter the following dimensions:
-
Sheet width Enter the width of the sheet of paper.
-
Sheet height Enter the height of the sheet of paper.
-
-
Side margin Enter the space between the group of multiple copies and the left and right edges of the sheet.
-
Top margin Enter the space between the group of multiple copies and the top edge of the sheet.
-
Horizontal gap Enter the space between the columns of multiple copies. For example, if you have two columns of business cards, changing this option will change the space between the columns.
-
Vertical gap Enter the space between each row of multiple copies. For example, if you have four rows of business cards, the horizontal space between the rows of business cards will change.
Preview
The Preview window shows the layout type and any margins that you select. The sheet's dimensions are displayed as the black line inside the white rectangle. The margin guides are displayed as the dotted blue lines inside the sheet dimension lines.


