
This article explains how to create new site content types or modify existing site content types
In this article
With the proper permissions, you can create new site content types. You can then add these content types to lists and libraries at the site level on which you created them, in addition to lower-level sites. For example, a site content type that you create at the top-level site is available to lists and libraries on all sites in the site collection. Content types that are created at a lower-level site are not available to higher-level sites.
Important: In order to create and modify site content types, you must have the Full Control permission level, such as the the default Site name Owners group and have the following user access rights:
-
Parent site Manage Lists, Add and Customize Pages
-
Child site Manage Lists, Add and Customize Pages
-
List or document library Manage Lists
About site content types and inheritance
In the course of a single project, a business might produce several different kinds of content, for example, proposals, legal contracts, statements of work, and product design specifications. A business might want to collect and maintain different kinds of metadata about each kind of content. Metadata might include an account number, project number, or project manager, for example. Although documents might be stored together because they are related to a single project, they can be created, used, shared, and retained in different ways. Organizations can define different sets of documents as content types.
Content types enable organizations to organize, manage, and handle content in a consistent way across a site collection. By defining content types for specific kinds of documents or information products, an organization can ensure that content is managed in a consistent way. Content types can be seen as templates that you apply to a list or library and you can apply multiple templates to a list or library so that they can contain multiple item or document types.
Content types are organized into a hierarchy Content types are organized into a hierarchy that allows one content type to inherit its characteristics from another. This structure enables you to handle whole categories of documents consistently across your organization.
New site content types are based on a parent content type When you define a new custom site content type in the Site Content Type Gallery for a site, you start by selecting an existing parent site content type in the Site Content Type Gallery as your starting point. The new site content type that you create inherits all of the attributes of its parent site content type, such as its document template, read-only setting, workflows, and columns. After you create this new site content type, you can make changes to it, such as adding or removing columns.
Child site content types inherit from the parent Content types that you create are based on a parent content type and thus inherit the attributes of that parent content type. An example of a child content type would be a list content type, based on a parent content type, that you apply to a list or library. Changes made directly to this child list content type do not affect the parent content type on which it is based. The attributes that can be inherited from a parent content type are:
-
Document template
-
Read-only setting
-
Workflows
-
Columns
-
Extensible attributes added by other applications
When you update a parent content type, you can choose whether you want any child content types to inherit those changes. When you choose to update all content types that inherit from parent content types, all of the settings on that page are also updated for content types that are children of the content type that you are changing. This update overwrites any previous customizations to the list and site content types that inherit from this parent.
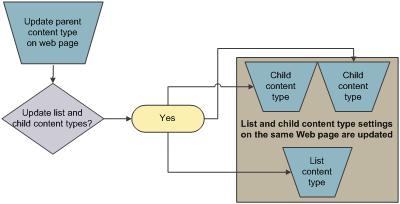
For example, if you change only the document template on the Advanced Settings page and choose to update list content types and child site content types, the document template and read-only setting are updated on all child content types because both of these settings are on the same page. Likewise, all changes made on the Workflow Settings page will be updated together on child content types. Each column has its own Change Site Content Type Column page, so the settings for each column must be updated separately.
Note that all attributes of a content type that appear on the parent content type — other than Name, Description, and Group — can be updated on child types. Columns or settings that do not appear on the parent type cannot be updated.
To ensure that changes you make to the parent content type do not overwrite settings on child content types, you can mark the child content type as read-only. Although this is desirable in some situations, it will also reduce your ability to centrally manage your content type hierarchy.
If you set a content type as read-only, the parent’s settings can still override the child's settings if you explicitly set the parent to be not read-only and then update changes on child content types.
Site content types are stored in groups When you create a new site content type, you must choose whether to store it in an existing group or to store it in a new group that you create. If you do not want your new site content type to be used by others, you can create a group named _Hidden and store your site content type in it.
Create a site content type
To create site content types for a site, you must have Full Control permissions for that site. To create site content types for the top-level site in a site collection, you must be a site collection administrator.
-
Go to the site on which you want to create a new site content type.
-
On the Site Actions menu

-
In the Galleries section, click Site content types.
The Site Content Type Gallery page appears.
-
On the Site Content Type Gallery page, click Create.
The New Site Content Type page appears.
-
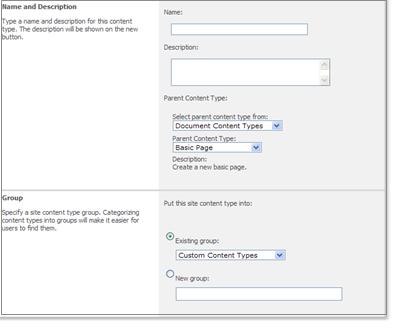
In the Name and Description section, type a name and a description for the new site content type.
-
In the Select parent content type from list, select the group from which you want to select the parent content type for your new content type. This list contains all the Site Content Type groups used in the current site.
-
In the Parent Content Type list, select the parent content type that you want to base your content type on. The list of parent content types differs depending on the Site Content Type group that you selected from the Select parent content type from list.
-
In the Group section, choose whether to store this new site content type in an existing group or a new group.
-
Click OK.
The Site Content Type: Your new content type name page appears. You can choose options on this page to further define your new content type.
Associate a document template with a site content type
Note: Document templates can be associated only with Document content types, not folders, lists, or discussion boards.
-
Go to the site on which the site content type that you want to change is defined.
-
On the Site Actions menu
-
In the Galleries section, click Site content types.
-
On the Site Content Type Gallery page, click the link for the site content type that you want to modify.
The configuration page for the site content type that you selected appears.
-
In the Settings section, click Advanced settings.
The Site Content Type Advanced Settings page appears.
-
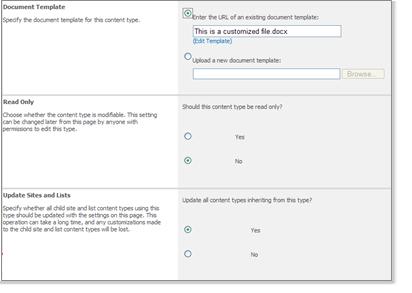
To provide the URL for an existing document template, in the Document Template section, type the URL for the location of the document template that you want to use. The following table provides examples of the types of URLs that you can use. The examples are based on the site content type resource folder being http://Server NameSite/_cts/Content Type Name/ and the document template being docname.doc.
|
URL name |
Example |
|
Relative path to the server |
Site/_cts/ContentTypeName/docname.doc |
|
Absolute path to the server |
http://contoso/Site/_cts/ContentTypeName/docname.doc |
-
If you want to upload the document template that you want to use, in the Document Templates section, click Upload a new document template, and then click Browse. In the Choose File dialog box, browse to the location of the file that you want to use, select it, and then click Open.
When uploading a new document template, the template is automatically stored in the default document template resource folder located at http://Server Name/Site/_cts/Content Type Name/
-
In the Update Sites and Lists section, specify whether the content types that inherit from this content type will be updated with your changes.
If you select Yes, other content types (child content types) that inherit from this content type (parent content type) will use the document template you selected.
-
Click OK.
Make changes to the columns for a content type
You can specify the properties or metadata that you want to collect for an item of a specific content type by adding columns to the site content type. For example, your organization might want to track a specific set of metadata for all of its purchase orders, such as account number, project number, and project manager. If you add columns for account number, project number, and project manager to the purchase order content type, users are prompted to provide this metadata for items of this content type.
There are several ways you can change columns for a content type. You can:
Add an existing column to a site content type
Follow this procedure to add a column that is already defined on your site or its parent site to a site content type. Adding a column to a content type ensures that the column or field appears on the list or library you associate the content type to.
-
Go to the site on which the site content type that you want to change is defined.
-
On the Site Actions menu
-
In the Galleries section, click Site content types.
-
On the Site Content Type Gallery page, click the link for the site content type that you want to modify.
The configuration page for the site content type that you selected appears.
If the site content type names are not hyperlinked or available to be selected, then it means that this site inherits its site content types from another site, and the site content type will need to be updated on that site.
-
In the Columns section, click Add from existing site columns.
The Add Columns to Site Content Type page appears.
-
In the Select Columns section, select the group that you want to filter on from the Select columns from list.
The following table describes the groups that are available by default and the types of columns they contain.
|
Select this |
To display this |
|
All Groups |
All columns that are available to any group. |
|
Base Columns |
Columns that are useful in many types of lists or libraries. |
|
Core Contact and Calendar Columns |
Columns that are useful in contact and calendar lists. These columns are typically used to synchronize metadata from client contact and calendar programs that are compatible with SharePoint technologies, such as Microsoft Office Outlook 2007. |
|
Core Document Columns |
Standard document columns from the Dublin Core Metadata Set. |
|
Core Task and Issue Columns |
Columns that are useful in task and issues lists. These columns are typically used to synchronize metadata from client task and issue programs that are compatible with SharePoint technologies, such as Microsoft Office Outlook 2007. |
|
Group Work Columns |
Columns that are useful in Group Work lists that are used in the Group Board Workspace. |
|
Extended Columns |
A set of special-purpose columns. |
-
Select the column that you want to add from the Available columns list, and then click Add.
To quickly add multiple column types, you can press CTRL and click each available column that you want to add.
-
In the Update Lists and Site Content Types section, specify whether the child site content types that inherit from this site content type will be updated with your changes.
-
After you finish adding the columns that you want, click OK.
Add a new column to a site content type
Follow this procedure to define a new column and add it to a site content type. Note that the new column that you create becomes available to the site on which it is created and to its child sites. After you create the new column, you can add it to other content types and also to lists and libraries. If you do not want your new column to be used by others, you can hide it by adding it to a new group called "_Hidden."
-
Go to the site on which the site content type that you want to change is defined.
-
On the Site Actions menu
-
In the Galleries section, click Site content types.
-
On the Site Content Type Gallery page, click the link for the site content type that you want to modify.
The configuration page for the site content type that you selected appears.
-
In the Columns section, click Add from new site column.
The New Site Column page appears.
-
In the Name and Type section, type a name for the new column type, and then select the type of information that can be stored in this column.
Column names are not case sensitive. For example, if a column named "Description" is already defined on your site collection, you cannot create a new column named "description.”
-
In the Group section, either select an existing group or type the name of a new group in which to store this new column.
-
In the Additional Column Settings section, specify any additional column settings that you want. For example, you can type a description for your column, specify whether information is required for this column, the maximum number of characters that can be stored in this column, and a default value for the column.
-
In the Update List and Site Content Types section, specify whether the child site content types that inherit from this site content type will be updated with your changes.
-
In the Column Validation section, enter the formula you want to use to validate the data in this column when new items are added to the list. You can, for example, set a maximum number a user can enter in a column, or use a formula to ensure that the area code of a phone number is included in a column.
-
After you finish adding the columns that you want, click OK.
Remove a column
-
Go to the site for which you want to change a site content type.
-
On the Site Actions menu, click Site Settings.
-
Under Galleries, click Site content types.
-
Click the name of the site content type you want to change.
If the site content type names are not hyperlinked or available to be selected, then it means that this site inherits its site content types from another site, and the site content type will need to be updated on that site.
Under Columns, click the name of the column that you want to remove from the content type.
-
Click Remove, and then click OK when you are asked if you want to remove the column from the content type.
Change the column order for a site content type
You can change the order in which columns appear for a site content type so that they follow a logical grouping for example.
-
Go to the site on which the site content type that you want to change is defined.
-
On the Site Actions menu
-
In the Galleries section, click Site content types.
-
On the Site Content Type Gallery page, click the link for the site content type that you want to modify.
The configuration page for the site content type that you selected appears.
-
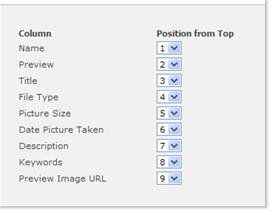
In the Columns section, click Column order.
-
In the Column Order section, use the drop-down lists in the Position from Top column to reorder the columns the way that you want.
-
In the Update Sites and Lists section, specify whether the child site content types that inherit from this site content type will be updated with your changes.
Make a column required, optional, or hidden
-
Go to the site for which you want to change a site content type.
-
On the Site Actions menu
-
Under Galleries, click Site content types.
-
Click the name of the site content type you want to change.
Choose an alert and enter text here. You may also set it’s AlertPosition property.
-
Under Columns, click the name of the column that you want to make required.
-
In the Column Settings section, do one of the following:
-
To require users to specify information for a column, click Required.
-
To make it optional for users to specify information for a column, click Optional.
-
To hide a column so that it does not appear in any New, Edit, or Display forms for the content type, click Hidden.
-
In the Update Sites and Lists section, under Update all content types inheriting from this type? click Yes if you want to update all content types that inherit from this site content type.
-
-
Click OK.
Add a workflow to a site content type
Note: A workflow must be deployed on your site collection before you can add it to a site content type. Contact your server administrator if the workflow that you want to add is not available.
-
Go to the site on which the site content type that you want to change is defined.
-
On the Site Actions menu
-
In the Galleries section, click Site content types.
-
On the Site Content Type Gallery page, click the link for the site content type that you want to modify.
The configuration page for the site content type that you selected appears.
-
In the Settings section, click Workflow settings.
The Change Workflow Settings page appears.
-
Click Add a workflow.
-
On the Add a Workflow page, select the Workflow template that you want to add and the settings that you want for the workflow.
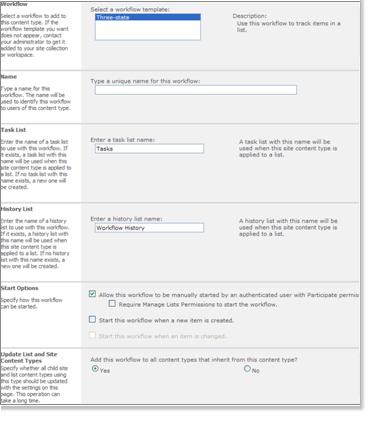
-
Do one of the following:
-
If the workflow you are adding has a Customize Workflow page, click Next to proceed to the Customize Workflow page, choose the settings you want, and then click OK.
-
If the workflow you are adding does not have a Customize Workflow page, click OK.
To learn more about adding workflows to lists, libraries, and content types, see links under See Also.
-
Make a content-type read only
-
Go to the site for which you want to change a site content type.
-
On the Site Actions menu
-
Under Galleries, click Site content types.
-
Click the name of the site content type you want to change.
If the site content type names are not hyperlinked or available to be selected, then it means that this site inherits its site content types from another site, and the site content type will need to be updated on that site.
-
Under Settings, click Advanced settings.
-
In the Read Only section, under Should this content type be read only?, click Yes.
-
In the Update Sites and Lists section, under Update all content types inheriting from this type? click Yes if you want to update all content types that inherit from this site content type.
-
Click OK.
Delete a site content type
When you delete a site type from a list or library, users will no longer be able to add new instances of that site content type to lists or libraries. Deleting a site content type does not remove any instances of that site content type that were previously associated with lists or libraries and that now exist as list content types, nor does it delete items that were created from the content type.
-
Go to the site for which you want to delete a site content type.
-
On the Site Actions menu
-
Under Galleries, click Site content types.
-
Click the name of the site content type you want to delete.
If the site content type names are not hyperlinked or available to be selected, then it means that this site inherits its site content types from another site, and the site content type will need to be updated on that site.
-
Under Settings, click Delete this site content type.
-
When you are asked if you want to delete the site content type, click OK.


