
Note: This article has done its job, and will be retiring soon. To prevent "Page not found" woes, we're removing links we know about. If you've created links to this page, please remove them, and together we'll keep the web connected.
With SharePoint Designer 2010, you can quickly create highly customized interfaces to your business data sources using forms. Forms are a vital part of any SharePoint site where you collect data from users. You create forms by first adding a Data View to one of your site pages and then inserting the individual fields from the data source as forms. Users, in turn, can use the form to write data back to the data source in the browser.
Forms can be created for a number of data sources, including database connections, XML documents, and SharePoint lists and libraries.
This article describes forms in more detail and the different ways you can create them in SharePoint Designer 2010.
In this article
What is a form
Forms are based on the Data View feature in SharePoint Designer 2010, so to better understand them, you want to understand Data Views. A Data View is a customizable view of a data source. You can insert a Data View into an ASPX page as either a view or a form. A Data View inserted as a view allows you to format the presentation of data – if you insert the Data View as a form, you can edit the data through the browser, and your changes are written back to and stored in the original data source.
Data Views inserted as forms can be created for SharePoint lists and libraries, database connections, and local XML documents. They do not, however, support SOAP and REST Web service connections. The form itself is always in edit mode and displays either one record or many records at once. Users can add new records and modify existing records through the browser (but they cannot delete records).
When you insert a Data View, SharePoint Designer 2010 retrieves data from a data source in the form of Extensible Markup Language (XML) and displays that data using Extensible Stylesheet Language Transformations (XSLT). After you insert a form onto your page, you can use Data View editing tools in SharePoint Designer 2010 to add or remove columns, filter, sort, and group fields, and so on. You can use the WYSIWYG tools to change font properties, images, controls, and the overall layout of the form.
When you use these tools, SharePoint Designer 2010 inserts the necessary XSLT directly into the page so you don’t have to know how to write XSL. If you want to customize the XSL directly, you can always open the page in Code view.
Note: Another way you can allow users to add and modify records in a Data View is to enable inline editing in the Data View. Learn more about customizing list and data views in the See Also section.
Insert a form using the ribbon
The quickest and easiest way to create a form is to use the Data Views and Forms option in the ribbon of SharePoint Designer 2010. When you create a form this way, you can choose from three types of forms: a new item form, an edit item form, or a display item form. You can create each type of form for a number of data sources, like SharePoint lists and libraries, XML files, and database connections.
When you add a form this way, SharePoint Designer 2010 adds a Data Form Web Part (DFWP) to the page. Once it is added, you can customize the form using the Data View editing options in the ribbon and the WYSIWYG tools on the page itself.
Perform these steps to insert a form using the ribbon in SharePoint Designer 2010.
-
Step one. Open your site in SharePoint Designer 2010.
-
In the Navigation pane, click Site Pages.
-
Select the site page where you want to add the Data Form.
Note If you don’t have a page for the Data Form, you need to create one – either an ASPX page or a Web Part Page. -
On the Page tab, in the Edit group, click Edit File.
-
Click inside in the div or form box provided.
In a Web Part Page, the div tag box looks like this: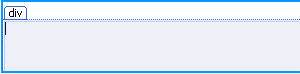
In an ASPX page, the form box looks like this:
-
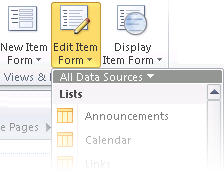
On the Insert tab, in the Data Views & Forms group, you see three form options:
-
Choose the type of form as described below:
-
New Item Form displays blank fields for a single record. Each field in its own row with the field name is the heading. Using a new item form, you can add data to a data source one record at a time. You’ll need to include all the necessary fields required for users to create new records.
-
Edit Item Form displays a single record as a form. Each field has its own row with the field name as the heading for that row. Using an edit item form, you can edit one record at a time. The form includes navigation links you can use to view the next or previous record.
-
Display Item Form displays a record as a view that can’t be edited and is commonly used to view the properties of a record.
Note: If you want to add a form with multiple items showing at once, see the next set of steps where you create forms using the Date Source Details task pane.
-
Select the data source you want to use.
Note: One of the options in the menu is to create a Custom List Form. This only applies to SharePoint lists and libraries. Learn more about list forms in the See Also section.
-
To see additional data sources, click More Data Sources and in the Data Sources Picker dialog box, choose a data source, and click OK.
-
The form is added to your page, displaying the fields from your data source.
Insert a form using the Data Source Details pane
Another way to create a form is to insert an empty Data View, choose the source create, and use the Data Source Details pane to add the individual fields. This option lets you choose which fields to include in the form at the beginning and then the type of form that should be used. You can choose from three types: a single item form, a multiple item form, or a new item form.
When you add a form this way, SharePoint Designer 2010 adds a Data Form Web Part (DFWP) to the page. Once added, you can customize the form using the Data View editing options in the ribbon and the WYSIWYG tools on the page itself.
Perform these steps to insert a form using the Data Source Details pane in SharePoint Designer 2010.
-
Open your site in SharePoint Designer 2010.
-
In the Navigation pane, click Site Pages.
-
Select the site page where you want to add the Data Form.
Note If you don’t have a page for the Data View, you need to create one – either an ASPX page or a Web Part Page. (See Creating SharePoint Pages in the See Also section.) -
On the Page tab, in the Edit group, click Edit File.
-
Click inside in the div or form box provided.
In a Web Part Page, the div tag box looks like this:
In an ASPX page, the form box looks like this: -
On the Insert tab, in the Data Views & Forms group, click Data View and choose Empty Data View.
-
In the empty Data View placeholder that appears, click the Click here to select a data source.

-
In the Data Sources Picker dialog box, select your data source and click OK.
-
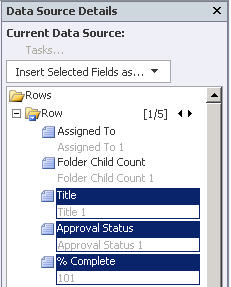
The Data Source Details task pane displays.
-
In the task pane, select the fields that you want to show in the Data Form. To select multiple fields, hold down CTRL while you click them.
Note: Depending on the type of data source you’re using, some fields may not be editable. For example, in a SharePoint list or library, the Created By, Modified By, and other system fields are not editable.
-
Click Insert Selected Fields as and then choose one of the following options:
-
Single Item Form displays a single record as a form. Each field has its own row with the field name as the heading for that row. Using a single item form, you can edit one record at a time. The form includes navigation links you can use to view the next or previous record.
-
Multiple Item Form displays multiple records as forms on the same page. Each field has its own column with the field name as the heading for the column. Using a multiple item form, you can quickly edit the data for multiple records at once and then save the changes at the same time.
-
New Item Form displays blank fields for a single record. Each field in its own row with the field name is the heading. Using a new item form, you can add data to a data source one record at a time. You’ll need to include all the necessary fields required for users to create new records.
-
-
The Data Form is added to your site page.
Suggested next steps
Once you create a Data View, you can start customizing it using the Data View tools and WYSIWYG formatting tools in SharePoint Designer 2010. You can add and remove columns, filter data, sort and group fields, apply conditional formatting, and much more. Using the WYSIWYG tools, you can change the table overall layout, add graphics, format text, and much more. Learn more about customizing list and data views in the See Also section.
Important: When working with forms, in particular, you may need to customize the form by adding descriptive text in the column headers, explaining what data input is required for certain fields. If, for example, you’re working with an SQL database as a data source, it may require a number value for a particular field. If users enter a text value instead, they’ll receive an error message when they try to save the form. As such, you should add descriptive text beside any field that has a specific requirement for data input.


