
Content types are a core part of the content management capabilities in Microsoft SharePoint 2010 Products. Content types allow organizations to effectively organize, manage, and handle content in a SharePoint site or site collection. By creating and defining content types for certain kinds of business documents and business processes, users can better manage their information with consistency and efficiency across the organization.
This article explains what content types are, how to create and customize them, and how to apply them to a list or library using Microsoft SharePoint Designer 2010.
For an in depth explanation of content types and how to use them in SharePoint Foundation 2010and Microsoft SharePoint Server 2010, see the topics in the See Also section.
In this article
Overview of content types
In the course of a single project, a business might produce several different kinds of content, for example, proposals, legal contracts, statements of work, and product design specifications. A business might want to collect and maintain different kinds of metadata about each kind of content. Metadata might include an account number, project number, or project manager, for example. Although documents might be stored together because they are related to a single project, they can be created, used, shared, and retained in different ways.
SharePoint includes content types that can be used to define different sets of data, documents, and processes in the same way. Each content type can be seen as a template that you apply to a SharePoint list or library, and this applies a set of attributes to every item in that list or library. You can even apply multiple content types to the same list or library and as such apply a combination of attributes to the items in the list.
By using content types effectively, you can ensure that whole categories of business documents and processes are handled consistently and efficiency across your organization.
What you can manage with content types
Content types are used to store a common set of attributes, which can then be applied to the items in a list or documents in a library. So rather than set these attributes up individually for every list and library across a site, you can define them in a content type and then apply the content type to each list or library.
Content types can store the following attributes:
-
Columns — You can create site columns containing a single line of text, a date and time, a choice list, and so on and store these columns in a content type. By storing them in a content type, you can apply them to any list or library on the site or site collection and those columns will appear in that list or library.
-
Workflows — You can associate existing workflows in SharePoint as well as custom workflows you create in SharePoint Designer 2010 with a content type. Once you associate a workflow with a content type, and then associate the content type with a list or library, it becomes available to every item or document checked into that list or library.
-
Custom forms — You can associate a custom new form, edit form, or display form with a content type. You can use the form building tools in SharePoint Designer 2010 or use Microsoft InfoPath 2010. Once the content type is associated with a list, users will see your forms when they create, edit, and view list items and library documents.
-
Document template — For document libraries, you can specify a document template to be used for all documents uploaded to that library. This provides a consistent look and feel for every document checked into the library that has the associated content type.
-
Document conversions — For document libraries, you can enable a conversion service that converts documents into Web pages and other formats. You can specify conversion settings in a content type.
-
Content type publishing Content type publishing — You can make the content type available for download for every Site Collection that uses this content types from this location.
-
Document Information Panel settings — The Document Information Panel displays in Microsoft Office 2010 client applications like Word, Excel, and PowerPoint for documents stored in a library. You can manage these settings in a content type.
-
Information management policies — If information management policies have been created for the site as site collection policies, you can apply them to individual site content types and then apply the content type to a list and library.
Note: Indicates features supported by SharePoint Server 2010.
Site content types and list content types
There are two kinds of content types that you can use depending on whether you want to use them in lists and libraries across multiple sites or in a specific list or library on a single site.
-
Site content types — Content types are first defined for a site in the Site Content Type Gallery. Content types that are defined at the site level are called site content types. Site content types are available for use in any subsite for which they have been defined. For example, if a site content type is defined for the top-level site in a site collection, it becomes available for use in lists and libraries across all sites in that site collection.
-
List content types — Site content types can be added individually to lists or libraries and customized for use in those lists or libraries. When a site content type is added to a list or library, it is called a list content type. List content types are children of the site content types from which they are created. List content types can make your document libraries and lists more flexible, because a single list or library can contain multiple item types or document types, each of which can have unique metadata, policies, or behaviors.
Content type inheritance
There are two kinds of content types that you can use depending on whether you want to use them in lists and libraries across multiple
Content types are built on a hierarchical-based inheritance model where every new content type is based on an existing content type. You never create content types from scratch. Instead, you use the default set of content types as is or create a new content type based on one of these content types.
Content types have the following key attributes that make them a powerful tool for managing content in your organization.
-
Content types are organized into a hierarchy — SharePoint organizes content types into a hierarchy that allows one content type to inherit its characteristics from another content type. This structure allows you to handle whole categories of data and documents consistently across the organization while allowing individuals to customize these attributes for particular sites or lists.
-
New site content types are based on parent content types — When you create a new custom site content type in the Site Content Type Gallery for a site, you start by selecting an existing parent site content type as your starting point. The new site content type you create inherits all of the attributes of its parent site content type, such as its columns, workflows, and document templates. After you create the new site content type, you can make changes to it, such as adding or removing columns.
-
Child site content types inherit from the parent content type — Content types that you create are based on a parent content type and thus inherit the attributes of that parent content type. An example of a child content type would be a list content type, based on a parent content type that you apply to a list or library. Changes made directly to the child list content type do not affect the parent content type on which it is based. When the parent content type is updated, you can choose whether child content types should inherit those changes. When you update all content types that inherit from a parent content type, all of the settings on the page are also updated for content types that are children of the one you are changing. This update overwrites any previous customizations to the list and site content types that inherit from the parent, unless they are marked as read-only.
Knowing how inheritance works is important to know if you add a site content type to a list or library and then start customizing the attributes of the content type. These changes will not be reflected in the parent content type. Also, if the list content type is not marked as read-only, your customizations could be overwritten by changes made to the parent content type. (If the list content type has been customized with additional attributes that the parent content type does not have, such as extra columns, these customizations will not be overwritten.)
Create, edit, and delete content types
You can create new site content types. You can then add these content types to lists and libraries at the site level on which you created them, in addition to lower-level sites. For example, a site content type that you create at the top-level site is available to lists and libraries on all sites in the site collection. Content types that are created at a lower-level site are not available to higher-level sites.
To create site content types for a site, you must have Full Control for that site – by default, this means you must be in the Owners group. To create site content types for the top-level site in a site collection, you must be a site collection administrator.
Create a content type
To create a new site content type, open your site in SharePoint Designer 2010 and perform the following steps.
-
In the Navigation pane, click Content Types.
-
On the Content Types tab, in the New group, click Content Type.
-
The Create a Content Type dialog box opens.
-
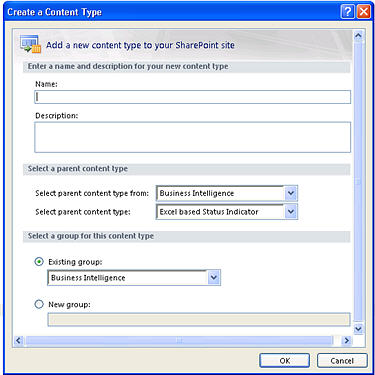
Type a name for the list in the Name field.
-
Type a description for the list in the Description field.
-
In the Select parent content type from list, select the group from which you want to select the parent content type for your new content type. This list contains all the Site Content Type groups used in the current site.
-
In the Select parent content type list, select the parent content type that you want to base your content type on. The list of parent content types differs depending on the Site Content Type group that you selected from the Select parent content type from list.
-
To create the new content type in an existing group, choose Existing group and then specify the group you want to use.
Or, to create a new group for the content type, choose New group and type a name for the group in the box provided.Note: Choose or type _Hidden if you don’t want the content type to be used by others
-
Click OK to create the new content type.
The new content type appears in the list of content types in SharePoint Designer 2010, under the group you choose above.
Edit a content type
When you delete a site type from a list or library, users will no longer be able to add new instances of that site content type to lists or libraries. Deleting a site content type does not remove any instances of that site content type that were previously associated with lists or libraries and that now exist as list content types, nor does it delete items that were created from the content type.
For more information on editing content types, see the topics in the See Also section.
To edit an existing content type, open your site in SharePoint Designer 2010 and perform the following steps.
-
In the Navigation pane, click Content Types.
-
Scroll through the list of content types and click the one you want to edit.
Note: Most of the content types in the list are likely inherited from a parent site and as such, they need to be edited directly from that site. Only those content types created for this site can be edited from here. Use the Source column to determine which content types were created for this site.
The summary page for the content type displays.
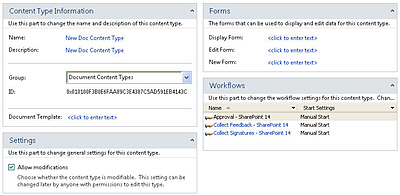
-
From here, you can use the summary page and the ribbon to customize the content type as described in the following sections and in the Next Steps.
-
Click Save in the Quick Access Toolbar or close the summary page and click Yes to save changes.
Change the title, description, and group
The title, description, and group affect how the content type appears in the gallery of content types in SharePoint Designer 2010 and SharePoint in the browser.
To change your content type title, description, and group, open your site in SharePoint Designer 2010 and perform the following steps.
-
In the Navigation pane, click Content Types.
-
Scroll through the list of content types and click the one you want to edit.
Note: Most of the content typed in the list are likely inherited from a parent site and as such, they need to be edited directly from that site. Only those content types created for this site can be edited from here. Use the Source column to determine which content types were created for this site.
-
On the summary page, under Content Type Information, perform the following steps:
-
To change the name, click the hyperlinked text beside Name and type a new name.
-
To change the description, click the hyperlinked text beside Description and type a new description.
-
To change the group used for the content type, click the pull-down menu beside Group and choose a different group.
Note: Choose type _Hidden if you don’t want the content type to be used by others.
-
-
Click Save in the Quick Access Toolbar or close the summary page and click Yes to save changes.
Change the associated document template
You can associate a document template with document content types (or any content type that is derived from the parent document content type). By associating a document template with a content type, you can ensure that all new documents created in the document library have a consistent look and feel because they’re based on the same document template.
To change the associated document template for a document content type, open your site in SharePoint Designer 2010 and perform the following steps.
-
In the Navigation pane, click Content Types.
-
Scroll through the list of content types and click the one you want to edit.
Note: Most of the content types in the list are likely inherited from a parent site and as such, they need to be edited directly from that site. Only those content types created for this sire can be edited from here. Use the Source column to determine which content types were created for this site.
-
On the summary page, under Content Type Information, click the hyperlinked text beside Document Template and type the URL for the location of the document template you want to use.
Note: Document templates are stored in the default site resource location http://Server Name/Site/Document Library Name /Forms/Content Type Name/ or a resource list of library set up specifically the for document templates. The URL can be relative to a location on the site or the resource folder. For example, a URL relative to the site would be <Server Name>/Site/Library Name/Forms/Docname.doc, and a URL relative to the resource folder would be simply Docname.doc.
-
When finished, click Save in the Quick Access Toolbar or close the summary page and click Yes to save changes.
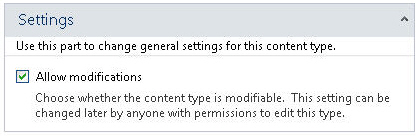
Make the content type read-only
To prevent others from making changes to a content type that was added to a list or library, you can make a list content type read-only. If you make it read-only, this prevents the list content type from inheriting any changes that are made to the parent site content type.
To make a content type read-only, open your site in SharePoint Designer 2010 and perform the following steps.
-
In the Navigation pane, click Content Types.
-
Scroll through the list of content types and click the one you want to edit.
Note: Most of the content types in the list are likely inherited from a parent site and as such, they need to be edited directly from that site. Only those content types created for this site can be edited from here. Use the Source column to determine which content types were created for this site.
-
On the summary page, under Settings, uncheck the box Allow modifications.
-
Click Save in the Quick Access Toolbar or close the summary page and click Yes to save changes.
Delete the site content type
When you delete a site content type, you remove it from the site content type gallery, preventing others from using it. Deleting a content type will not delete any content (documents, lists, libraries, workflows, etc.) associated with it. Before you can delete a site content type, you must first remove it from any lists or libraries it is associated with.
To delete an existing content type, open your site in SharePoint Designer 2010 and perform the following steps.
-
In the Navigation pane, click Content Types.
-
Scroll through the list of content types and click the one you want to delete.
Note: Most of the content types in the list are likelt inherited from a parent site and as such, they need to be edited directly from that site. Only those content types created for this site can be edited from here. Use the Source column to determine which content types were created for this site.
-
On the Content Type Settings tab, in the Edit group, click Delete.
Note: If you see the message “The content type is in use,” that means it is being used by a list or library on the site. You must first remove in from the list or library before proceeding.
-
Click Yes to confirm the deletion.
This returns you to the content type gallery, where you no longer see your content type.xxx
Add columns to a content type
One of the most powerful attributes of a content type is its ability to manage site columns across an organization. A site column is a reusable column definition that you can use to assign metadata to lists and libraries across a site collection. The site column itself can be one of several types, such as a line of text, a date, a number, a lookup, and so on.
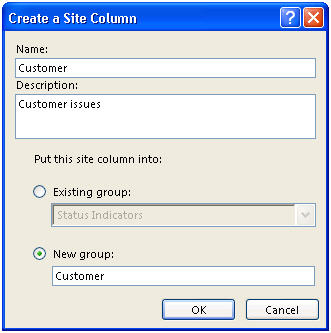
For example, you might create a site column called “Customer” and apply it to all of the lists and libraries on your site where customer information is required. You would do this by adding the site column to a content type and then applying the content type to the necessary lists and libraries.
Customizing columns in a content type includes creating the new site column, adding it to a content type, making it required, optional, or hidden for the content type, and removing it. To create a site column, you open it directly from the site columns gallery, not from the content type.
Create a new site column
To add new columns to a site content type using SharePoint Designer 2010, you must first create the site column. In the next steps, you’ll add the column to a site content type.
Open your site in SharePoint Designer 2010 and perform the following steps.
-
In the Navigation pane, click Site Columns.
-
On the Columns tab, in the New group, click New Column.
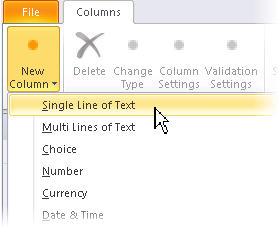
-
Choose the type of column you want to create (Single Line of Text, Choice, Number, etc.).
-
The Create a Site Column dialog box displays.
-
Type a column name in the Name field.
-
Type a column description in the Description field.
-
Choose one of the groups in the Existing group list or click the New group and type a name for a new group for this column.
Note: Groups are used to organize site columns in the site column gallery so that they’re easier to find when you add them to a content type.
-
Click OK to close the dialog and create the site column.
Your column appears in the site column gallery under the group you chose.
Add an existing column to a site content type
To add a site column that already exists to a content type, open your site in SharePoint Designer 2010 and perform the following steps.
-
In the Navigation pane, click Content Types.
-
Scroll through the list of content types and click the one you want to edit.
Note: Most of the content types in the list are likely inherited from a parent site and as such, they need to be edited directly from that site. Only those content types created for this site can be edited from here. Use the Source column to determine which content types were created for this site.
-
On the Content Type Settings tab, in the Edit group, click Edit Columns.
-
On the Columns tab, in the New group, click Add Existing Site Column.
-
In the Site Columns Picker dialog box, select the site column you want to add to your content type.
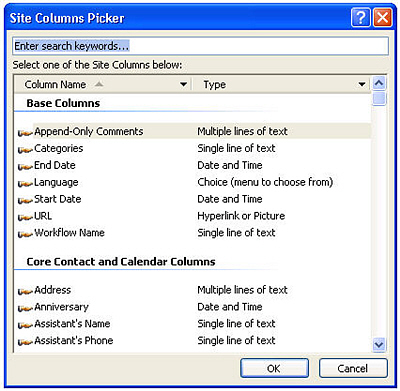
-
Click OK to add the column.
Repeat these steps for each column you want to add to the content type. -
Click Save in the Quick Access Toolbar or close the content type editor and click Yes to save changes.
Make a column required, optional, or hidden
To make a site column required for a content type, open your site in SharePoint Designer 2010 and perform the following steps.
-
In the Navigation pane, click Content Types.
-
Scroll through the list of content types and click the one you want to edit.
Note: Most of the content types in the list are likely inherited from a parent site and as such, they need to be edited directly from that site. Only those content types created for this site can be edited from here. Use the Source column to determine which content types were created for this site.
-
On the Content Type Settings tab, in the Edit group, click Edit Columns.
-
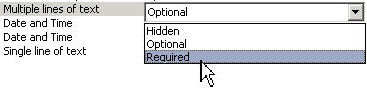
Select the column you want to edit, and then click its value in the Property column until you see the drop-down menu.
-
Choose the desired option for the column:
-
Hidden: Hides the column from users. Typically used for Lookups and other columns that serve functional purposes on your site.
-
Optional: Makes the column optional for users. Typically used for text columns containing a title, description, and so on.
-
Required: Makes the column required so that users must provide a value when editing the items in a list or library.
-
-
Click Save in the Quick Access Toolbar or close the content type editor and click Yes to save changes.
Deleting a column in a content type
When you delete a column in a content type, you’re removing it from the content type. You’re not actually deleting the site column.
To delete a column in a content type, open your site in SharePoint Designer 2010 and perform the following steps.
-
In the Navigation pane, click Content Types.
-
Scroll through the list of content types and click the one you want to edit.
Note: Most of the content types in the list are likely inherited from a parent site and as such, they need to be edited directly from that site. Only those content types created for this site can be edited from here. Use the Source column to determine which content types were created for this site.
-
On the Content Type Settings tab, in the Edit group, click Edit Columns.
-
Click the name of the column that you want to delete.
-
Click Delete in the Edit group of the Columns tab.
The column is removed from the list of columns for the content type. -
Click Save in the Quick Access Toolbar or close the content type editor and click Yes to save changes.
Next steps
Once you’ve created and customized a content type with the desired settings and columns, your next steps might include:
-
Apply the content type to a list or library — When you apply a content type to a list or library, you associate all of the columns, templates, workflows, and other attributes of the content type with the list or library.
-
Associate list forms with the content type — You can associate a custom new form, edit form, and display form with a content type. Use the form building tools in SharePoint Designer 2010 or use Microsoft InfoPath 2010 to create the custom forms. Once you associate the content type with a list or library, users will see your custom forms when they create, edit, and view items in the list or library.
-
Associate workflows with the content type — You can associate existing workflows in SharePoint as well as custom reusable workflows you create in SharePoint Designer 2010 with a content type. Once you associate a workflow with the content type, and then associate the content type with a list or library, the workflow becomes available to every item or document in the list or library.
-
Use the Administration Web Page to further customize the content type — In addition to customizing your content type in SharePoint Designer 2010, you can open the Administration Web Page and further customize the content type, such as specifying how document conversions take place, changing the Document Information Panel settings, specifying Information management policies, and more.
Learn more about these tasks in the See Also section.


