
An event is an activity that lasts 24 hours or longer. Examples of a events include trade shows, seminars, and vacations.
By default, events and annual events don’t block your calendar and show your time as busy when viewed by other people. The block of time for an all day event is typically shown as free.
Create an event
-
In the Calendar, select New Appointment.
You can also select New Items > All Day Event. -
Enter a description in the Subject box and optionally, add a Location.
-
Use the calendar drop-down boxes next to Start time and End time to select the date of your event. To turn your appointment into an all day event, check the All day event box.
Note: You can create an all day event that spans multiple days. -
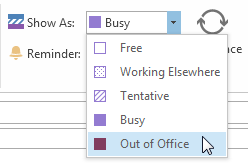
To indicate to people who are viewing your calendar that you are out of office instead of free, in the Options section of the ribbon, click Out of Office in the Show As list.
-
By default, all day events are created with a reminder set to occur 0.5 days before the event. This means that an event that is set for April 15 will generate a reminder on April 14 at noon. If you don't want to set a reminder, select None in the Reminder drop-down.
-
Click Save and Close.
Set an event to recur
-
Open the event that you want to set to recur.
-
In the Options section of the ribbon, click Recurrence.
-
Click the recurrence frequency — Daily, Weekly, Monthly, Yearly — that you want, and then select the options for the frequency.
-
Click OK, and then click Save and Close.
Make an event private
In a Microsoft 365 organization or an Exchange organization, others within your organization can see your calendar details. Marking an event private hides those details from everyone other than you and any others in your organization to whom you've granted read permissions to your calendar or to your mailbox. For example, marking an event private will not hide its details from anyone with delegate access to your calendar or who has Send As permissions for your mailbox.
-
Create or open the event that you want to make private.
-
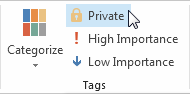
In the Tags section of the ribbon, click Private.
Important: You should not rely on the Private feature to prevent other people from accessing the details of an event, contact, or task. To make sure that other people can’t read the item that you mark as private, don’t grant them read permission to your Calendar, Contacts, and Tasks folders. A person who is granted read permission to access your folders can use programmatic methods or other email applications to view the details of a private item. Use the Private feature only when you share folders with people whom you trust.


