
You can use Publisher to create and customize a newsletter.
Create a newsletter
-
Click Built-in > Newsletters and scroll down to find the Newsletters category.
(In Publisher 2010, click Newsletters under Most Popular.)
-
Select a template, and under Customize, click the color scheme and font scheme that you want.
-
Click the business information set that you want, or create a new one.
-
Under Options, choose One-page spread (if you plan to print your newsletter one or double-sided) or Two-page spread (if you want to work with a design that includes facing pages and you plan to print your newsletter on tabloid-sized paper).
-
Select the Include customer address check box if you want the customer address on the newsletter itself for mailing rather than on a separate envelope.
-
Click Create.
-
Change the template to include things that you’ll want to reuse in future newsletters, like a title and logo.
-
Save your new template and, from the Save As dialog that appears, navigate to the location and folder you want, choose Publisher Template in the Save as type box.
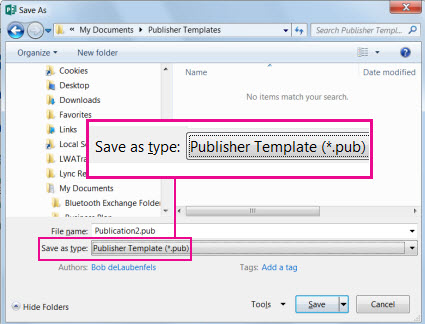
Tip: You can tell Publisher where you always want to save your templates. If you got to File > Options > Save and enter the path to the folder you want to contain all your templates in Default personal templates location. If you do this a new tab, named Custom, will also be available when you are creating a new publication and this tab will contain all your personal templates.
If you'd like to change your newsletter, you can add pages to a newsletter or Remove pages from a newsletter. You can also Print a newsletter on 11x17 paper or avoid paper and postage altogether by creating and sending email newsletters.
Make design changes to the layout
-
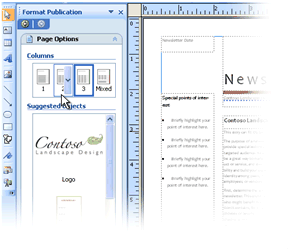
On the Page Design tab, click Options, and then click the number of columns that you want on each page.
On the inside pages (for example, pages 2 and 3 of a 4-page newsletter), the Select a page to modify option appears. Click Left inside page or Right inside page, and then, for each page, click one of the following formats: 3 stories, Calendar, Order form, Response form, or Sign-up form.
Work with the text
If you already created a business information set, your business contact information and logo will automatically replace some of the placeholder text.
Note: Business information does not automatically replace the placeholder text in templates that you download from Office Online. To replace the placeholder names, addresses, and logos with your business information, click the smart tag button 
-
For each block of placeholder text, do one of the following:
-
Select the placeholder text, and then type.
-
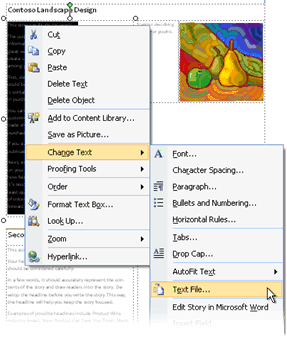
Right-click to select the placeholder text, point to Change Text on the shortcut menu, click Text File, click the file that contains the text that you want to use, and then click OK.
Note: In most cases, the text resizes automatically to fit within the text box. For example, if an article title is long, the text is automatically reduced in size so that it will fit.
-
-
Adjust the text size. Do one of the following:
-
To prevent the text from resizing automatically to fit in a text box that is not connected to other text boxes, click the text box, and on the Text Box Tools Format tab, click Text Fit >Do Not AutoFit.
-
To change the font size manually, select the text, and then click a new font size in the Font Size list on the Text Box Tools Format tab.
-
For more information about working with text boxes, see Fit text in a text box.
Work with the pictures
-
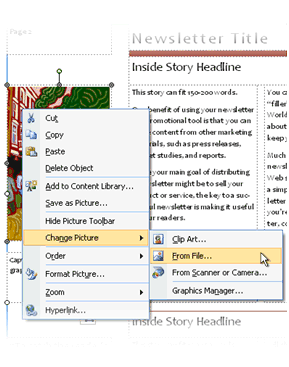
Right-click the placeholder picture, point to Change Picture, click Change Picture, choose a new picture from one of the available sources in the Insert Pictures dialog box, and then click Insert.
Tip: If you don't see Change Picture when you right-click, click the placeholder picture once until you see white circles surrounding the picture's frame. Click the picture again until you see gray circles with x's in them surrounding the picture itself, and then right-click the picture.
For more information about working with pictures, see Tips for working with images.
See also
Tips for writing effective marketing publications
Tips for printing your publication
Find, create, or change a template in Publisher
Create your newsletter
Choose and customize the newsletter design
-
Start Publisher.
-
In the Publication Types list, click Newsletters.
-
Under Newsletters, click Newer Designs or Classic Designs.
-
Do one of the following:
-
Click the preview image for the newsletter design that you want.
The Profile newsletter template is the starting point for the newsletter that is shown in this article.
-
Search for additional newsletter template designs on Microsoft Office Online.
How?
Important: You must first be connected to the Internet before you search Office Online for templates.
-
In the Search for templates box, type a keyword. For example, type newsletters. In the list, click On Microsoft Office Online, and then click the green Search button.
Note: The Search for templates box is above the Newsletters heading.
-
Click the template that you want.
-
-
-
Choose the options that you want for customizing your design.
Note: If you use a template that you downloaded from Office Online, you cannot customize the design until you open the publication.
Do any of the following:
-
Under Customize, click the color scheme and font scheme that you want.
-
Under Customize, click the business information set that you want, or create a new one.
-
Under Options, click One-page spread if you plan to print your newsletter one-sided, or click Two-page spread if you want to work with a design that includes facing pages and you plan to print your newsletter two-sided or on tabloid-sized paper.
-
Under Options, select the Include customer address check box if you want the customer address on the newsletter itself for mailing rather than on a separate envelope.
-
-
Click Create.
Make design changes to the layout
-
In the Page Options task pane, under Columns, click the number of columns that you want on each page.
On the inside pages (for example, pages 2 and 3 of a 4-page newsletter), the Select a page to modify list appears. Click Left inside page or Right inside page, and then, for each page, click one of the following formats: 3 stories, Calendar, Order form, Response form, or Sign-up form.
To learn more about about working with columns, see Set up text columns by using layout guides.
-
Under Suggested objects, click an option to insert it on the page.
Work with the text
If you already created a business information set, your business contact information and logo will automatically replace some of the placeholder text.
Note: Business information does not automatically replace the placeholder text in templates that you download from Office Online. To replace the placeholder names, addresses, and logos with your business information, click the smart tag button
-
For each block of placeholder text, do one of the following:
-
Select the placeholder text, and then type.
-
Right-click to select the placeholder text, point to Change Text, click Text File, click the file that contains the text that you want to use, and then click OK.
Note: In most cases, the text resizes automatically to fit within the text box. For example, if an article title is long, the text is automatically reduced in size so that it will fit.
-
-
Adjust the text size. Do one of the following:
-
To prevent the text from resizing automatically to fit in a text box that is not connected to other text boxes, click the text box, point to AutoFit Text on the Format menu, and then click Do Not AutoFit.
-
To change the font size manually, select the text, and then click a new font size in the Font Size list on the Formatting toolbar.
For more information about working with text boxes, see Fit text in a text box.
-
For information about how to personalize your newsletters based on recipient, see Create a mail merge and Tips for personalizing your publication.
Work with the pictures
-
Right-click the placeholder picture, point to Change Picture, and then click the picture source.
Tip: If you don't see Change Picture when you right-click, click the placeholder picture once until you see white circles surrounding the picture's frame. Click the picture again until you see gray circles with x's in them surrounding the picture itself, and then right-click the picture.
-
Choose the new picture, and then click Insert.
For more information about working with pictures, see Tips for working with images.
Distribute your newsletter
After you create a publication in Office Publisher 2007, you have several options for distributing it:
-
Send the newsletter in an email message, either displayed in the body of the message or included as an attachment, such as a PDF file or XPS file.
-
To learn about sending email publications, see Use Publisher to create and send email newsletters.
-
To find out how to save your newsletter as a PDF or XPS file, see Save As or convert a publication to .pdf or .xps using Publisher.
-
For information about using email as part of your marketing campaign, see Tips on e-mail marketing.
-
-
Publish the newsletter on a website.
-
To learn how to publish newsletter editions as PDF file or XPS files and link to them from a page on your website, see Save Publisher files in formats that others can view.
-
-
Package all its component files to send to a commercial printer.
-
For a list of the most important issues to pay attention to, see Tips for preparing your publication for commercial printing.
-
When it is time to prepare your publication for handing off to the printer, see Use the Pack and Go Wizard to save a file for commercial printing.
-
-
Print the newsletter on a desktop printer.
If you are printing only a few copies, you can print your newsletter on your desktop printer. If your printer supports printing on 11-by-17-inch (or tabloid) paper, you can create a folded newsletter that has 8.5-by-11-inch pages. You can use this technique with any publication size that is half that of the paper size.
Set up the newsletter to print on a desktop printer
-
Open the newsletter publication that you want to print as a folded booklet.
-
In the Format Publication task pane, under Newsletter Options, click Change Page Size.
-
In the Page Setup dialog box, under Blank Page Sizes, click Booklets, and then click Letter Booklet 8.5 x 11".
-
Click OK.
-
On the File menu, click Print Setup, and then click the Publication and Paper Settings tab.
-
In the Printer name list, select a printer that can print on 11-by-17-inch or tabloid paper.
-
Under Paper, verify that the 11-by-17-inch or tabloid paper size is selected.
-
Under Orientation, verify that Landscape is selected.
-
Under Printing options, click Booklet, side-fold.
If Booklet, side-fold is not an available option, the selected paper size may be too small for the pages. Make sure that the paper size is twice the page size.
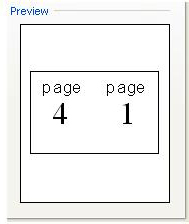
Under Preview, you can see how two of the pages will appear when they are printed on one tabloid sheet.
-
Click OK.
Print the newsletter on a desktop printer
-
On the File menu, click Print Preview to review your work, and then click Close.
-
On the File menu, click Print, and then click the Publication and Paper Settings tab.
-
If your printer supports two-sided printing (or duplex printing), verify that Two-sided or Two-sided, flip short side is selected under 2-sided printing options.
-
Under Copies, enter the number of copies that you want to print.
Note: If you are printing multiple copies of a newsletter that requires multiple sheets of paper, select the Collate check box to keep the pages in order in each copy of your printed publication.
-
Under Print range, click All pages.
-
Select any other options that you want, and then click Print to print the publication.
If you are printing on tabloid-sized paper, Office Publisher 2007 prints the first and last pages on one side of the sheet of paper, the second and next-to-last pages on the other side of the sheet, and so on, as shown here.

If your computer doesn't support two-sided printing, the Publisher Printer Setup Wizard starts and guides you through printing a copy of your publication in the right order so that the first and last pages are printed on one sheet of paper, the second and next-to-last pages on another sheet, and so on. When you photocopy the pages back to back, fold them, and then staple or bind them together, they will be in the right order.
See also
Tips for printing your publication
Tips for preparing your publication for commercial printing
Use the Pack and Go Wizard to save a file for commercial printing


