When creating a Microsoft list, you can save time by importing an existing Excel spreadsheet. This method converts the table headings to columns in the list, and the rest of the data is imported as list items. Importing a spreadsheet is also a way to create a list without the default Title column.
Important: Creating a list from an Excel spreadsheet is not available in the GCC High and DoD environments.
Another method of moving data into SharePoint is to export a table directly from Excel. For more info, see Export an Excel table to SharePoint. For more info on SharePoint supported browsers, see Plan browser support in SharePoint Server.
Create a list based on a spreadsheet
-
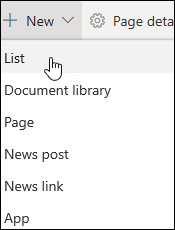
From the Lists app in Microsoft 365, select +New list or from your site's home page, select + New > List.
-
In Microsoft Teams, from the Files tab at the top of your channel, select More > Open in SharePoint, and then select New > List.
-
-
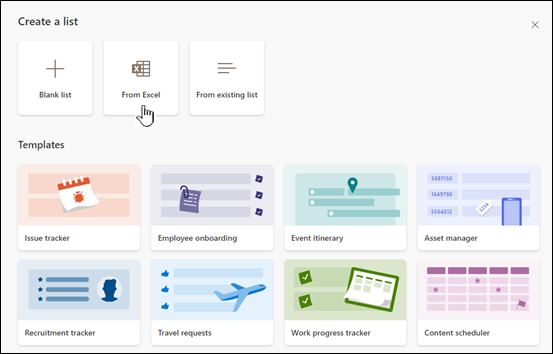
On the Create a list page, select From Excel.
-
Choose Upload file to select a file on your device, or Choose a file already on this site.
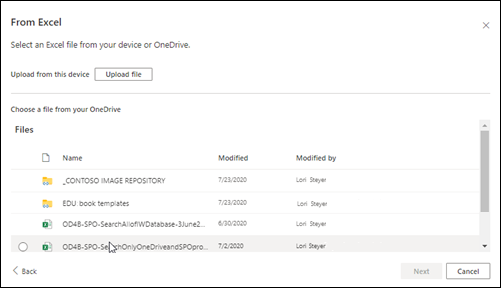
If you upload from your device, the Excel file will be added to the Site Assets library of your site, which means other people will have access to the original Excel data.
Note: If the Upload file button is greyed out, you don't have permission to create a list from a spreadsheet. For more information, see your organization's site admin.
-
Enter the name for your list.

-
(Optional) Check Show in site navigation to display the list on your site's Contents page.
-
Click Create.
Notes:
-
If the spreadsheet file you're importing doesn't have a table in it, follow the on-screen instructions to create a table in Excel, and then import the table to your list. If you get stuck creating a table, search for "Format as Table" at the top of your file in Excel.
-
You can use tables with up to 20,000 rows to create a list.
-
Create a list based on a spreadsheet in SharePoint 2016 and 2013
Note: When you're using a site template, it is no longer possible within SharePoint to create a list from an Excel workbook. However, you can still achieve the same thing by exporting data to SharePoint from Excel, as described in Export an Excel table to SharePoint.
-
On the site where you want to add a spreadsheet based list, select Settings

-
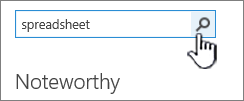
In the Find an app field, enter spreadsheet, and then select the search icon

-
In the search results page, select Import Spreadsheet.
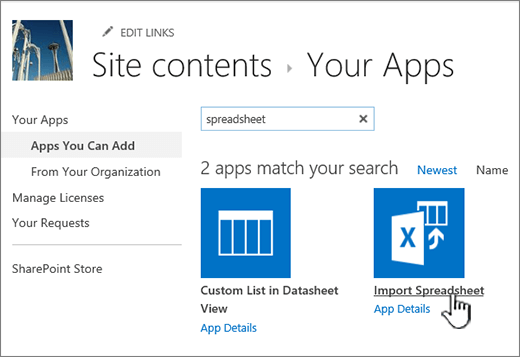
-
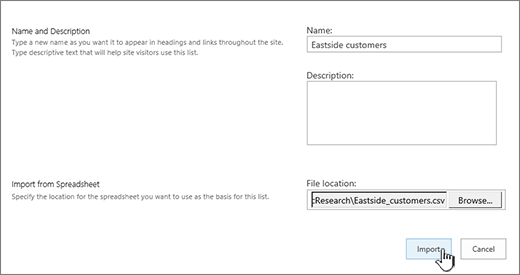
In the New app page, enter a Name for the list.
The name appears at the top of the list in most views, becomes part of the web address for the list page, and appears in site navigation to help users find the list. You can change the name of a list, but the web address will remain the same.
-
Enter an optional Description.
The description appears underneath the name in most views. You can change the description for a list at any time using list settings.
-
Browse to or enter the File location of the spreadsheet. When done, select Import.
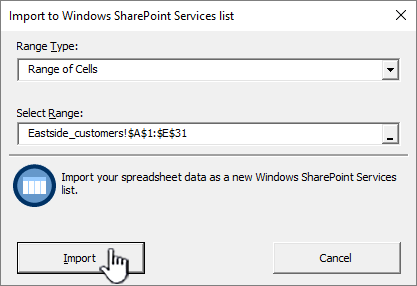
The spreadsheet opens in Excel, and the Import to Windows SharePoint Services List window appears.
-
In the Import to Windows SharePoint Services List window, select Table Range, Range of Cells, or Named Range. If you want to select a range manually, select Range of Cells, and then select Select Range. In the spreadsheet, select the upper left cell, hold down the Shift key, and select the lower right cell of the range you want.
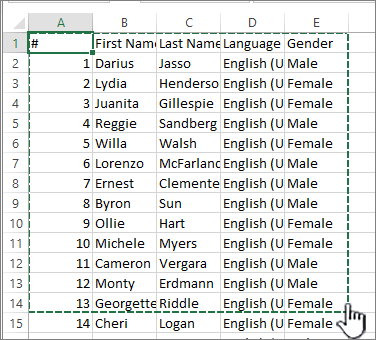
The range appears in the Select Range field. Select Import.
After you import a spreadsheet, check the columns of the list to make sure that the data was imported as you expected. For example, you may want to specify that a column contains currency instead of a number. To view or change list settings, open the list, select the List tab or select Settings

-
The spreadsheet data appears in a list in SharePoint.
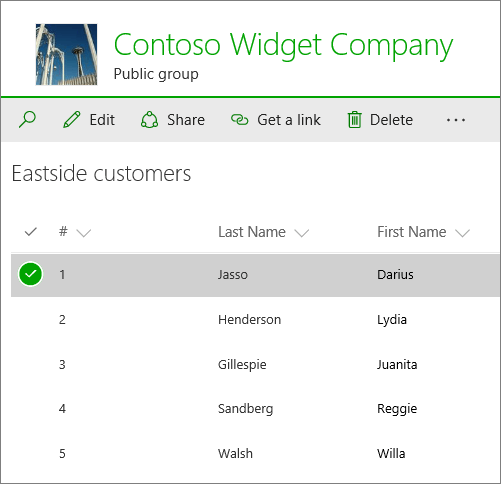
Important: Be sure to use a 32-bit web browser, such as Microsoft Edge, to import a spreadsheet, as importing a spreadsheet relies on ActiveX filtering. Once you import the spreadsheet, then you can work with the list in any SharePoint-supported browser.
Create a list based on a spreadsheet in SharePoint 2010
-
Select Site Actions


Note: A SharePoint site can be significantly modified. If you cannot locate an option, such as a command, button, or link, contact your administrator.
-
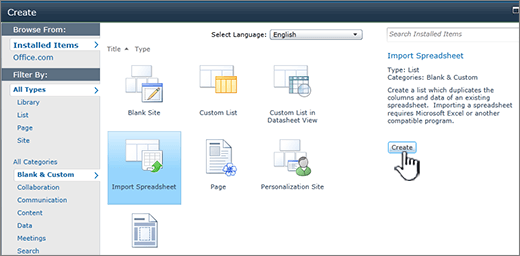
In SharePoint 2010, under All Categories, select Blanks & Custom, select Import Spreadsheet, and then select Create.
In SharePoint 2007, under Custom Lists, select Import Spreadsheet, and then select Create.
-
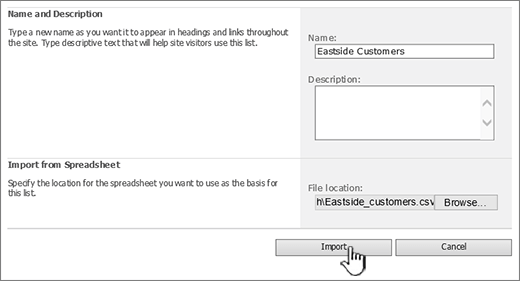
Enter the Name for the list. Name is required.
The name appears at the top of the list in most views, becomes part of the web address for the list page and appears in site navigation to help users find the list. You can change the name of a list at any time, but the web address will remain the same.
-
Enter the Description for the list. Description is optional.
The description appears underneath the name in most views. You can change the description for a list.
-
Browse or enter the File Location of the spreadsheet that you want to import, and then select Import.
-
In the Import to Windows SharePoint Services list dialog, select the Range Type, and in Select Range, specify the range in the spreadsheet that you want to use to create your list.
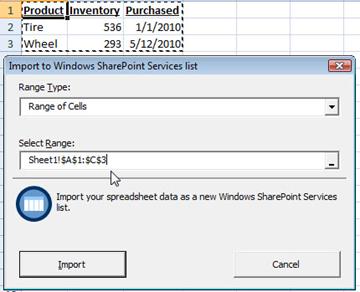
Note: Depending on your spreadsheet program, you may be able to select the range of cells that you want directly in the spreadsheet. A table range and a named range must already be defined in the spreadsheet for you to select it in the Import to Windows SharePoint Services list dialog.
-
Select Import.

After you import a spreadsheet, check the columns of the list to make sure that the data was imported as you expected. For example, you may want to specify that a column contains currency instead of a number. To view or change list settings, open the list, select the List tab, or select Settings, and then select List Settings.
Important: Be sure to use a 32-bit web browser, such as Microsoft Edge, to import a spreadsheet, as importing a spreadsheet relies on ActiveX filtering. Once you import the spreadsheet, then you can work with the list in any SharePoint-supported browser.
The types of columns that are created for a list are based on the kinds of data that are in the columns of the spreadsheet. For example, a column in the spreadsheet that contains dates will typically be a date column in the SharePoint list.
All versions of SharePoint let you import a spreadsheet of data, though how you do it varies slightly between the versions. Examples here use Excel, but another compatible spreadsheet would work. If your spreadsheet program's native file format isn't supported, export your data to a comma delimited format (.CSV) and import using that file.
For more info about how to customize and add your imported list to a page or site, see Introduction to lists.
Note: Typically, the columns are set up on the SharePoint site based on the type of data that they contain. After you import a list, however, you should inspect the columns and data to make sure that everything was imported as you expected. For example, you may want to specify that a column contains currency rather than just a number. To view or change the list settings, open the list, and on the Settings menu, select List Settings.
Leave us a comment
Was this article helpful? If so, please let us know at the bottom of this page. If it wasn't helpful, let us know what was confusing or missing. Please include your version of SharePoint, OS, and browser. We'll use your feedback to double-check the facts, add info, and update this article.


