
Create a folder in a list when creating a view is not sufficient to group and/or manage your content in lists created in Microsoft SharePoint, the Lists app in Microsoft 365, or Teams.
Creating a folder in a list is similar to creating SharePoint libraries. But in lists, you cannot create a folder until the list owner or a user with design permissions turns on the ability to create a folder:
To turn on the ability to create a folder
-
Go to List settings > Advanced settings > Folders.
-
Under Make "New Folder" command available?, select Yes.
-
Select OK.
Create a folder in a list
By default, you use the New Folder command to create a folder in Microsoft 365 lists. However, the New Folder may not be available unless the list owner or administrator has turned on that feature.
-
Go to the SharePoint site containing the list where you want to add the folder.
Or in Microsoft Teams, from the Files tab at the top of your channel, select More > Open in SharePoint.
-
Select the name of the list on the Quick Launch bar, or select Settings

Note: Does your screen look different than this and you're using SharePoint? Your administrator may have SharePoint Classic experience set on the document library. If so, see Creating a folder in a SharePoint Classic experience list.
-
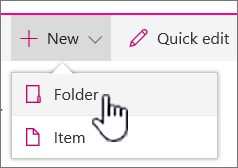
In the top toolbar, select the + New button, and then select Folder from the dropdown.
Note: If the + New folder command is not visible, you can turn it back on with at least owner or designer permissions. Select Settings
-
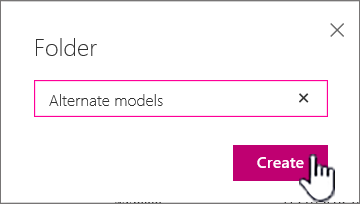
In the Folder dialog, enter a folder name in the field, and then select Create.
-
Note: To change the folder name, select the ellipses ... and then select Edit. Change the folder name, and click Save.
-
(Optional) You can invite people to share the folder. For more info, see Edit and manage permissions for a SharePoint list or library.
Tip: Consider using SharePoint views instead of folders, because they enable content to be filtered, grouped, and sorted in multiple ways. If you have a large list, a combination of views and folders might work best. To create views, see Create, change, or delete a view of a list or library.
Create a folder in a Classic experience list
To create a folder in SharePoint Classic experience, follow these steps.
Note: If the New Folder command is not available, you can turn it back on if you have at least owner or designer permissions. On the Library tab of the ribbon, select Library Settings, and then select Advanced settings. In the Folder section, make sure that the Yes option is selected for Make "New Folder" command available.
-
Navigate to the SharePoint site containing the list where you want to add the folder.
-
Select the name of the list on the Quick Launch bar, or select Settings

Note: Designers can modify the appearance and navigation of a site significantly. If you cannot locate an option, such as a command, button, or link, contact your administrator.
-
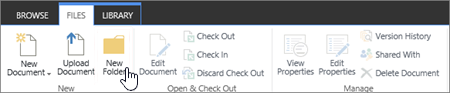
On the ribbon, select the Items tab, and in the New group, select New Folder.
Note: If the New Folder command is not available, you can turn it back on if you have at least owner or designer permissions. On the List tab of the ribbon, select List Settings, and then select Advanced settings. In the Folder section, make sure that the Yes option is selected for Make "New Folder" command available.
Note: To change the folder name later on, select the ellipses ... , select the ellipses ... in the dialog, and then select Rename. Change the folder name in the Name field, and then select Save.
-
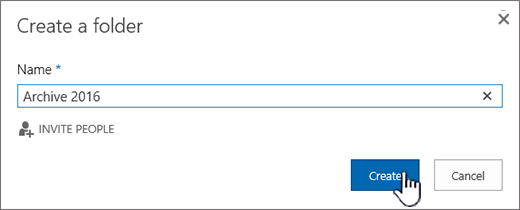
In the Create a new folder dialog, enter a folder name in the Name field, and then select Create.
Create a folder in a SharePoint Server 2016 or SharePoint Server 2013 list
A SharePoint list owner or a user with design permissions can determine whether the New Folder command appears by changing the advanced settings.
-
Go to the SharePoint site containing the list where you want to add the folder.
-
Select the name of the list on the Quick Launch bar, or select Settings
Note: Designers can modify the appearance and navigation of a site significantly. If you cannot locate an option, such as a command, button, or link, contact your administrator.
-
On the ribbon, select the Files tab, and in the New group, select New Folder.
Note: If the New Folder command is not available, you can turn it back on if you have at least owner or designer permissions. On the List tab of the ribbon, select List Settings, and then select Advanced settings. In the Folder section, make sure that the Yes option is selected for Make "New Folder" command available.
-
In the New Folder dialog, enter a folder name in the Name field.
In SharePoint Server 2016 you can optionally invite people to share the folder.
-
When done, select Create or Save.
Notes:
-
To change the folder name later on, select the ellipses ... , select the ellipses ... in the dialog, and then select Rename. Change the folder name in the Name field.
-
To quickly go to the next level up in the folder hierarchy, on the ribbon, select the List tab, and then select Navigate Up.
You might consider using SharePoint views instead of folders because they enable content to be filtered, grouped, and sorted in multiple ways. If you have a large list, a combination of views and folders might work best. To learn how to create views, see Create, change, or delete a view of a list or library.
Create a folder in a SharePoint 2010 list
By default, the New Folder command does not appear in lists. A SharePoint list owner or a user with design permissions for the list can determine whether the New Folder command appears by changing the advanced list settings.
-
Navigate to the SharePoint site containing the list for which you want to add the folder.
-
Select the name of the list on the Quick Launch bar, or select Site Actions, select View All Site Content, and then under the appropriate list section, select the name of the library.
Note: Designers can modify the appearance and navigation of a site significantly. If you cannot locate an option, such as a command, button, or link, contact your administrator.
-
On the ribbon, under the List Tools section, select the Items tab, and in the New group, select New Folder.
Note: If you have at least owner or designer permissions, you can turn on folders for a list. On the ribbon > List Settings > Advanced settings, select List. Under Make "New Folder" command available?, select Yes. To do this, you need to have at least owner or designer permissions.
-
In the New Folder dialog, enter a folder name in the Name field, and then select OK.
You might consider using SharePoint views instead of folders, because they enable content to be filtered, grouped, and sorted in multiple ways. If you have a large list, a combination of views and folders might work best. To learn how to create SharePoint views, see Create, change, or delete a view of a list or library.
If you're not sure which version of SharePoint you have, see Which version of SharePoint am I using?
Leave us a comment
Was this article helpful? Is there missing content? If so, please let us know what was missing or confusing at the bottom of this page. Please include your version of SharePoint, OS, and browser. We'll use your feedback to double-check the facts, add info, and update this article.


