
You can create and customize list views using the browser, or you can create views using SharePoint Designer 2010. In the browser, you can perform basic list view customization, like filtering, changing the sort order, and showing or hiding columns. Using SharePoint Designer 2010, you can perform this same level of customization and in addition, you can change the layout of the list, apply conditional formatting to the list, connect the list view to others lists, and much more.
List views created in the browser and list views created with SharePoint Designer 2010 are interchangeable. You can create the initial view in the browser and then customize it in SharePoint Designer 2010, and you can create the initial view in SharePoint Designer 2010 and then later customize it in the browser.
This article explains what list views are and how you create them using SharePoint Designer 2010.
In this article
What is a list view?
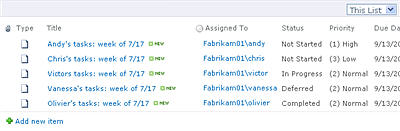
Every SharePoint list or library has at least one view associated with it. The view is a live, customizable display of the list items stored in the list as shown here.
With views, you can change the way a list appears in the browser. You can, for example, create a filter so that only certain items show up, create a custom sort order so that the most important items appear first, or add and remove list columns so that the list is easier to read.
Anytime you find yourself changing the appearance of a list to meet your needs, you should consider creating a view. When doing so, you can choose to customize the existing view or create new views, each serving a different purpose. The Announcements list, for example, contains one view by default that shows all of the items in the list; while the Tasks list contains several views by default, each serving a different purpose. There's a view for active tasks, tasks due today, tasks assigned to you, and so on. As a result, you can choose the view that best suits your needs, as shown here.

The view itself is a Web Part called an XSLT List View Web Part (XLV for short). This Web Part is stored on an ASPX page that is by default associated with a list or library on your site so that users are always taken to that page when they view the list or library in a browser. When you open a view in SharePoint Designer 2010, the view retrieves the list data as Extensible Markup Language (XML) and displays the data using Extensible Stylesheet Language Transformations (XSLTs). Here you see a list view as it appears in SharePoint Designer 2010.
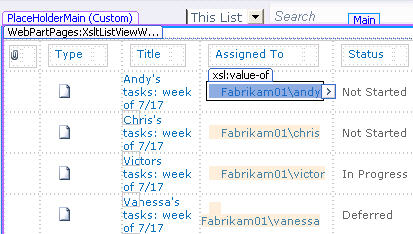
When you customize the view, SharePoint Designer 2010 inserts the necessary Extensible Stylesheet Language (XSL) into the page. If you’re unable to customize the view using the view editing tools in SharePoint Designer 2010, you can always edit the XSL directly in Code view.
In addition to creating a list view, you can use SharePoint Designer 2010 to create a standalone Data View that can read from any number of data sources, including SharePoint lists and libraries, databases, Web services, and server-side scripts. A data view can be created on any ASPX page and is typically used to bring data together in one place, for example, to create a dashboard on your team site. Unlike list views, Data Views can only be created and customized in SharePoint Designer 2010. Find more information about Data Views in the See Also section.
Create a list view
When you create a new list view in SharePoint Designer 2010, you create a new ASPX page with an XSLT List View Web Part on it, and this page is automatically associated with your list. You can make your view the default view that everyone sees when they browse to the list, or you can create an additional view that users can choose from when they browse to the list.
-
With your site open in SharePoint Designer 2010, click Lists and Libraries in the Navigation pane.
-
Click the desired list from the gallery, for example, Tasks.
-
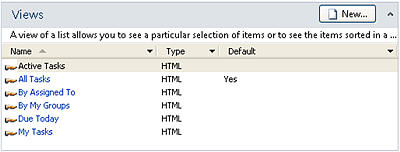
On the summary page, under Views, click New.
Note: Alternatively, you can click List View in the Ribbon on the List Settings tab.
-
In the Create New List View dialog box, specify a name for the view.

Note: The name that you specify will be used as both the title and the filename of the view.
-
To make this view the default that users see when they browse to this list, click Make this the default view.
If you don’t make this view the default view for the list, users will see your view listed as one of the available views to choose from.
-
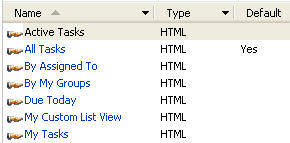
Click OK to create the new view and return to the summary page for your list where you will see your new view.
In the below illustration, you see a new view called My Custom List View alongside the other views associated with the list.
Repeat these steps to create multiple views for your list.
Suggested next steps
Once you’ve created a list view, you’re ready to start customizing the view. To customize an existing view, just click the view from the summary page, and this opens the ASPX page containing the view. When you select the view, you see several commands become available in the ribbon for customizing your view.
Here are some of the ways you can customize your list view in SharePoint Designer 2010.
-
Add or remove columns You can quickly and easily add, remove, or arrange columns in the view. For example, you may want to show only the title and the body fields for each list item to create a simpler view for users.
-
Filter data You can filter the data in a list by showing only the items that meet a certain criteria. For example, you may choose to show just the items that are due today in a Task list.
-
Sort and group You can sort or group the data in a view. For example, you may choose to rearrange items in a list so that they are viewed in alphabetical or numerical order.
-
Apply conditional formatting You can apply specific formatting to a view when the data meets certain conditions. For example, you can highlight in red all tasks that haven’t started yet.
-
Apply different view styles You can quickly and easily change the entire layout of a view by choosing a different view style. For example, you can choose a style where every other row is shaded.
-
Create a formula column You can create a calculated column that displays the result of a calculation of other columns in the view, similar to a spreadsheet. For example, you can multiply the unit price by the number of units in stock to display the total value of the items in a separate column.
-
Change the paging You can change the paging of the view. For example, you can display sets of 5 items or limit the view to 5 items.
-
Display data from multiple sources You can link two or more related data sources and display them in a single view. For example, you may want to show product categories from one list and product information from another list in the same view.
-
Use Asynchronous updates You can enable asynchronous updates (or AJAX) in a view so that changes to the list can be viewed immediately without having to refresh the entire page in the browser.
-
Add parameters You can create and pass parameters to a view. For example, you may want to pass a parameter from a user input menu and use it to change the way the view displays.
-
Use HTML, ASP.NET, and SharePoint controls You can bind these controls to the data source associated with your view. You can then allow users to change the appearance of the view based on these controls.
Find more information about these tasks and other ways to customize a view in the See Also section.


