
Note: This article contains information for SharePoint Server (on-premises) only. Not using SharePoint Server? Learn how to create a blog in modern SharePoint.
A blog is a Web site that enables you or your organization to quickly share ideas and information. Blogs contain posts that are dated and listed in reverse chronological order. People can comment on your posts, as well as provide links to interesting sites, photos, and related blogs.
Blogs posts can be created quickly, and they often have an informal tone or provide a unique perspective. Although blogs are frequently used for commentary on the Internet, they can be used in several ways in a corporate environment.
To see how to create blogs in SharePoint 2013 and 2016, see Video: Create and manage a blog to share information
In this article
Overview
A SharePoint blog is a site that contains lists and libraries, such as a list of blog posts, a list of other blogs, and a library for photos. Once you create a blog, you can set up categories, and then customize the blog settings.
This article gives an overview of some light customization you can do quickly.
Note: To create or customize a blog, you must have permission to create a site.
When you create a blog, you need to decide whether you want the blog to inherit permissions from the parent site or set up unique permissions manually. In most cases, you should set up unique permissions for the blog to ensure that you can manage its site settings, lists, and libraries independently of its parent site. For example, you might want to grant less restrictive permissions on your blog than on the parent site, such as enabling all authenticated users on your intranet to read and comment on the blog.
You can also create and customize a blog by using a Web design or editing program, such as Microsoft SharePoint Designer 2010.
Before you start adding content to your blog, you will want to make sure that your site, lists, and libraries are set up the way that you want. For example, you may want to edit the description of a list to help your readers understand its purpose, change permissions for the blog or the Posts list, or track versions of your blog posts so that you can restore a previous version of a post if necessary.
Once you've customized the settings for your blog, you can set up categories to help you organize your posts. Categories are especially helpful if you create blog posts about different subjects or for different purposes, such as current events, brainstorming for a special project, or a technology or hobby. When posts are organized by categories, people can more easily find the posts that fit their interests by clicking the appropriate category in the Categories list.
Create a blog
To create a blog, you must have permission to create sites. For more information, see your site owner or administrator.

-
Click Site Actions

-
In the Create dialog box, click the Blog site template.
-
In the Title box, type a name for your blog site.
The title appears in the navigation for every page in the site, such as the top link bar.
-
In the URL name box, type the last part of the Web address that you want to use for your blog site.
-
Do one of the following:
-
To quickly create your blog according to the default settings, including the same permissions as the parent site, click Create.
-
To customize some of the site settings, such as set unique permissions or change whether the site appears in the Quick Launch or the top link bar, select More Options.
-
In the Permissions section, do one of the following:
-
If you want to use the same permission and groups as the parent site, click Use same permissions as parent site.
-
If you want to set up unique permission for the blog, click Use unique permissions. If you select unique permissions, you'll have an opportunity to set up permissions after you finish entering the settings on the current page.
-
-
To display the top link bar from the parent site on pages in your blog, click Yes in the Navigation Inheritance section.
-
Click Create.
-
If the Set Up Groups for this Site page appears, set up the visitors, members, and owners of the site.
-
-
Set up categories
If you plan to create several blog posts, or posts about different subjects, it is a good idea to set up categories. Your readers can click the category that they want to read, which makes it easy for them to find posts that they are interested in.
You can add more categories or edit the category names later. If you don't want to use categories, you can choose None for the category when you create a post.
-
Click All Site Content.
-
Under Lists, click Categories.
The Categories list appears. If you haven't set up categories on the blog before, the list contains category placeholders, such as Category 1 and Category 2.
-
In the Categories list, click the Edit button

-
Select the placeholder text, type the new text that you want, and then click Save
-
Repeat steps 3 and 4 to replace the existing placeholder categories with your own categories.
-
To add additional categories, click Add new item just below the list of categories, and then type a name for the category in the Title box.
-
To delete a category, point to its name, select the check box that appears next to the category name, and then click Delete Item on the ribbon.
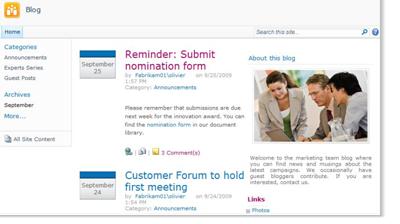
Change the image and description
You can change the image and description that appear under About this blog by modifying the Web Part that contains this information.
-
On the home page of your blog, point to About this blog, click the arrow that appears next to it, and then click Edit Web Part.
-
To change the default image, click it, insert another image in its place, and resize it if necessary by clicking and dragging one of the square resizing boxes around the perimeter of the image.
-
To change the description, select the default text and delete or type over it, as appropriate.
-
When you are finished changing the contents of the Web Part, click OK in the Web Part task pane to the side of the Web Part.
Top of Page
Customize other blog settings
Once created, you may want to customize settings for your blog, or for its lists and libraries. To help you quickly customize and manage settings, the blog provides a list of links for customizing.
The following procedure provides general steps for customizing your blog.
-
To customize a list or library on your blog, do one of the following:
-
To customize the Posts list, under Blog Tools, click Manage posts.
-
To customize the Comments list, under Blog Tools, click Manage comments.
-
To customize any other lists or libraries in the blog — such as the Links list or Photos picture library — click All Site Content, and then click the list that you want to change.
-
-
To change other settings on your blog, do the following:
-
Click Site Actions
-
Click the type of setting that you want to change, such as Site theme or Site permissions, and then make the appropriate changes.
-
Repeat this procedure for any other settings, lists, or libraries that you want to change.


