
Note: This article has done its job, and will be retiring soon. To prevent "Page not found" woes, we're removing links we know about. If you've created links to this page, please remove them, and together we'll keep the web connected.
Creating rules to route documents to specific locations in Microsoft SharePoint Server 2010 helps expedite the process of filing records in their respective SharePoint libraries and folders. As a major component of records management, creating rules to route records is also part of your file plan. Any SharePoint site can be enabled for document routing. This article shows you how to create rules for organizing and routing records within SharePoint Server.
Note: You must first enable the Content Organizer feature and configure the organizer to route records. The Content Organizer feature can only be activated at the site level. To learn more about configuring the Content Organizer, see the links under See Also.
In this article
Overview
Business documents originate from many different sources and often need to be stored in a way that decreases vulnerability to regulatory compliance and litigation risks. After configuring the Content Organizer to route records, you can establish and program specific Content Organizer rules that enable you to automatically store records based on unique business rules and requirements.
In conjunction with using content types, creating rules to automatically route documents within a centralized enterprise repository replaces the need to manually upload documents or other items to a library or folder. Users fill out predetermined criteria for any given document and, based on the predefined routing rules, the document is then routed to the correct library or folder. Content organizer rules are stored as a SharePoint list.
The Content Organizer also helps you monitor and control the maximum number of documents that can be stored in any given library. For example, if a document is added to a library folder that has a maximum limit of 5000 items, the Content Organizer automatically creates a new folder and routes the document to that folder.
Where can documents come from?
Documents that are routed to specific libraries or folders can come from various sources. As part of a records management process, documents can come from:
-
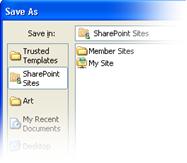
Client applications, such as Microsoft Word, when you use the Save As function.
-
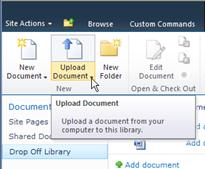
Direct upload to the Drop Off library, which is a special library that is created when you activate the Content Organizer for a site.
-
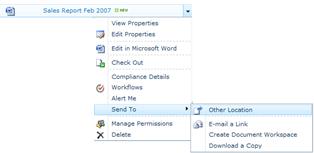
The Send To command when coming from another SharePoint site.
-
A third-party application through a Web Service.
-
Exchange managed folder - emails can be treated as records and routed just like any other document.
What determines the routing location?
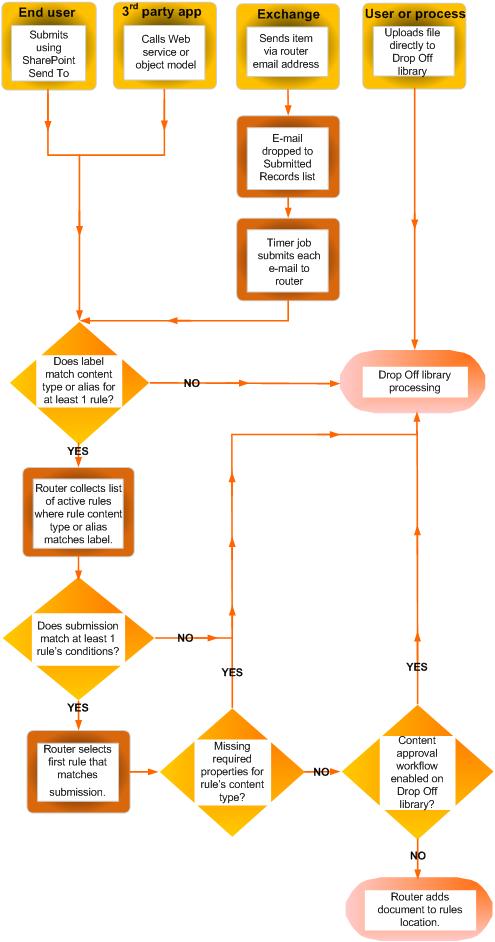
Documents can be routed to a Records Center site or any other kind of SharePoint site. The Drop Off library, which is automatically created when activating the Content Organizer feature, serves as the default location where documents are routed if they do not meet predetermined criteria. There are several main elements that comprise the document routing process:
Web service or e-mail submission Other SharePoint sites or third-party applications can submit documents to the Content Organizer. Exchange can email documents to the Content Organizer. Documents or e-mail records with the correct content type, metadata, and matching rules are automatically sent to the proper library or folder.
Target libraries and folders Content stewards or records managers manually create libraries and folders where documents should be routed.
Site content types These are required and users manually add appropriate site content types to target libraries.
Important: Because the Content Organizer will only work on content types that are, or derived from, the Document content type, you cannot use it for organizing large lists.
Drop Off library Documents that don’t have enough metadata to match a rule, or that are missing required metadata are sent to the Drop Off library so users can enter required metadata. All content types used for routing are automatically associated with the Drop Off library. You can configure the Content Organizer so that all uploaded documents are temporarily routed to the Drop Off library. For more information on configuring the Content Organizer, see Configure the Content Organizer to route records.
Document routing list This list helps you create a plan for how content should be organized in this site. You use this list to create rules that ensure that documents submitted to a site are routed to the correct location and have the correct properties. Content stewards or records managers visit this list to create, manage, and view routing rules.
The diagram below shows how documents and emails are routed based on meeting specific criteria.
First steps
There are several important steps you need to follow before creating rules for routing documents.
-
Create libraries and folders that you want documents to be routed to. You might want to create folders for each type of document you are routing. For example, create a library just for e-mail records or Excel spreadsheets. To learn about creating libraries, see the links in the See Also section.
-
Content types must be associated with documents that are to be routed. In this way, the content type can be part of the criteria that determines the final location where a document is stored.
Create rules to route documents
For each record type that you add to the Record Routing list, you specify a record title and description. You also specify the location in the site where the record is stored. To ensure that all relevant records are routed to the appropriate location, you can specify alternate names for the record type.
Note: You must have at least Site Owner permissions to create rules to route documents.
-
Navigate to the site for which you want to create Content Organizer rules.
-
From the Site Actions menu

-
On the Site Settings page, under the Site Administration section, click Content Organizer Rules.
-
In the New group on the ribbon, click New Item and then click Rule.
-
Type a name that describes the rule’s conditions and actions.
-
In the Rule Status and Priority section, choose whether the rule should be applied to incoming content. If Active is selected, select a priority that will determine how content is routed should it match more than one Content Organizer rule.
-
Next, associate the rule with a content type. By doing this, submissions to the organizer are labeled with the selected content type and properties used in the conditions of the rule are identified.
-
Select the appropriate content group. The group you select determines the content types you can choose from in the next step.
-
Select the appropriate content type.
-
If the content type you selected has an alternative name on another SharePoint site, select the checkbox under Alternate name, type the alternate name in the field provided, and then clickAdd. The alternate content type names appear in the list box below.
-
In the Conditions section, select the conditions that a submission’s properties must meet for the rule. You might, for example, want the rule to apply to all documents that have the word “budget” in the title. You can add more conditions by clicking the Add another condition link.
Note: The properties available from the Property drop-down list differ according to the content type you selected in step 6.
-
Type or browse for a location to place content that matches the rule. Select the Automatically create a folder checkbox to group similar documents together in folders. For example, if you have a property that lists all documents for projects in your organization, you can force the organizer to create a separate folder for each project.


