
Consolidating data is a useful way to combine data from different sources into one report. For example, if you have a PivotTable of expense figures for each of your regional offices, you can use a data consolidation to roll up these figures into a corporate expense report. This report can contain sales totals and averages, current inventory levels, and highest selling products for the whole enterprise.
Note: Another way to consolidate data is to use Power Query. For more information, see Power Query for Excel Help.
To summarize and report results from separate worksheet ranges, you can consolidate data from each separate worksheet range into a PivotTable on a master worksheet. The separate worksheet ranges can be in the same workbook as the master worksheet or in a different workbook. When you consolidate data, you are assembling it so that you can more easily update and aggregate data regularly or as needed.
The resulting consolidated PivotTable report can have the following fields in the PivotTable Field List, which you can add to the PivotTable: Row, Column, and Value. In addition, the report can have up to four page filter fields, called Page1, Page2, Page3, and Page4.
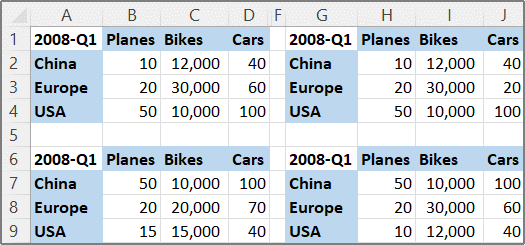
Each range of data should be arranged in cross-tab format, with matching row and column names for items that you want to summarize together. Do not include any total rows or total columns from the source data when you specify the data for the report. The following example shows four ranges in cross-tab format.
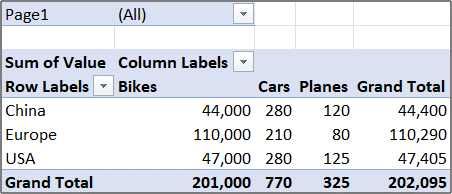
Data consolidation can use page fields that contain items representing one or more of the source ranges. For example, if you're consolidating budget data from the Marketing, Sales, and Manufacturing departments, a page field can include one item to show the data for each department, plus an item to show the combined data. The following example shows a consolidated PivotTable that has one page field and multiple items selected.
If the range of data is likely to change the next time that you consolidate the data (that is, the number of rows may change), consider defining a name for each source range in the separate worksheets. Then use those names when you consolidate the ranges in the master worksheet. If a source range expands, you can update the range for the name in the separate worksheet to include the new data before you refresh the PivotTable.
Excel also provides other ways to consolidate data that work with data in multiple formats and layouts. For example, you can create formulas with 3D references, or you can use the Consolidate command (on the Data tab, in the Data Tools group).
You can use the PivotTable and PivotChart Wizard to consolidate multiple ranges. In the wizard, you can choose between using no page fields, a single page field, or multiple page fields.
To combine the data from all the ranges and create a consolidation that does not have page fields, do the following:
-
Add the PivotTable and PivotChart Wizard to the Quick Access Toolbar. To do that:
-
Click the arrow next to the toolbar and then click More Commands.
-
Click Customize Quick Access Toolbar (…) in the bottom left-hand corner below the ribbon and then click More Commands.
-
Under Choose commands from, select All Commands.
-
In the list, select PivotTable and PivotChart Wizard, click Add, and then click OK.
-
-
Click a blank cell (that is not part of a PivotTable) in the workbook.
-
Click on the PivotTable Table and PivotChard wizard icon on the Quick Access Toolbar.
-
On Step 1 page of the wizard, click Multiple consolidation ranges, and then click Next.
-
On Step 2a page of the wizard, click I will create the page fields, and then click Next.
-
On Step 2b page of the wizard, do the following:
-
Go back to the workbook and select the cell range, and then back on the PivotTable and PivotChart Wizard, click Add.
Tip: If the cell range is in another workbook, open the workbook first to make it easier to make select the data.
-
Under How many page fields do you want?, click 0, and then click Next.
-
-
On the Step 3 page of the wizard, select between adding the PivotTable to a new or an existing worksheet, and then click Finish.
To include a single page field that has an item for each source range, plus an item that consolidates all the ranges, do the following:
-
Add the PivotTable and PivotChart Wizard to the Quick Access Toolbar. To do that:
-
Click the arrow next to the toolbar and then click More Commands.
-
Click Customize Quick Access Toolbar (…) in the bottom left-hand corner below the ribbon and then click More Commands.
-
Under Choose commands from, select All Commands.
-
In the list, select PivotTable and PivotChart Wizard, click Add, and then click OK.
-
-
Click a blank cell (that is not part of a PivotTable) in the workbook .
-
On Step 1 page of the wizard, click Multiple consolidation ranges, and then click Next.
-
On Step 2a page of the wizard, click Create a single page field for me, and then click Next.
-
On Step 2b page of the wizard, do the following:
-
Go back to the workbook and select the cell range, and then back on the PivotTable and PivotChart Wizard, click Add.
Tip: If the cell range is in another workbook, open the workbook first to make it easier to make select the data.
-
-
Click Next.
-
On the Step 3 page of the wizard, select between adding the PivotTable to a new or an existing worksheet, and then click Finish.
You can create multiple page fields and assign your own item names for each source range. This lets you create partial or full consolidations; for example, one page field that consolidates Marketing and Sales apart from Manufacturing, and another page field that consolidates all three departments. To create a consolidation that uses multiple page fields, do the following:
-
Add the PivotTable and PivotChart Wizard to the Quick Access Toolbar. To do that:
-
Click the arrow next to the toolbar and then click More Commands.
-
Click Customize Quick Access Toolbar (…) in the bottom left-hand corner below the ribbon and then click More Commands.
-
Under Choose commands from, select All Commands.
-
In the list, select PivotTable and PivotChart Wizard, click Add, and then click OK.
-
-
Click a blank cell (that is not part of a PivotTable) in the workbook.
-
On Step 1 page of the wizard, click Multiple consolidation ranges, and then click Next.
-
On Step 2a page of the wizard, click I will create the page fields, and then click Next.
-
On Step 2b page of the wizard, do the following:
-
Go back to the workbook and select the cell range, and then back on the PivotTable and PivotChart Wizard, click Add.
Tip: If the cell range is in another workbook, open the workbook first to make it easier to make select the data.
-
Under How many page fields do you want?, click the number of page fields that you want to use.
-
Under What item labels do you want each page field to use to identify the selected data range?, for each page field, select the cell range, and then enter a name for that range.
Example
-
If you selected 1 under How many page fields do you want?, select each range, and then enter a different name in the Field One box. If you have four ranges and each one corresponds to a different quarter of the fiscal year, select the first range, enter Q1, select the second range, enter Q2, and repeat the process for Q3 and Q4.
-
If you selected 2 under How many page fields do you want?, do the same as the previous example in the Field one box. Then, select two ranges, and enter the same name, such as H1 and H2, in the Field two box. Select the first range, enter H1, select the second range, enter H1, select the third range, enter H2, select the fourth range, and then enter H2.
-
-
Click Next.
-
-
On the Step 3 page of the wizard, select between adding the PivotTable to a new or an existing worksheet, and then click Finish.


