
As a site collection administrator, you can configure a Customer or Product workspace for offline availability in the Duet Enterprise for Microsoft SharePoint and SAP Web site. Any user, with the appropriate permissions can then use the workspace offline in Microsoft Outlook 2010.
This topic tells you how to make the Contacts list in the Customer workspace available offline in Outlook 2010.
In this article
Introduction
In the Duet Enterprise Web site, an entity workspace contains one or more lists with data from an SAP backend. For example, the Products workspace has a list of products, or the Customers workspace has a list of customers, contacts, inquiries and quotations list.
Working with an entity workspace offline gives you more flexibility to use the workspace data. For example, if you configure the Customer workspace for offline availability, you can consolidate your business contacts from SAP with your other Outlook contacts in Outlook 2010. You can then use Outlook 2010 more effectively for corresponding with business contacts and customers.
To make a workspace available offline, first create a downloadable package (called a BCS solution) that contains several important elements, such as lists of workspace data, task panes, and actions.
-
Lists In the Customers workspace, two lists are available for offline use—Customers and Contacts.
-
Task pane A workspace task pane is a window that provides information about another workspace element, or about options to perform a task. For example, a task pane can show details of a contact or a product.
-
Actions A task (such as Open Workspace) that you are able to perform related to a workspace.
In Outlook 2010, task panes and actions enable an interactive experience of connecting and working with the information in a workspace. By default, Duet offers a few pre-defined task panes and actions. However, if the default ones do not meet your needs, you can add customized task panes and actions. Customized task panes and actions add functionality to the offline experience in Outlook 2010. For example, you can create a task pane that lists the quotations and inquiries related to a customer, or an action to open an email template or reports for a particular contact, and so on.
Note: The Connect to Outlook option in a SharePoint 2010 site only enables you to take the list data in a workspace offline, and not task panes and actions.
Step 1: Enable libraries and upload building block files to the site collection
Building block files are source files for the task panes, actions, and other core files that you need to package together to enable the workspace to function offline in Outlook 2010. First, you have to upload these source files to the site collection. Later in the process, you create a package of building block files to download to Outlook 2010.
To configure a workspace for offline use, three types of building block files are important.
-
A BCS Solution Task Pane file, which is an Extensible Markup Language (XML) file. You can use the task pane file that duet provides, or use a custom file.
-
A Business Data Action file, which is also an XML file. You can use the default action file or use a custom file.
-
The Dynamic Linked Library (DLL) file that implements the task pane and action.
Note: If you are unsure of the location or the name of the file, contact your server administrator.
Enable libraries on the site collection
First, you have to enable the libraries on the site collection that stores these building block files. The following steps describe how to enable libraries:
-
From the Site Actions menu, click Site Settings.
-
Under Site Collection Administration, click Site collection features.
Note: If the Site collection features option does not appear, then click Go to top level settings option under Site CollectionAdministration. The Site Collection Features option will now appear.
-
On the Features page, against BCS Solution Galleries, click Activate.
You are now ready to upload the source files to the site collection starting with the DLL file.
Upload the building block files to the site collection
-
Click Site Collection Administration on the breadcrumb navigation at the top of the page.
-
On the Site Settings page, under BCS Solution Galleries, click Application Assemblies.
-
On the All Documents page, click Add document. Then in the Upload Document window, click Browse to navigate to the DLL file, and then click OK.
-
On the Site Actions menu, click Site Settings.
-
On the Site Settings page, under BCS Solution Galleries, click Task panes.
-
On the All Documents page, click Add document. Then in the Upload Document window, click Browse to navigate to the task pane file (for example, ContactDetails.xml), and then click OK.
-
On the Site Actions menu, click Site Settings.
-
On the Site Settings page, under BCS Solution Galleries, click Business data actions.
-
On the All Documents page, click Add document. Then in the Upload Document window, click Browse to navigate to the action file (for example, CollabOnAction.xml), and then click OK.
Step 2: Build the BCS solution
A BCS solution is a package of downloadable files that enable specific functionality. In this case, the BCS solution contains a collection of files that together enable elements of a Duet workspace to function offline. It includes workspace lists, BCS Solution Task Panes, and BCS Data Actions. When you create a BCS Solution, the resulting objects are called BCS Solution Artifacts.
To build a BCS solution, you have to follow these steps:
-
Configure a setting that will make the workspace available offline in Outlook 2010.
-
Add the BCS Solution Task Pane files for the workspace.
-
Add the Business Data Action files for the workspace.
-
Generate the BCS Solution Artifacts.
Note: If you are unsure of what files to use or where they are located, contact your server administrator.
Configure a workspace for offline availability
-
Open the Customers collaboration space.
-
From the Site Actions menu, click Site Settings.
-
On the Site Settings page, under Site Actions, click Manage site features.
-
On the Features page, locate the BCS Solution Design Feature and click Activate.
-
Click Site Settings on the breadcrumb navigation at the top of the page.
-
On the Site Settings page, under Duet Enterprise Administration, click Outlook Application Designer.
-
On the Outlook Application Designer page, under External Lists, click Contacts.
-
On the Outlook settings page, under List Settings, click Outlook Client Settings.
-
In the Edit Outlook settings for this external list dialog box, select the Offline this external list to Outlook and Auto generate Outlook forms check boxes and click OK.
-
(Optional) Repeat steps 7 to 9 for configuring another workspace.
You are ready to upload the task pane files for the workspace.
Upload the Business Data Task Pane files for the workspace
Note: If you are unsure of what files to use or where they are located, contact your server administrator.
-
On the Outlook settings page, under Task Panes, click Add from Business Data Task Panes Gallery.
-
In the Add task pane page, do the following:
-
In Select a task pane, select a task pane from the available task panes.
-
In Display properties, enter a display name and a tool tip for the task pane. A tool tip is the text that appears when you hover over the task pane in Outlook 2010.
-
In Default task pane, select Make this the default task pane if you want to make the selected task pane as the default task pane.
-
Click OK.
-
(Optional) Repeat the previous steps to upload additional task panes.
Note: If you do not see any task panes listed, it might mean that your site administrator has not uploaded the task pane files to the site collection. Contact your site administrator.
You are now ready to upload the action files for the workspace.
Upload the Business Data Action files for the workspace
-
On the Outlook settings page, under Business Data actions, click Add from Business Data Actions Gallery.
-
On the Add business data actions page, do the following:
-
In Select a business data action, select an action from the available actions.
Note: If you do not see any actions listed, it might mean that your site administrator has not uploaded the action files to the site collection. Contact your site administrator.
-
In Display properties, enter a display name Open Customer Workspace and a tool tip for the action. The tool tip text appears when you hover over the task pane in Outlook 2010.
-
Click OK.
-
In Map business data action parameters, select a field from the dropdown menu of entity fields.
-
Click OK.
-
(Optional) Repeat steps 25 and 26 for adding more action files.
Generate the BCS Solution Artifacts
The next step is to generate the BCS Solution Artifacts. A BCS Solution Artifact is a software object that collects elements of the solution into a logical unit that the system can process.
-
On the Outlook settings page, click Back to the Outlook Application Designer page.
-
Click Generate BCS Solution Artifacts.
-
Click OK when you get a message that the operation is successfully completed.
Step 3: Generate the BCS Solution and open in Outlook 2010
Once you have generated the BCS Solution Artifact, you or other users with the necessary permissions can generate the BCS Solution and download the solution in Outlook 2010.
-
On the Site Actions menu, click Generate BCS Solution.
-
On the Generate BCS Solution page, in Certificate, select a certificate, and then click OK.
Note: If the OK button is not available, it means that the farm administrator has not uploaded the necessary certificates to the Trusted Publishers and Trusted Root Certification Authorities stores in the farm. Contact your server administrator for further assistance.
-
Click OK in the Web page to confirm when the operation completes successfully.
Duet Enterprise opens the All Documents page, where you can download the solution in Outlook 2010. In the All Documents page, you can even manage permissions for the solution. This means you can add users who can download the solution in Outlook 2010, or even remove users.
Download the solution in Outlook 2010
-
On the Site Actions menu, select Download BCS Solution. Click Allow.
-
On the Microsoft Office Customization Installer dialog box, click Close.
The Contacts list now opens automatically in Outlook 2010. In Outlook 2010, you can view and update contact details, email contacts, or open a customer workspace corresponding to a contact.
Follow these steps to work with contacts:
-
In Outlook 2010, double-click a contact in the contacts list.
-
On the contact details window, click the Duet Enterprise tab, and click View SAP actions. The View SAP actions option displays the task pane and action that we added in the earlier steps.
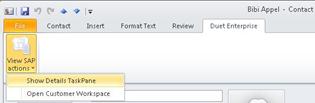
Do one of the following:
-
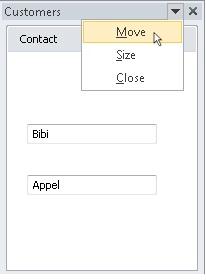
Click Show Details Task Pane to view the contact details task pane. The task pane displays the contact’s full name and the title. By default, the task pane is docked to the contact details window, and this position might prevent you from viewing the full details. You can undock it by clicking the dropdown appearing next to Customers, and then clicking Move.
-
Click Open Customer Workspace to open the customer workspace on the Duet Enterprise Web site for the selected contact.
Each time you open Outlook 2010, a synchronization window opens automatically to show that Outlook 2010 is synchronizing with the workspace on the Duet Enterprise Web site.
-
-


