
You can configure a SharePoint site's recycle bin to control the amount of time a user can restore deleted content before it's removed forever and the amount of storage space the recycle bin consumes. The SharePoint Application Management settings page lets you turn the site recycle bin on or off, set the number of days that deleted items are retained in the recycle bin, and set how much storage space the second stage (site collection) recycle bin uses.
Important:
-
The SharePoint Recycle Bin is different from the Recycle Bin in Windows. To recover files deleted in Windows from your desktop or apps, try the Windows Recycle Bin first. To put your Windows recycle bin on your desktop, see Put the Windows recycle bin back on your desktop.
Configure the SharePoint Server 2019, 2016, 2013, or 2010 recycle bin settings
Configuring the Recycle Bin settings affects all sites hosted by the web application.
-
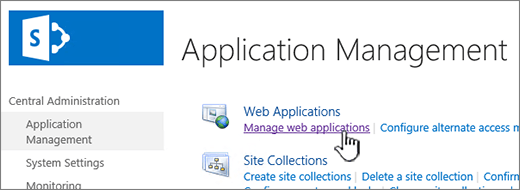
Open the SharePoint Central Administration app.
-
Under Application Management, click Manage web applications.
-
Choose the site you want to configure recycle bin settings for and then click General Settings under Manage on the ribbon.

-
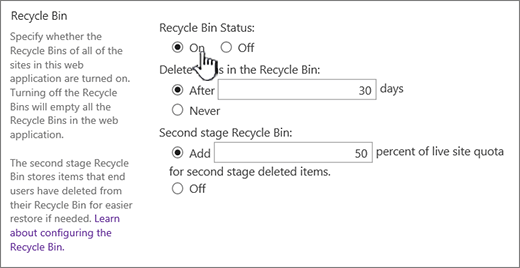
On the Web Application General Settings page, scroll to the Recycle Bin section, and you can configure the following settings:
-
Under Recycle Bin Status, select On or Off to specify whether the Recycle Bins of all the sites within this web application are turned on or turned off.
If you turn off the Recycle Bins, all of the files in them will be deleted. Deleting these files can take a long time, depending on the fullness and quantity of Recycle Bins.
-
Under Delete items in the Recycle Bin, select either After or Never.
If you select After, type in the corresponding box the number of days to wait before the Recycle Bins are emptied (that is, the number of days that the items in Recycle Bins remain in a deleted state). If you select Never, the Recycle Bins are never automatically emptied.
-
Under Second Stage Recycle Bin, select either Add or Off.
If you select Add, type the percentage of the site quota to add for second-stage Recycle Bin capacity in the corresponding box.
When you enable the second-stage Recycle Bin for a web application, you must designate how much disk space is available to the second-stage Recycle Bin as a percentage of the quota allotted to the web application. For example, if you have allotted 100 megabytes (MB) of space for the web application, allotting a 50% quota for the second-stage Recycle Bin allots 50 MB for the second-stage Recycle Bin and 150 MB for the web application. You can allot up to 100% for the second-stage Recycle Bin quota.
-
-
Scroll to the end of the dialog and click OK.
Configure the SharePoint Server 2007 recycle bin settings
Configuring the Recycle Bin settings affects all sites hosted by the web application.
-
On the top navigation bar, click Application Management.
-
On the Application Management page, in the SharePoint Web Application Management section, click Web application general settings.
-
On the Web Application General Settings page, in the Recycle Bin section, configure the following settings:
-
Under Recycle Bin Status, select On or Off to specify whether the Recycle Bins of all the sites within this web application are turned on or turned off.
If you turn off the Recycle Bins, all the files in them will be deleted. Deleting these files can take a long time, depending on the fullness and quantity of Recycle Bins.
-
Under Delete items in the Recycle Bin, select either After or Never.
If you select After, type in the corresponding box the number of days to wait before the Recycle Bins are emptied (that is, the number of days that the items in Recycle Bins remain in a deleted state). If you select Never, the Recycle Bins are never automatically emptied.
-
Under Second Stage Recycle Bin, select either Add or Off.
If you select Add, type the percentage of the site quota to add for second-stage Recycle Bin capacity in the corresponding box.
When you enable the second-stage Recycle Bin for a web application, you must designate how much disk space is available to the second-stage Recycle Bin as a percentage of the quota allotted to the web application. For example, if you have allotted 100 megabytes (MB) of space for the web application, allotting a 50% quota for the second-stage Recycle Bin allots 50 MB for the second-stage Recycle Bin and 150 MB for the web application. You can allot up to 100% for the second-stage Recycle Bin quota.
-
-
Scroll to the end of the dialog and click OK.
Put the Windows recycle bin back on your desktop
While the Windows recycle bin has nothing to do with SharePoint, it is important to have it handy for retrieving local files that you delete. Here's how to put it back on your desktop:
To put the Windows 10 Recycle bin back on your desktop:
-
Select the Start


-
Select Personalization > Themes > Desktop icon settings.
-
Select the Recycle Bin check box > Apply.
• To get to desktop icon settings in Windows 8.1, swipe in from the right edge of the screen, then select Search. Type desktop icons in the search box, and then select Show or hide common icons on the desktop.
• To get to desktop icon settings in Windows 7, select the Start button, type desktop icons in the search box, and then select Show or hide common icons on the desktop.
Leave us a comment
Updated October 3, 2018
Was this article helpful? If so, please let us know at the bottom of this page. If not, let us know what was confusing or missing. Please include your version of SharePoint, OS, and browser. We'll use your feedback to double-check the facts, add info, and update this article.


