
You can quickly and easily customize the look of your SharePoint site to reflect your professional style and brand. The options available to you depend on the version of SharePoint you're using.
Note: To change the look, you need site owner or design permissions on the site.
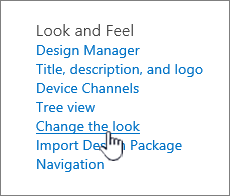
Change the look settings are located under Settings 
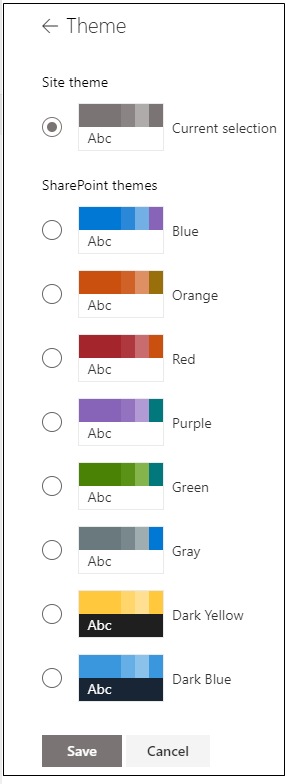
Use a theme to change the colors of your SharePoint site
You can choose one of the default SharePoint themes and customize it as needed, choose a company theme with approved branding for your company, or use one of the classic experience designs. To create and upload a company theme, see SharePoint site theming.
Notes:
-
Some functionality is introduced gradually to organizations that have opted in to the Targeted Release program. This means that you may not yet see this feature or it may look different than what is described in the help articles.
-
For additional ways to customize your site, see Customize your SharePoint site.
-
On your site, click Settings
Note: If you don’t see Change the look on the Settings menu, you may not have permission to manage this option. For more information, see Understanding permission levels in SharePoint or ask your administrator.
-
Select the look you want. You'll see a preview of what your site looks like with the selected theme applied. Click Save to apply it to your site or, if you don't like what you see and want to revert back to what you had in the beginning, click Cancel instead.
Notes:
-
Your administrator may have set site theming to show only a list of company-approved themes. If so, you won't see any of the default SharePoint themes.
-
If you're updating the theme on a subsite or your administrator has sites set to the classic experience, follow the instructions in the Classic experience designs section .
-
-
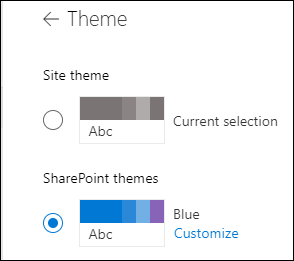
To customize the colors of one of the default SharePoint themes, select the theme and then click Customize.
-
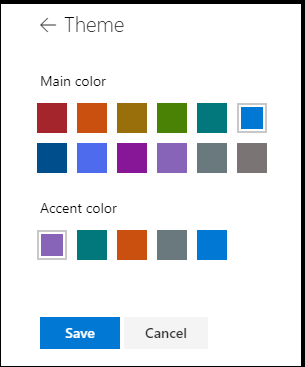
Choose the main color and accent color you want, and then click Save to apply it to your site. The list of main colors and accent colors varies depending on the default SharePoint theme you choose to customize.
Note: Currently, you can't change the background color for your site using this setting. SharePoint administrators can make changes to company-approved themes as described in SharePoint theming.
Customize your site header
-
On your site, click Settings

Notes:
-
If you don’t see Change the look on the Settings menu, you may not have permission to manage this option. For more information, see Understanding permission levels in SharePoint or ask your administrator.
-
The minimal and extended header layouts will be temporarily removed from the Change the look panel for GCC, GCC High, DoD, Gallatin, and Sovereign clouds customers. Sites using the minimal header will automatically transition to the compact header and sites using the extended header layout will automatically transition to the standard header.
-
-
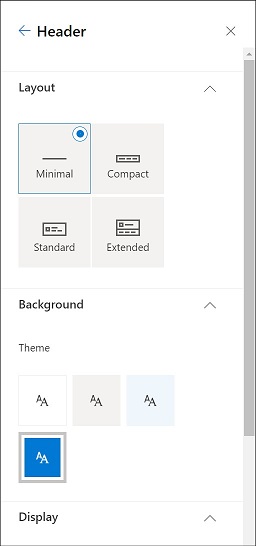
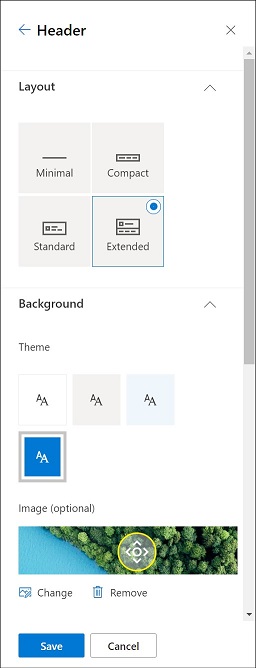
Choose a layout: (Compact layout is the default for all Modern sites):
-
Minimal layout: Reduced height with all content in a single line including small site logo, site title, site navigation, and site actions and labels.

-
Compact layout: A larger height layout that uses the full size site logo while keeping content on a single line.

-
Standard layout: A layout with the full size site logo and content split onto 2 lines.

-
Extended layout: Our largest layout with content split into 2 content areas with site logo, site title, and an optional background image separate from the other contents below.

Note: If you are using the Extended Header on a Hub site designated as Home, the site navigation will be replaced with the Hub navigation bar.
-
-
In the Background section, select a theme color to change the background color of your site header. Select Extended to determine the focal point for the background image.
-
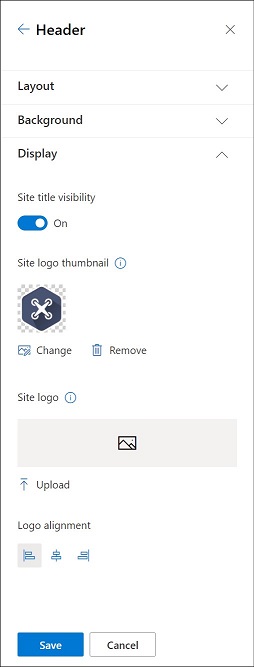
In the Display section, do the following:
-
Select the Toggle to set the visibility of your site title;
-
Select Change to add a site logo thumbnail (must be a square logo for default use in experiences that require a square aspect ratio);
-
Select Change to add a site logo. If using Extended layout, select Site logo alignment.
Note: To ensure that your icon renders properly, please pick one that fits within the range of 64 x 64 pixels to 192 x 64 pixels (width x height).
-
-
When you're done, click Save.
Change your navigation style
-
On your site, click Settings
Note: If you don’t see Change the look on the Settings menu, you may not have permission to manage this option. For more information, see Understanding permission levels in SharePoint or ask your administrator.
-
Select one of the following options:
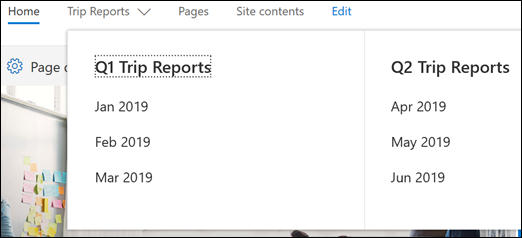
Megamenu
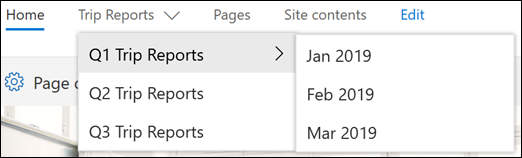
Cascading
Notes:
-
Megamenu is not supported on sites with the classic publishing feature(s) turned on.
-
To change your navigation links, see Customize the navigation on your SharePoint site.
-
Links added to the 3rd level when using the megamenu style will display as a single vertical list only.
-
-
Click Apply to save your changes.
Add a site footer
-
On your site, click Settings
Notes:
-
If you don’t see Change the look on the Settings menu, you may not have permission to manage this option. For more information, see Understanding permission levels in SharePoint or ask your administrator.
-
The site footer feature is only available on communication site pages. They are not available for list pages, library pages, or other pages on your site.
-
-
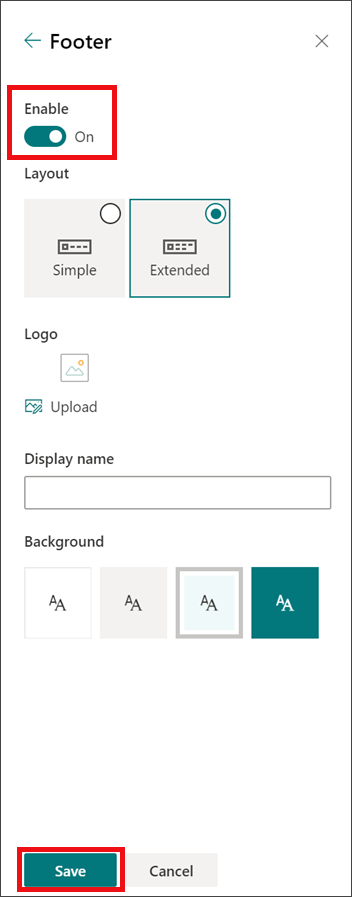
Toggle the Footer visibility switch to On to add a footer to your site.
-
Choose a layout:
-
Simple layout: Display one level of links and labels, up to eight columns wide.

-
Extended layout: Display two level of links and labels, up to eight columns wide.

-
3. Select Upload to add your logo image to the footer. The image is automatically resized.
4. To add a name for your footer, enter a Display name.
5. Select a background color.
6. Select Save to save your changes.
Edit footer labels and links
After you've added a footer to your site you can add a links or labels to the footer. Select Edit in the footer on the left hand side of the menu labels and links.
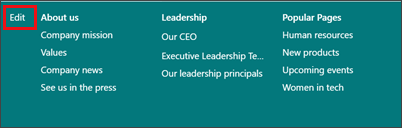
For details about adding or editing links and labels, see Customize the navigation on your SharePoint site. You can add one level of up to eight links or labels.
Change the color, background, or font with classic experience themes
If your administrator has sites set to the classic experience, or you're changing the theme of a subsite, follow these steps to change the color, background, and font of your SharePoint site:
-
On your site, click Settings
-
Click View classic settings or Classic change the look options. If you're already in the classic experience, skip this step.

-
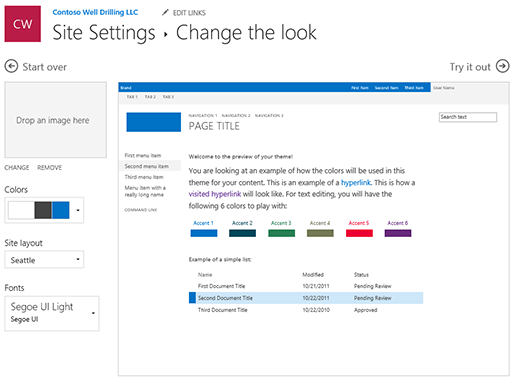
Choose a look from among the choices. Don’t worry if you don’t like the color or the image exactly, you can change that in the next step.
-
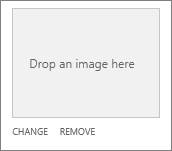
To add or change the background image, choose Change to upload an image of your own, or drag an image from your computer onto the thumbnail image above the Change command.
-
To change the color scheme, click the arrow next to Colors and select another color scheme.
-
To change the layout, click the arrow next to Site layout and select another layout, which controls the position of the navigation links, search box, and so on.
-
To change the fonts, click the arrow next to Fonts and select another font.
Note: You can change the font type style, but you can't change the size.
-
When you’re ready to see a full-sized preview of how your changes look when applied to your site content, click Try it out. The changes are not yet visible to other site users.
Note: If you don't like what you see and want to revert back to what you had in the beginning, click Start over or you can click your site logo to exit Change the look and go back to the home page of your site.
-
If you like what you see in the preview, click Yes, keep it. If not, click No, not quite there and try something else.

Use a theme to change the colors of your SharePoint site
You can choose one of the default SharePoint themes and customize it as needed, choose a company theme with approved branding for your company, or use one of the classic experience designs. To create and upload a company theme, see SharePoint site theming.
Notes:
-
Some functionality is introduced gradually to organizations that have opted in to the Targeted Release program. This means that you may not yet see this feature or it may look different than what is described in the help articles.
-
For additional ways to customize your site, see Customize your SharePoint site.
-
On your site, click Settings
Note: If you don’t see Change the look on the Settings menu, you may not have permission to manage this option. For more information, see Understanding permission levels in SharePoint or ask your administrator.
-
Select the look you want. You'll see a preview of what your site looks like with the selected theme applied. Click Save to apply it to your site or, if you don't like what you see and want to revert back to what you had in the beginning, click Cancel instead.
Notes:
-
Your administrator may have set site theming to show only a list of company-approved themes. If so, you won't see any of the default SharePoint themes.
-
If you're updating the theme on a subsite or your administrator has sites set to the classic experience, follow the instructions in the Classic experience designs section .
-
-
To customize the colors of one of the default SharePoint themes, select the theme and then click Customize.
Choose the main color and accent color you want, and then click Save to apply it to your site. You can also select whether or not a grey (Neutral), light (Soft) or dark (Strong) version of the main color is applied to the header of your site or you can keep the default white header background. The list of main colors and accent colors varies depending on the default SharePoint theme you choose to customize.
Note: Currently, you can't change the background color for your site using this setting. SharePoint administrators can make changes to company-approved themes as described in SharePoint theming.
Change the color, background, or font with classic experience themes
If your administrator has sites set to the classic experience, or you're changing the theme of a subsite, follow these steps to change the color, background, and font of your SharePoint site:
-
On your site, click Settings
-
Click View classic settings or Classic change the look options. If you're already in the classic experience, skip this step.
-
Choose a look from among the choices. Don’t worry if you don’t like the color or the image exactly, you can change that in the next step.
-
To add or change the background image, click Change to upload an image of your own, or drag an image from your computer onto the thumbnail image above the Change command.
-
To change the color scheme, click the arrow next to Colors and select another color scheme.
-
To change the layout, click the arrow next to Site layout and select another layout, which controls the position of the navigation links, search box, and so on.
-
To change the fonts, click the arrow next to Fonts and select another font.
Note: You can change the font type style, but you can't change the size.
-
When you’re ready to see a full-sized preview of how your changes look when applied to your site content, click Try it out. The changes are not yet visible to other site users.
Note: If you don't like what you see and want to revert back to what you had in the beginning, click Start over or you can click your site logo to exit Change the look and go back to the home page of your site.
-
If you like what you see in the preview, click Yes, keep it. If not, click No, not quite there and try something else.
Use a theme to change the color, background, or fonts of your SharePoint site
-
On your site, click Settings

You can also click Settings
Notes:
-
If the Get started with your site tiles are on your home page, you can click the What’s your style? tile.
-

-
If you don’t see Change the look on the Settings menu or on the Site Settings page, you may not have permission to manage this option. For more information, see Understanding permission levels in SharePoint or ask your administrator.
-
-
Choose another look from among the choices. Don’t worry if you don’t like the color or the image exactly, you can change that in the next step.
-
Now, you can get creative:
-
To add or change the background image, click Change and upload an image of your own, or drag an image from your computer onto the thumbnail image above the Change command.
Note: If drag and drop is not working, install the latest version of your browser software or at least Microsoft Office 2013.
-
To change the color scheme, click the arrow next to Colors and select another color scheme.
-
To change the layout, click the arrow next to Site layout and select another layout, which controls the position of the navigation links, search box, and so on.
-
To change the fonts, click the arrow next to Fonts and select another font.

Notes:
-
You can instantly see what changes look like in the preview area. To revert back to what you had in the beginning, click Start over. You can also click your site logo to exit Change the look and go back to the home page of your site.
-
Since SharePoint installations may have different versions, or can be customized any number of ways, the designer of your site might have provided a different way to exit. Ask your administrator if you don't see one.
-
-
To see a full-sized preview of how your changes look when applied to your site content, click Try it out. The changes are not yet visible to other site users. If you don't like what you see so far, click Start over.
-
If you like what you see in the preview, click Yes, keep it. If not, click No, not quite there and try something else.
Note: Once you're done, or you change your mind, click the one of the breadcrumb navigation links in the upper left of the screen to get back to where you were.
The title is often the first thing your site visitors look at when they visit your site so it’s a good idea to choose a title that describes your team or project. Adding a logo can help people quickly see that they’re on the right site.
-
On your SharePoint site, click Settings
-
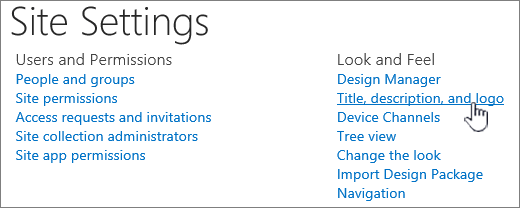
On the Site Settings page, under Look and Feel, click Title, description, and logo.
Note: If you don’t see Title, description, and logo, you may not have permission to manage that option. You need to have at Owner or Design permissions for your site. Organization can also define the design for an entire site collection and has removed your permission to manage these options. For more information, see Understanding permission levels in SharePoint.
-
Enter a new title in the Title field.
The new title appears on each page of the site.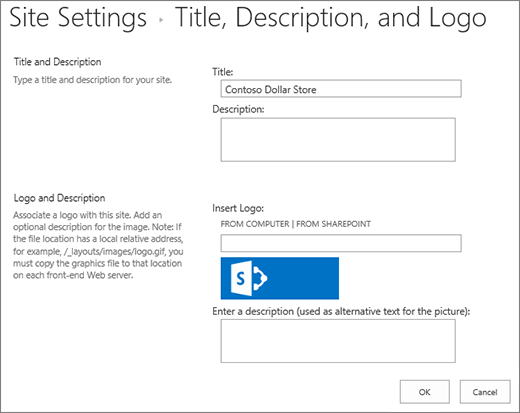
-
Enter a new description in the Description field. The description doesn’t appear on the site but does show up on your search results pages.
-
Change the logo:
-
To upload your logo from your computer, click From Computer, click Browse, locate the image and click Open.
-
To add your logo from SharePoint, click From SharePoint, browse to the library where the image is stored, select the image and click Insert. (This assumes you’ve already uploaded your logo to your team site.)
-
-
Click OK to save your changes.
If you don’t like how the logo appears on your site, just modify the logo and repeat the steps above to overwrite the logo.


