
The timeline is a graphical way to display a task list. It can be customized in several ways. The following describes how to customize the timeline:
Change the fonts and colors
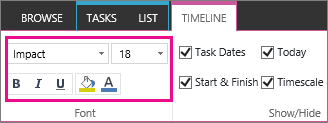
You can change the font face, size, format, and color for the text used on the timeline. You can also change the fill colors used for the timeline bars, diamonds, and background.
To change the fonts and colors used on the timeline:
-
Click once on the title of the timeline to select it.
-
To change the font used on a timeline bar, click the bar. In the Font group on the Timeline tab, change the font face, size, format, and color.
Tip: When you click a bar or diamond on the timeline, a box appears with information about that task. If this box is in the way when you’re ready to format a different bar or diamond, simply click the X in the top right corner of the box to close it.
-
To change the color used to fill in a bar or diamond, click the bar or diamond, and then In the Font group on the Timeline tab, click Highlight Color and choose a color.
Note: The color used to fill a diamond is also used for the line drawn between the diamond and the task name.
-
To change the color used to fill in the background of the timeline, click in a space in the timeline that isn’t filled by a bar or diamond, and then In the Font group on the Timeline tab, click Highlight Color, and choose a color.
The timeline includes task dates, a marker indicating the current date, and dates across the top to mark the timescale by default. However, you can also include the overall project start and finish dates, or choose to hide any of the default date indicators. You can also choose the format for task start dates and due dates.
To choose how you want to include dates on the timeline:
-
Click once on the timeline title to select it.
-
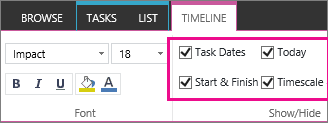
Select the check box next to each type of date that you want to include on the timeline from the Show/Hide group on the Timeline tab.
-
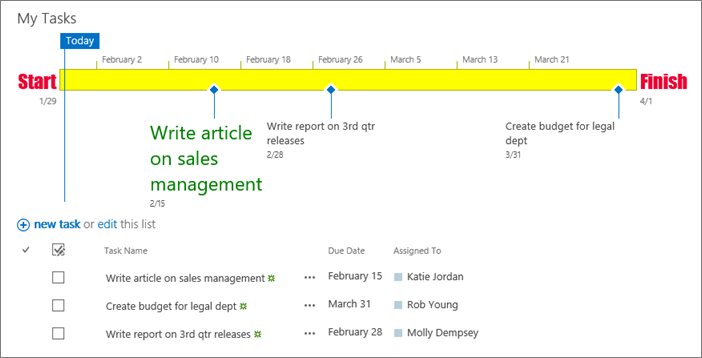
Task Dates Select the Task Dates check box to display the start date and due date for each task within the task’s bar or next to the task’s diamond.
-
Today Select the Today check box to display an indicator on the timeline for the current date.
-
Start & Finish Select the Start & Finish check box to display a start date at the beginning of the timeline and a finish date at the end of the timeline. These dates are taken from the earliest task start date, and the latest task due date.
-
Timescale Select the Timescale check box to display markers across the top of the timeline at dated intervals.
-
-
To choose the format to use for dates within task bars or next to task diamonds, on the Timeline tab, in the Show/Hide group, click Date Format, and select the format you want to use.
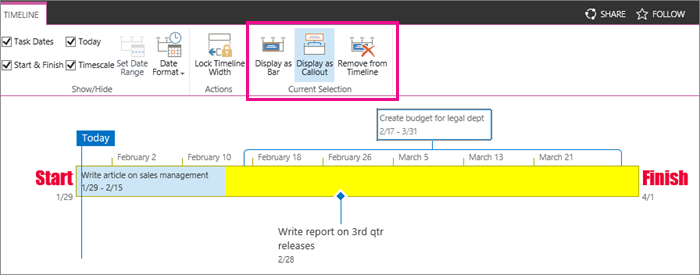
Tasks without a start date, or tasks that have a start date but no due date, always appear as diamonds on the timeline. A task with a start date and a due date, however, can appear as a bar on the timeline, or you can choose to display it as a callout above the timeline. This can be particularly useful if you have chosen to indent tasks in your task list as a way to communicate different phases of a project, or larger tasks that have several subtasks.
For example, let’s say you have a task list like this:
-
Phase 1
-
Task A
-
Task B
-
Task C
-
-
Phase 2
-
Task D
-
Task E
-
You might choose to display Phase 1 and Phase 2 as callouts on the timeline, and Tasks A through E as bars on the timeline.
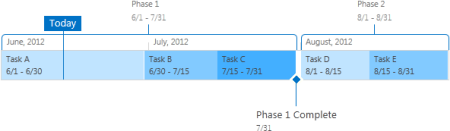
To display a task as a callout on the timeline, click once on the task bar, and then, on the Timeline tab, in the Current Selection group, click Display as Callout. If you decide you would rather return the callout to the timeline as a bar, click once on the callout text, and then, on the Timeline tab, in the Current Selection group, click Display as Bar.
You can also remove tasks from the timeline entirely, without removing them from the task list. This can be helpful if you need to simplify the timeline, or if you would prefer that some tasks didn’t show up in the Project Summary web part.
There are two ways to remove a task from the timeline:
-
Click once on the bar, diamond, or callout text, and then, on the box that appears, click Remove from Timeline.
-
Click once on the bar, diamond, or callout text, and then, on the Timeline tab, in the Current Selection group, click Remove from Timeline.
After you have added tasks to the timeline and arranged them in a way that you feel accurately represents the project, you can lock the timeline width so that others who view the timeline see the timeline for your project in the way you have intended. If you do not lock the timeline width, the width will vary based on the size of the window being used to view the timeline.
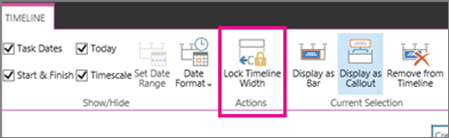
To lock the timeline width, arrange the timeline to accurately represent your project, and then click Lock Timeline Width in the Actions group on the Timeline tab. Now, when someone else views your timeline, it will remain at the width that you have set, regardless of the viewer’s window size.


