
Add meetings, appointments, and other events to your calendar in Outlook Web App and track and share with others.
Your calendar in Outlook Web App lets you create and track appointments and meetings. You can create multiple calendars, link to other people’s calendars, and even share your calendar with other people in your organization.
Note: It isn't possible to search your calendar if your organization is using the 2013 version of Outlook Web App.
|
This article is for Outlook Web App, which is used by organizations that manage email servers running Exchange Server 2013 or 2010. If you're using Microsoft 365, or Exchange Server 2016 or 2019, your email program is Outlook on the web. For help with Outlook on the web, see Get help with Outlook on the web. |
What you’ll see in Calendar
After your Inbox, the calendar is probably where you’ll spend the most time when using Outlook Web App. You can view your calendar four different ways: Day, Work week, Week, and Month.
You can choose any event in your calendar to see a quick view of that event.
An event that you create shows you as the creator and includes a link to edit or delete the event.
A meeting that you’ve been invited to shows the organizer and includes links to respond to the invitation. If the organizer includes an online meeting invitation, you’ll see a link to join the meeting.
The day view is most useful if you have a busy schedule, or if you want to view multiple schedules side by side. The controls remain the same, only the view has changed.
Week is the default view when you first visit your calendar in Outlook Web App. You can change the default to Day, Work week, or Month by using the options in the upper-right corner.
-
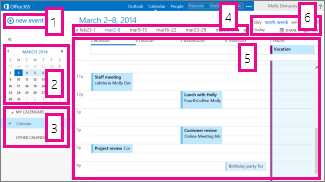
New event. An event can be an appointment, a meeting, or an all-day event. Choose

-
Calendar. Use the calendar in the folder pane on the left to go from one date to another. Shading indicates the period you’re currently viewing, and darker shading marks the current date.
Tip: You can use the left or right arrow to collapse


-
My calendars. You can view more than one calendar at a time. Under My calendars you can create other calendars, such as a calendar to use for a specific project or to track personal appointments. You also can add other people’s calendars and select which to display. If you select multiple calendars to display, they’re merged into a single view and each calendar is given a different color.
-
Day nav bar. You can use this area to go from one day to another. Choose any date to jump to that date. Or use the arrows at either end to see the dates before or after those displayed.
-
Main pane. Calendars are displayed in the main pane. To create a new appointment, double-click an open time slot on the day you want.
-
View options. Choose the view you want, and share or print your calendar.
The month view can appear very crowded. To make it more usable, there’s an agenda displayed for the selected day:
-
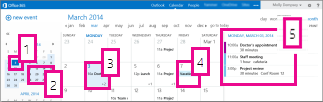
Current date. Darker shading shows the current date.
-
Month. Lighter shading shows the selected month.
-
Day. Shading shows the selected day and the number in the lower-right corner for each day shows how many non-displayed items there are. Double-click or double-tap an item to open it. You can create a new event for any date by double-clicking or double-tapping in an open time slot for that date.
-
All-day event. A shaded item highlights an all day event.
-
Agenda. The agenda for the selected day. You can create a new item on the current date by double-clicking or double-tapping an open time slot in the agenda.
Create a calendar item
To create a new appointment or meeting request in any view, choose New event or double-click (or double-tap) an open time slot on the day you want.
-
Choose New event and add a title and location.
-
Choose a start time and duration, and adjust the time of the reminder notification if you need to.
-
In the Show as list, choose how you want the appointment to appear on your calendar: Free, Working elsewhere, Tentative, Busy, or Away.
-
(Optional) You can make this a recurring appointment and you can mark the appointment as private.
-
(Optional) In the text box, type information about the appointment. Use the formatting options in the toolbar above the text box.
-
Choose Save when you're done.
A meeting is a calendar event that you send to other people. You create a meeting the same way you do an appointment, but you invite attendees and may add a resource such as a conference room.
-
Choose New event and add a title and location. Choose a start time and duration, and adjust the time of the reminder notification if you need to.
-
In Attendees, click the + symbol and choose the people you want to invite from your contacts list.
Tip: You can use the Scheduling Assistant if you want to make sure everyone is available for the time you chose. If your organization supports it, you can also use the Scheduling Assistant to reserve a conference room or other resource.
-
(Optional) You can make this a recurring meeting by choosing an option in the Repeat list. Select the Request responses check box if you want participants to let you know if they will attend the meeting.
-
Add a message for the meeting participants, and then choose Send to send the invitation.
Modify or delete a calendar event
Modifying or deleting meetings and appointments is done in a similar way.
-
Select the event on your calendar to bring up the event callout and select Edit.
Note: To edit a meeting request, you must be the person that set up the meeting.
-
For an appointment, make changes to the event on the Details page and choose Save. For a meeting request, choose Send.
-
Select the event on your calendar to bring up the event callout and select Delete.
-
For an appointment, select Delete on the confirmation message that appears.
-
For a meeting that you set up, right-click the item, select Cancel. If you want to add a note to the cancellation message being sent out to attendees, select Edit the cancellation before sending. To just cancel the meeting, select Send the cancellation now.
-
For a meeting you are invited to, right-click the item, select Delete, and then select the appropriate option depending on whether you want to include a message along with declining the meeting, send the response without a message, or not sent a response at all.
-
Share your calendar
You can easily share your calendar with other people in your organization.
-
Start by choosing Share at the top of the calendar window.

-
Share with. Type the name of the person you want to share your calendar with in the Share with box. Outlook Web App automatically searches in the address book for the name you typed.
-
Contact. After the person is found, they’re automatically added to the list of people to share the calendar with. You can add as many people as you want.
-
Share access options. Choose how much information you want to share. Full details lets the person see all the information about events—except those marked as Private—on your calendar. Limited details show the subject and location. Availability only shows only that you have an event at a particular time, but no other details are provided. Private events always show as busy.
You can give people inside your organization permission to edit your calendar by selecting Editor. To give someone permission to send and respond to meeting requests on your behalf, select Delegate.
-
Subject. You can edit the subject if you like.
-
Calendar. If you have more than one calendar, choose which you want to share. Most people share their default calendar (named Calendar), but you can share any calendar that’s part of your mailbox.
-
After you’ve added everyone you want to share with and what level of access you want them to have, choose


For more information about sharing calendars, see Sharing your calendar and Calendar Delegation in Outlook Web App.
What if I want to know more?
See the following resources for more information about calendars and Outlook Web App.


