A SharePoint publishing site is a classic site that’s built using a publishing site template. It’s a site where authoring and publishing are more structured and where content management processes are enforced. Publishing sites have typically been used to create enterprise intranets and communication portals.
Notes:
-
Before you build a classic publishing site, consider building a modern communication site. Communication sites are designed to be attractive, flexible, and responsive, and don't require heavy development investments. See Moving from publishing sites to communication sites.
-
Publishing sites and associated web parts do not support the Multiple Language User Interface (MUI) feature with SharePoint content. Instead, use the variations feature, which will redirect users to the appropriate variation site, based on the language setting of their web browser. For more information, see Create a multi-language website.
Publishing sites have unique features that streamline the authoring, approving, and publishing processes. These features are enabled automatically when you create a publishing site and include page layouts, column types, web parts, lists, and libraries.
Note: The Enterprise Wiki is also a publishing site but is less structured and is intended for easy authoring when formal content management processes are not required.
This article explains how to create a publishing site collection and publishing sub-sites, including the publishing site with workflow.
Create a publishing portal
The publishing portal is the top level of the site collection. You must enable publishing here before you can create publishing sub-sites or activate publishing on existing sites.
To set up a publishing portal
-
Sign in to Microsoft 365 as a global admin or SharePoint admin.
-
Select the app launcher icon

-
Choose Resources > Sites. Then choose Add a site.
-
Choose Add a site.
Note: Alternatively, you can choose Admin centers > SharePoint then New.
-
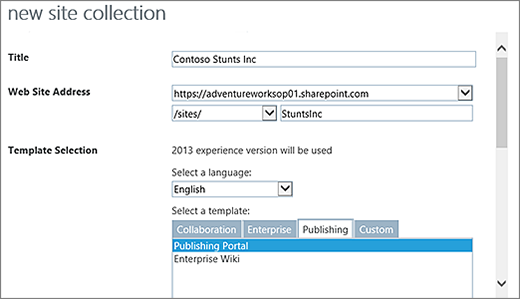
In the New Site Collection dialog box, enter the following information:
-
In the Title box, type a title for the site collection.
-
For Web Site Address, select a domain name and a URL path (for example, /sites/) from the list, and then type a URL name for your publishing portal site collection.
-
In Template Selection, in the Select a language dropdown, choose a language for the site collection. It is important to select the appropriate language for the site collection because once it’s chosen, it cannot be changed. You can enable the SharePoint multiple language interface on your sites, but the primary language for the site collection will remain the same.
-
In Template Selection, in the Select a template section, choose Publishing > Publishing Portal, or Enterprise > Publishing Portal depending on your version of SharePoint.
-
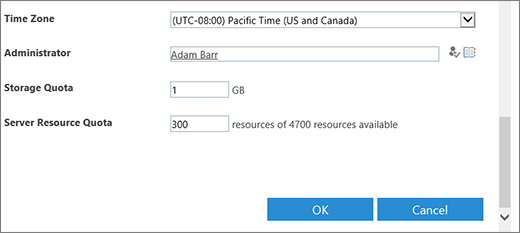
In Time Zone, select the standard time zone appropriate for the location of the site collection.
-
In Administrator, type the user name of your site collection administrator. You can also use the Check names or Browse buttons to find a user to make site collection administrator.
-
In Storage Quota, type the number of MB to allocate to this site collection. Check the MB available value to make sure you don’t exceed the MB available.
-
In the Server Resource Quota box, accept the resource quota default. This setting no longer affects the resource amounts available for the site collection.In Server Resource Quota, type the usage quota to allocate to the site collection.
-
-
Click OK. It might take a few minutes before your new publishing portal site collection appears in the URL list.
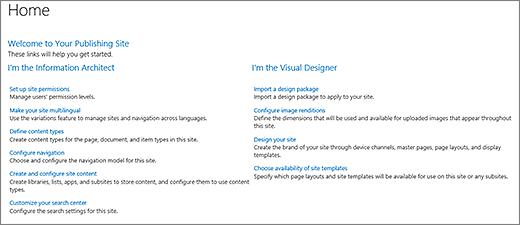
Once your portal has been created, you’ll see a list of getting started links. These links correspond to tasks for fleshing out your new site collection. There is no particular order to these tasks and none of them are mandatory. The tasks you undertake and the order in which you do them depends on what makes sense for your organization.

To get started, click the site collection link you just created, and in the site collection properties dialog, click the Web Site Address. This takes you to the Home page of your new site.
Create a publishing sub-site
A publishing sub-site is a site that sits below the publishing site collection (or below a site collection with publishing features enabled) in a hierarchy. When a sub-site is created beneath a publishing site collection, publishing features are enabled automatically.
-
From your publishing-enabled site collection, click Settings

-
Click new subsite.
-
In the Title box, type a title for the site collection.
-
In Description, type a brief description of the site’s purpose.
-
In Web Site Address, append the existing URL with a descriptive name for your new subsite.
-
In Template Selection, in the Select a language dropdown, choose a language for the site. It is important to select the appropriate language because once it’s chosen, it cannot be changed. Your site language can differ from your site collection language.
-
In Template Selection, in the Select a template section, choose Enterprise > Publishing Site.
-
Under User Permissions, choose one of the following:
-
Use same permissions as parent site if you want to share one set of permissions between this new site and its parent. Choosing this option means you can’t later change the permissions on this site unless you’re an administrator on the parent.
-
Use unique permissions if want users of this site to have different permissions than on the parent site or if you have users who don’t have access to the parent site.
-
-
In Navigation Inheritance, choose Yes if you want to use the same top link bar that’s present on the parent site. Otherwise, choose No.
-
Click Create.
Create a publishing sub-site with approval workflow
A publishing approval workflow automates the routing of content to subject matter experts and stakeholders for review and approval. What makes the publishing approval workflow unique is that it’s designed specifically for publishing sites where the publishing of new and updated web pages is tightly controlled. In these kinds of sites, no new content can be published until it has been approved by every approver in the workflow. For more info see Work with a publishing approval workflow.
Note: The publishing approval workflow is not available for publishing site collections.
To set up a publishing site with workflow
-
From your publishing-enabled site collection, click Settings
-
Click new subsite.
-
In the Title box, type a title for the site collection.
-
In Description, type a brief description of the site’s purpose.
-
In Web Site Address, append the existing URL with a descriptive name for your new subsite.
-
In Template Selection, in the Select a language dropdown, choose a language for the site. It is important to select the appropriate language because once it’s chosen, it cannot be changed. Your site language can differ from your site collection language.
-
In Template Selection, in the Select a template section, choose Enterprise > Publishing Site with Workflow.
-
Under User Permissions, choose one of the following:
-
Use same permissions as parent site if you want to share one set of permissions between this new site and its parent. Choosing this option means you can’t later change the permissions on this site unless you’re an administrator on the parent.
-
Use unique permissions if want users of this site to have different permissions than on the parent site or if you have users who don’t have access to the parent site.
-
-
In Navigation Inheritance, choose Yes if you want to use the same top link bar that’s present on the parent site. Otherwise, choose No.
-
Click Create.
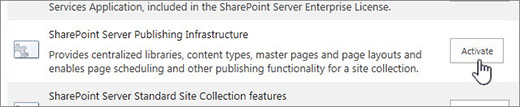
Activate publishing features
If you want to add publishing features to an existing site, follow these steps. You must have enabled publishing on the parent site collection before activating the features at the site level. For more info, see Features enabled in a SharePoint publishing site.
-
From the root of your site collection, click Settings
-
On the Site Settings page, under Site Collection Administration, click Site collection features.
-
On the Site Collection Features page, next to SharePoint Server Publishing Infrastructure, click Activate.