
The enterprise resource pool is used to manage and assign resources to plans within Project Server. In Microsoft Project Professional, you can add resources to the list of enterprise resources that are contained within Project Server.
Note: You must have appropriate permissions to add resources to the enterprise resource pool.
What do you want to do?
Add individual resources to the enterprise resource pool
Adding resources within Microsoft Project requires that Microsoft Project Professional be connected to Project Server with an account that has permissions to add resources to the enterprise.
-
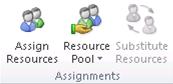
In Microsoft Project, select the Resources tab. In the Assignments group, select Resource Pool, and then select Enterprise Resource Pool.
Project Web Access is displayed within your Web browser
Note: The Web browser may have opened up behind Project. Check the Windows task bar to see if a new Web browser has opened.
-
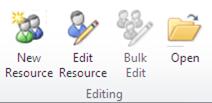
Select New Resource.
-
Specify the following items about the new resource:
-
Resource Type To change the resource type, in the Type list, select work resource, cost resource, or material resource. You also can choose whether the resource is a budget resource or a generic resource by selecting the Budget check box or Generic check box.
Note: Clear the Resource can logon to Project Server check box if you don't want to collect information on tasks that the resource works on, or if you don't want the resource to log on to Microsoft Project Server.
-
Resource Name and other identifying information This includes the actual name of the resource, as well as the e-mail address and Resource Breakdown Structure (RBS) value.
If this resource maintains a team Web site, type the hyperlink name and the URL address in the Hyperlink Name box and Hyperlink URL box respectively.
-
Leveling To exclude this resource from the leveling process, clear the Can Level check box.
-
Timesheet manager and default assignment owner If the resource has a Timesheet Manager or Default Assignment owner, other than himself, type or search for the manager’s name.
To specify the assignment owner, in the Default Assignment Owner box, type or search for the assignment owner's name. Typically, the assignment owner is the work resource who was initially assigned to the task, but the assignment owner could also be a manager or anyone else on a team.
To specify the project calendar that should be applied to the resource, in the Base Calendar list, select the calendar.
You can choose whether the resource is committed or proposed to work on a project by choosing the Default Booking Type box.
-
Team details If the resource name represents a Team of resources, then check the box Team Assignment Pool and browse for the team name.
If the resource belongs to a team, then browse for the team name and leave the box unchecked. You can also browse for the name of the team by choose Browse

-
Availability To change the availability of the resource for the Earliest Available box and the Latest Available box, select the Date Picker

-
Cost and group codes If your organization created codes for grouping and costing purposes, select these codes in the Group box, Code box, Cost Center box, and Cost Type box.
-
-
Your organization may require additional information about your resources. Under Resource Custom Fields, enter the information that your organization requires for each resource. This section won't appear if your organization has not defined custom resource fields.
-
Choose Save.
If you want an enterprise resource to work on a task within your project, you need to use the feature Build Team from Enterprise in your project. Learn how to add resources to your project.
Add multiple resources from Project to the enterprise resource pool
Before you can add multiple resources to the enterprise resource pool, you need to add them to the Resource Sheet view, or start with a plan that already has resources.
-
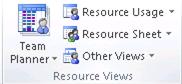
In Microsoft Project Professional, select the View tab. In the Resource Views group, select Resource Sheet.
Enter the resource you want to import into the enterprise resource pool. If you already have resources in your project that aren't part of the enterprise resource pool, these existing resources will be imported.
-
On the Resources tab, select Add Resources, and then select Import Resources to Enterprise.
The Import Resources wizard is displayed on the left, with the Resource Sheet view on the right that contains the resources in the current project. -
To map any customized fields you have in your project with enterprise custom fields that are defined by your organization, select Map Resource Fields.
After mapping resource fields, select OK in the Map Custom Fields dialog box. -
Select Continue to Step 2 for each resource that you want to add to the enterprise resource pool.
Note: The Resource Sheet view will have an Errors column to give you warnings of any mistakes made in importing resources.
-
In the Import Resources wizard, select Yes in the corresponding Import column. This step will insure that no errors are created when resources are imported into the enterprise resource pool.
Any errors will appear next to the resource name in the Errors column to the right. -
Select Save and Finish. The resources have now been imported to the enterprise resource pool.
If you want an enterprise resource to work on a task within your project, you need to use the feature Build Team from Enterprise in your project. Learn how to add resources to your project.
Notes:
-
You can select a Project plan from an earlier version of Project to import resources. This is useful if you have resources in .mpp files from earlier versions of Project or resource lists in other file formats.
-
If you want to add resources that already exist in a database or a list in Microsoft Office Excel, use the Import Wizard that appears when you open a file that is not a Microsoft Project Plan (MPP) or Microsoft Project Template (MPT) file, or when you select ODBC in the Open dialog box. Learn how to add or update enterprise resources using an external data file.
Add more resources from the Enterprise Resource Pool in Microsoft Project Professional
Multiple resources can also be added from Project Server.
-
In Project Web App, select Resource to take you to the Resource Center. Select at least one resource and then selectOpen.
Note: You have to select at least one resource in order to open Enterprise Resource Pool in Project Professional.
-
In Project, add resources to the Resource Sheet view.
-
Close and save Project.
Note: Your organization may require additional information about your resources. Under Resource Custom Fields, enter the information that your organization requires for each resource. This section will appear only if your organization has custom resource fields.
The resources that you added to the project will be added to the enterprise resource pool.


