
This article provides guidance on associating blank or custom templates to a Document library to enable users to easily create generic or highly customized Microsoft Office documents based on those templates. You will find this information especially useful if you want to enable the consistent use of specific types of documents such as expense reports, event-specific branded PowerPoint slides, or trip reports. After the custom templates are added to a Document library, the library itself can be saved as a template used to produce specific types of documents for a specific group within your organization such as human resources, legal, or IT.
What do you want to do?
Introduction
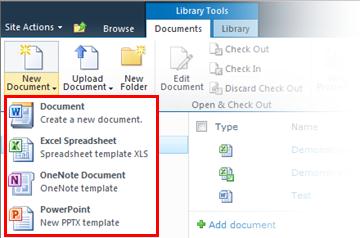
When you create a new document for any given document library, the default type of document template available to you is a Microsoft Word document. But what if you want to quickly add a Microsoft Excel worksheet, a Microsoft OneNote document, or a Microsoft PowerPoint presentation to your Document Library? And what if you want each document type to follow a particular template so that all documents of a certain type are consistent?
This article is divided into the two steps necessary for creating and then adding content types to be used as templates for various file types within a Document Library.
Create a content type for a document template
Note: You must be a site collection owner to successfully complete this procedure.
-
Go to the top level of the site collection and select Site Settings from the Site Actions menu.
-
Under the Galleries section of the Site Settings page, click Site content types.
Note: Note that, by default, the New Word content type exists under the Group Work Content Types section. This is typically the choice that is available to you when adding a new document to any Document Library.
-
Click Create at the top of the Site Content Type settings page.
-
On the New Site Content Type page, do the following:
-
Type “PowerPoint” in the Name field.
-
Type “Create new presentation in this library” in the Description field.
-
Select Document Content Types from the Select parent content type from drop down list.
-
Select Document from the Parent Content Type drop-down list.
-
Click OK.
-
-
On the Site Content Types > PowerPoint page, under Settings, click Advanced Settings.
-
In the Document Template section, select Upload a new document template, click Browse, and then double-click a PowerPoint slide or template that you want to use.
Note: You must have Microsoft Office installed in order to create Office generated documents.
-
Click OK.
Note: You can also add a new Excel, OneNote or Word template by repeating the above steps for each file type.
Note: You can create multiple and different templates of the same file type.
Display the new template as a choice when creating new documents
Now that you have created content types for your PowerPoint, OneNote, and Excel templates, you need to add the content types to a Document Library. This step ensures that they will appear as choices from the New Document command on the ribbon.
-
Navigate to the library to which you want to associate the new content types.
-
On the Library tab of the ribbon, click Library Settings. If you are working with a list, click List Settings.
-
Under General Settings, click Advanced Settings.
-
In the Content Types section, click Yes under Allow management of content types, and then click OK.
-
On the Library Settings page, under Content Types, click Add from existing site content types.
-
On the Add Content Types page, select All Groups under Select site content types from.
-
Under Available Site Content Types, look for and select the new content types to associate to this library and click Add.
Note: You can multi-select content types by pressing the <CTRL> key while clicking on several content types in the list.
-
The next time you click New on the ribbon for the library you want to add items to, the new template content types appears as choices in the drop-down list.
Save your customized library as a template
Now that you have created content types for your PowerPoint, OneNote, and Excel templates and added them to the Document Library, you can save this library as a template. In this way, you won’t have to repeat the steps above if you want something similar for another Document Library.
Note: You must have Designer permissions to accomplish this task.
-
Go the Document Library that you want to save as a template.
-
Under Library Tools in the ribbon, click the Library tab.
-
In the Settings group of the ribbon, click Library Settings.
-
Under Permissions and Management, click Save document library as template.
-
Type the file name, the template name and template description in the fields provided.
-
If you want document libraries created from this new Document library template to include the items already in the document library, select the Include Content checkbox.


