
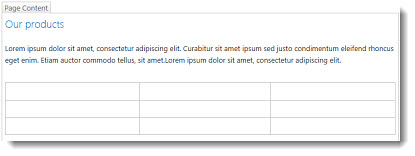
You can add tables to your web pages to help structure text, images, or objects on a page. You might do this to show data in a table, a price list, a product comparison, a list of terms and definitions, and so on. You might also do this to position content, for example, show employee biographies, your contact information, or business hours. This article explains how to position or structure content on a page using the table editor on your website and other methods like HTML and CSS.
In this article
Insert a table
To insert a table on a page, lot onto your Microsoft 365 account, open the website editor, and follow these steps.
-
Browse to the web page where you want to add the table.
-
Click the Page tab.
-
Click the Edit button.
-
Click on the page where you want to add the table.
-
Click the Insert tab.
-
Click the Table button.

-
There are two ways to add the table:
-
Click the arrow to expand the table gridlines, hover your mouse pointer over the table gridlines, and then click the desired number of table cells.
-
Or, click the Insert Table button, type the number of columns and rows you want, and click OK.
-
-
The table is added to your web page, where you can start adding content to it or customizing it, tasks that are described next.
Customize a table
Once you insert a table on your web page, you can start customizing it. You can add and delete rows or columns, merge and split rows or columns, resize the table, change the appearance, and so on.
Add rows and columns
You can add rows and columns of cells in a table to allow for more structured content on the page. You can add them above, below, left, or right of the cell where your cursor is located. Only entire rows or columns can be added at once rather than individual cells.
To add rows or columns in a table
-
Edit the web page that contains your table.
-
Place your cursor in the table cell where you want to add the row or column.
-
Click the Table Layout tab.
-
Choose one of the following:
-
Insert Above to add a row above the selected cell.
-
Insert Below to add a row below the selected cell.
-
Insert Left to add a column to the left of the selected cell.
-
Insert Right to add a column to the right of the selected cell.
-
Tip: If you don’t like the outcome of the new cells, you can undo the action by typing CTRL + Z or clicking the Format Text tab and choosing Undo.
You’ll see the changes immediately applied to your table. If you had text or images in the cells, they’ll be placed together in the new merged cell.
Merge cells
When you merge cells, you combine two or more cells to allow for more room for text, images, and other objects in the table. You can merge cells above or below one another and left or right from one another, but you can only merge individual cells and not entire rows or columns.
To merge cells in a table
-
Edit the web page that contains your table.
-
Place your cursor in the table cell you want to merge.
-
Click the Table Layout tab.
-
Click Merge Cells and choose one of the following:
-
Merge Above to merge with the cell above.
-
Merge Below to merge with the cell below.
-
Merge Left to merge with the cell to the left.
-
Merge Right to merge with the cell to the right.
-
Tip: If you don’t like the outcome of the merged cells, you can undo the action by typing CTRL + Z or clicking the Format Text tab and choosing Undo.
You’ll see the changes immediately applied to your table. If you had text or images in the cells, they’ll be placed together in the new merged cell.
Split cells
When you split cells, you turn a single cell into two cells to apply more structure to the table contents. You can split cells horizontally or vertically, but you can only split individual cells and not entire rows or columns.
To split cells in a table
-
Edit the web page that contains your table.
-
Place your cursor in the table cell you want to split.
-
Click the Table Layout tab.
-
Click Split Cells and choose one of the following:
-
Split Horizontal to split the cell into two cells, side-by-side.
-
Split Vertical to split the cell into two cells, one over the other.
-
Tip: If you don’t like the outcome of the split cells, you can undo the action by typing CTRL + Z or clicking the Format Text tab and choosing Undo.
You’ll see the changes immediately applied to your table. If you had text or images in the cell, they’ll remain in the original cell and not the new one.
Resize the table
You can change the size of a table as well as the individual rows and columns that make up the table. You might do this to fit more page content in a table cell or make more room on the rest of the page for other content. You can specify the table or cell size in pixels (px) or as a percentage (%).Only the entire row, column, or table can be resized at once rather than individual cells.
To change the size of the table
-
Edit the web page that contains your table.
-
Place your cursor inside the table you want to resize.
-
Click the Table Layout tab.
-
Next to Table Width, enter a percent or pixel value. A value of 100% or 700px or more uses the entire page content area.
-
Next to Table Height, enter a percent or pixel value. Keep in mind that the number of paragraphs determines table height too.
-
Next to Column Width, enter a percent or pixel value. A value of 100% or 700px or more uses the entire page content area.
-
Next to Column Height, enter a percent or pixel value. Keep in mind that the number of paragraphs determines cell table height too.
Tip: If you don’t like the outcome of the resized table or cells, you can undo the action by typing CTRL + Z or clicking the Format Text tab and choosing Undo.
You’ll see the changes immediately applied to your table. If you had text or images in the cells, they’ll remain in the resized cell.
Change the table style
You can customize the appearance of a table by changing its style, designating a header or footer row, and applying special formatting to the first and last table row or column.
To change the table style
-
Edit the web page that contains your table.
-
Place your cursor in the table that you want to customize.
-
Click the Site tab.
-
Choose one of the following table style options. (You may not see formatting differences if the “Light” or “Clear” table style is currently applied to your table.)
-
Header Row applies special formatting to the first row of the table.
-
Footer Row applies special formatting to the last row of the table.
-
First Column applies special formatting to the first column of the table.
-
Last Column applies special formatting to the last column of the table.
-
-
Choose a table style. Each style changes the border color, cell color, and header or footer color. (Some styles only change the header and footer if you selected that option above.)
-
Default Table Style – Light: Thin, light, gray grid borders.
-
Table Style 1 – Clear: No visible borders.
-
Table Style 2 – Light Banded: Light gray horizontal lines, every other row shaded grey.
-
Table Style 3 – Medium Two Tones: Blue header, every other row is shaded light blue.
-
Table Style 4 – Light Lines: Gray header, light blue horizontal lines.
-
Table Style 5 – Grid: Gray grid borders, every other row shaded gray.
-
Table Style 6 – Accent 1: Blue grid borders, blue header.
-
Table Style 7 – Accent 2; Light blue grid borders, light blue header.
-
Table Style 8 – Accent 3: Green grid borders, green header.
-
Table Style 9 – Accent 4: Olive grid borders, olive header.
-
Table Style 10 – Accent 5: Red grid borders, red header.
-
Table Style 11 – Accent 6: Purple grid borders, purple header.
-
-
Click Show Grid Lines to show or hide table grid lines. This is simply a visual aid in case you applied the Clear Table Style or otherwise hid table borders but you still need to see the table to work with it.
You’ll see the changes immediately applied to your table. If you had text or images in the cell, they’ll remain in the original cell with the new style applied.
Add text or objects to the table
When you’re finished customizing the table, you’re ready to start adding content to the table, such as text, graphics, and other objects as described here.
To add text or objects to the table
-
Edit the web page that contains your table.
-
Place your cursor inside the table cell where you want to add content.
-
To add text, just start typing the text or paste the text in the table cell. To change the typeface or font size, click the Format Text tab and choose the font settings from there.
-
To insert an image, video, or another object, click the Insert tab and insert the object like you would on any of your web pages. (If the image or video is larger than the table cell, the table cell will automatically resize to fit the image or video.)
-
To remove the text, images, or objects, select it in the cell and press Delete on your keyboard.
Delete a cell, row, column, or table
You can delete individual cells, rows, columns, or the entire table if necessary.
To delete a cell, row, column, or table
-
Edit the web page that contains your table.
-
Place your cursor inside the cell, row, column, or the table you want to delete.
-
Click the Table Layout tab.
-
Click Delete and chose one of the following:
-
Delete Cell to delete the individual cell where your cursor is located.
-
Delete Column to delete the column where your cursor is located.
-
Delete Row to delete the row where your cursor is located.
-
Delete Table to delete the entire table where your cursor is located.
-
Continue customizing the table or contents on the page.
Create your own table, HTML content, or CSS
If you want to create a custom table or use your own HTML code with CSS to position content on a page, you can do so by creating your HTML code in a web page editor like Expression Web or Dreamweaver. Make your changes in the editor, and then copy and paste the web page code into your public website by following these steps.
Add a custom table or web page code to your web site
-
Edit the web page for which you want to add a table or HTML content.
-
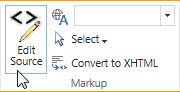
Click the Format Text tab and then click Edit Source in the Markup group.
-
In the HTML Source window, type or paste your custom HTML or modify the existing source content, such as applying DIV tags. (The HTML Source window is also a useful way to copy a table from one part of your website to another, which is faster than recreating and customizing a table.)
-
Click OK and then save the page.
-
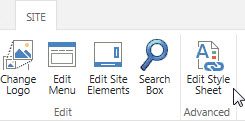
To further customize the HTML (for example, by using CSS layers), click the Site tab, and then click Edit Style Sheet.
-
In the Edit Style Sheet window, add your custom CSS, and then click Save.
Tip: To further customize the layout and positioning of content on a page, you might consider creating a custom page layout using the Design Manager.


