
Note: This article has done its job, and will be retiring soon. To prevent "Page not found" woes, we're removing links we know about. If you've created links to this page, please remove them, and together we'll keep the web connected.
You can change the look of your shape by adding a picture to it. (A fill is the interior of a shape.) If you want to add other types of fills, such as a color, gradient, or pattern fill, see Add a fill or effect to a shape or text box.
-
Add a shape to your document, and then click the shape to select it.
To add the same picture to multiple shapes, click the first shape, and then press and hold CTRL while you click the other shapes.
-
Under Drawing Tools, on the Format tab, in the Shape Styles group, click Shape Fill > Picture, and select the picture that you want.
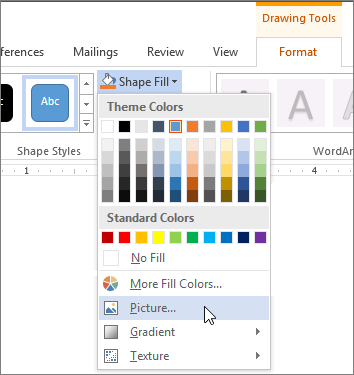
Note: If you do not see the Drawing Tools and Format tabs, make sure that you selected a shape. You might have to double-click the shape to select it and open the Format tab.
You can remove a portion of the picture or control the size and position of the picture used for the shape fill by using fit, fill, and cropping tools. For detailed information and instructions, see the section "Crop to fit or fill a shape" in Crop a picture.


