
Hyperlinks in Visio are different from those in other Office apps. In Visio, you assign a hyperlink to a shape instead of text.
Any shape can take a hyperlink, or multiple hyperlinks. The hyperlinks can link to another page or shape in the current drawing, a page or shape in another drawing, a document other than a Visio drawing, a Web site, FTP site, or e-mail address.
To make a hyperlink look like a traditional text-based link, see Emulate a text hyperlink below.
Note: Before you begin, make sure the current drawing and the file you are linking to have both been saved.
Link to a page or shape in a Visio drawing
-
Select the shape that you want to link.
-
On the Insert tab, in the Links group, select Hyperlink.
(Keyboard shortcut: Ctrl+K)
-
Next to Address, click Browse, and select the drawing you want to link to.
Note: If you want to link to a page in the same drawing, leave the Address section blank.
-
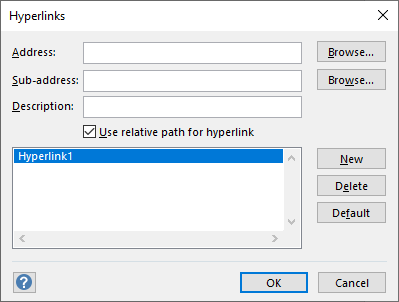
Next to Sub-address, click Browse, and in the Hyperlink dialog box, do the following:
-
Choose which page you want to link to.
-
If necessary, type the name of the shape that you want to link to.
To get the shape's name, on the Developer tab, click Shape Name. If you don't see the Developer tab, you can add it to the Ribbon. For more information, see Show the Developer tab.
-
You have the option of making your link a relative hyperlink, which is one that specifies the location of the file that you are linking to, relative to the location of your current drawing. If you aren't sure whether to use a relative hyperlink, don't select the Use relative path for hyperlink option.
Link a shape to a file on your computer or network
-
Select the shape that you want to link.
-
On the Insert tab, in the Links group, select Hyperlink (keyboard shortcut: Ctrl+K).
-
Next to Address, click Browse, click Local File, and select the file you want to link to.
Tip: If you don't see the file you want, try selecting a different file type in the Files of type list.
Link a shape to a website
-
Select the shape that you want to link.
-
On the Insert tab, in the Links group, select Hyperlink (keyboard shortcut: Ctrl+K).
-
Next to Address, select Browse, select Internet Address, and then find the website you want to link to.
-
To link to a specific bookmark on a Web page, in the Sub-address box, type the bookmark name.
If you aren't sure whether to use a bookmark name, leave the Sub-address box blank.
-
In the Description box, type a name for the hyperlink. This name is used as the link name in the shape's shortcut menu.
-
To add another hyperlink to this same shape, click New and type the information for the new link.
Emulate a text hyperlink
To make hyperlink that's more like a traditional text hyperlink, use a textbox shape in your drawing:
-
Select Insert > Text Box, and then draw the box on the canvas.
A blinking insertion point appears in the center of the box, ready for you to enter text.
-
Type the text that you want to appear as a link.
-
Select the Home tab, then use the options in the Font group to style the text the way you want.
-
On the Insert tab, in the Links group, select Link.
-
In the Hyperlinks dialog box, enter the link address in the Address box.
-
In the Description box, enter appropriate text (similar to what you used in step 2).
This name is used as the link name on the shape's shortcut menu when someone right-clicks the shape.
-
Click OK.
Open a draft email message from a shape
-
Select the shape that you want to link.
-
On the Insert tab, in the Links group, select Hyperlink (keyboard shortcut: Ctrl+K).
-
In the Address text box, type mailto: and then add the email address for the mail message.
Follow a hyperlink
-
Ensure that no shapes on the page are selected.
-
Point at the linked shape, press Ctrl, and then click.
(If another shape is selected when you press Ctrl+click, the hyperlink won't be followed. Instead, the shape you click is added to the selection with the already-selected shape.)
-
Alternatively, right-click the shape, and then click the hyperlink URL or name (from the Description box) in the shortcut menu.
Note: If you saved the drawing as a Web page, or you are in full-screen view, just click the shape to follow the link.
Change or delete a hyperlink
-
Select the shape.
-
On the Insert tab, click Hyperlink.
(Keyboard shortcut: Press Ctrl+K)
-
To change a hyperlink, select the hyperlink in the hyperlink list, make the changes that you want in the Address, Sub-address, and Description boxes, and then click OK.
-
To delete a hyperlink, select the hyperlink in the hyperlink list, click Delete, and then click OK.
You can add a hyperlink to any shape. The hyperlink can link to another page in the current drawing, a Web site, or it can open a draft email message.
To make a hyperlink look like a traditional text-based link, use Insert > Text Box, add the text you want, and then follow any of the following procedures.
Link to a page in the same Visio drawing
-
Select the shape that you want to link.
-
On the Insert tab, select Link.
-
In the Link to box, select Page in this file.
-
Under Choose page, select the page you want to link to.
-
Optionally, click Add display text, and enter a description of the hyperlink.
When someone points at the hyperlinked shape, the display text appears in a tooltip.
-
Select OK to confirm your changes.
Link a shape to a website
-
Select the shape that you want to link.
-
On the Insert tab, select Link.
-
In the Link to box, select URL.
-
Select Enter URL, then add the web address (https://...) of the web page you want to link to.
-
Select Add display text, then enter a description of the hyperlink.
When someone points at the hyperlinked shape, the display text appears in a tooltip.
-
Select OK to confirm your changes.
Open a draft email message from a shape
-
Select the shape that you want to link.
-
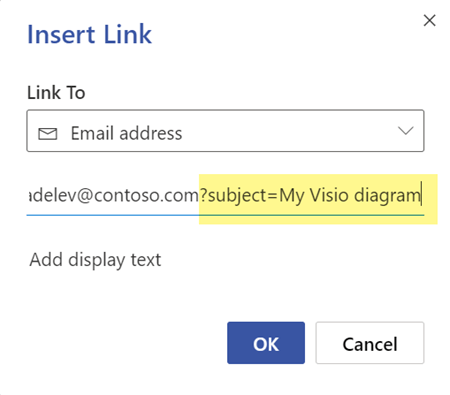
On the Insert tab, select Email address.
-
Select Enter email address, then add the address of one or more email recipients.
-
Use a comma to separate multiple addresses, as illustrated here:

-
To define a Subject line for the message, append ?subject=Topic of message after the email address.
-
-
Select Add display text, and then enter a description of what happens when the hyperlink is clicked, such as "Send email to ...".
Edit or remove a hyperlink
-
Select the shape whose hyperlink you want to edit.
-
On the Insert tab, select Link.
-
Revise the link as needed or select Remove if you want to delete the link entirely from the shape.
Follow a hyperlink
-
Ensure that no shapes on the page are selected.
-
Point at the linked shape, press Ctrl, and then click.
(If another shape is selected when you press Ctrl+click, the hyperlink won't be followed. Instead, the shape you click is added to the selection with the already-selected shape.)


