
|
Here are some basic database tasks that you can do to help you learn how to use Microsoft Access 2010.
|
In this article
What is Access?
Access 2010 is a database application design and deployment tool that you can use to keep track of important information. You can keep your data on your computer, or you can publish to the Web — so others can use your database with a web browser.
Many people start using Access when the program that they are using to keep track of something gradually becomes less fit for the task. For example, suppose you are an event planner, and you want to keep track of all the details that you need to manage to make your events successful. If you use a word processor or spreadsheet program to do this, you can easily run into trouble with duplicate and inconsistent data. You can use calendaring software, but tracking financial information in a calendar isn't a good fit.
Relational databases in Access
Sometimes you need a relational database to track such information — a storehouse of data that has been separated into smaller collections of data (called tables) to eliminate redundancy, and then related together based on common bits of information (called fields). For example, an event planning relational database might contain a table with customer information, a table with vendor information, and a table with event information. The table with event information might have a field to relate it to the customer table, and a field to relate it to the vendor table. That way, for example, if a vendor's phone number changed, the information could be changed once in the vendor table, instead of in every event that involved the vendor.
Access is a tool that you can use to quickly and easily develop relational database applications that help you manage information. You can create a database to help you keep track of just about any kind of information, such as inventory, professional contacts, or business processes. In fact, Access comes with templates that you can use right away to track a variety of information, making things easy even for a beginner.
When you open Access
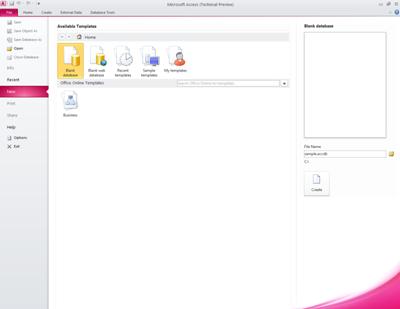
When you start Access 2010, you see the Microsoft Office Backstage view, where you can get information about the current database, create a new database, open an existing database, and view featured content from Office.com.
Backstage view also contains many other commands that you can use to adjust, maintain, or share your databases. Commands in Backstage view generally apply to entire databases, not to objects inside of a database.
Note: You can get to Backstage view at any time by clicking the File tab.
Find and apply a template
Access provides you with a wide variety of templates that you can use to speed up your database creation process. A template is a ready-to-use database that contains all of the tables, queries, forms, and reports needed for performing a specific task. For example, there are templates that can be used to track issues, manage contacts, or keep a record of expenses. Some templates contain a few sample records to help demonstrate their use. Template databases can be used as is, or you can customize them to better fit your needs.
To find and apply a template to your database, do the following:
-
On the File tab, click New.
-
Under Available Templates, do one of the following:
-
To reuse a template that you’ve recently used, click Recent Templates, and then select the template that you want.
-
To use a template that you already have installed, click My Templates, and then select the template that you want.
-
To find a template on Office.com, under Office.com Templates, click a template category, select the template that you want, and then click Download to download the template from Office .com to your computer.
You can also search for templates on Office.com from within Access. In the Search Office.com for templates box, type one or more search terms, and then click the arrow button to search.
-
-
Optionally, click the folder icon next to the File Name box to browse to a location where you want to create the database. If you don't indicate a specific location, Access creates the database in the default location that is displayed below the File Name box.
-
Click Create.
Access creates the database and opens it for use.
Create a database from scratch
If you want a more thorough introduction to the concepts behind using Access to create a database, see the article Database design basics.
If none of the templates fits your needs, or if you have data in another program that you want to use in Access, you may decide that it is better to create a database from scratch. In Access 2010, you have a choice: a standard desktop database, or a web database.
For more information about web databases, see the article Build a database to share on the Web.
To create a new database, do the following:
-
Start Access.
-
On the New tab in Backstage view, click Blank Database or Blank Web Database.
Important: The choice that you make here will determine what features are available in the database. Desktop databases cannot be published to the Web, and web databases do not support some desktop features, such as totals queries.
-
On the right, type a name for your database in the File Name box.
To change the location in which you create the file, click Browse

-
Click Create.
Access creates the database, and then opens an empty table (named Table1) in Datasheet view.
-
Access puts the cursor in the first empty cell in the Click to Add column of the new table.
To add data, begin typing — or you can paste data from another source, as described in the section Paste data from another source into an Access table, later in this article.
Notes:
-
Entering data in Datasheet view is designed to be very similar to entering data in an Excel worksheet. The main restriction is that data must be entered in contiguous rows and columns, starting at the upper-left corner of the datasheet. You should not try to format your data by including blank rows or columns as you might do in an Excel worksheet, because doing so will waste space in your table. The table merely contains your data. All visual presentation of that data will be done in the forms and reports that you design later.
-
The table structure is created while you enter data. Any time that you add a new column to the datasheet, a new field is defined in the table. Access sets the data type of the field based on the type of data that you enter. For example, if you have a column in which you have entered only date values, Access will set the data type of that field to Date/Time. If you later attempt to enter a non-date value (such as a name or a phone number) in that field, Access displays a message informing you that the value does not match the data type of the column. When possible, you should plan your table so that each column contains the same type of data, whether it is text, dates, numbers, or some other type. This makes it much easier to build queries, forms, and reports that select just the data that you want.
-
If you do not want to enter data yet, click Close 
Note: Access will delete Table1 if you close it without saving.
Open an existing Access database
Tip: To quickly open one of the last several databases that you had open, on the File tab, click Recent, and then click the file name.
-
On the File tab, click Open.
-
Click a shortcut in the Open dialog box — or, in the Look in box, click the drive or folder that contains the database that you want.
-
In the folder list, double-click folders until you open the folder that contains the database.
-
When you find the database, do one of the following:
-
To open the database in default open mode, double-click it.
-
To open the database for shared access in a multiuser environment, so that both you and other users can both read and write to the database at the same time, click Open.
-
To open the database for read-only access, so that you can view it but cannot edit it, click the arrow next to the Open button, and then click Open Read-Only.
-
To open the database for exclusive access, so that no one else can open it while you have it open, click the arrow next to the Open button, and then click Open Exclusive.
-
To open the database for read-only access, click the arrow next to the Open button, and then click Open Exclusive Read-Only Other users can still open the database, but they only have read-only access.
-
If you can't find the database that you want to open
-
In the Open dialog box, click the My Computer shortcut — or, in the Look in box, click My Computer.
-
In the list of drives, right-click the drive that you think might contain the database, and then click Search.
-
Enter your search criteria, and then press ENTER to search for the database.
-
If the database is found, open it by double-clicking it in the Search Results dialog box.
Because the search was initiated from the Open dialog box, you must click Cancel in that dialog box before the database will open.
You can directly open a data file in an external file format (such as dBASE, Paradox, Microsoft Exchange, or Excel). You can also directly open any ODBC data source, such as Microsoft SQL Server or Microsoft FoxPro. Access automatically creates a new Access database in the same folder as the data file, and adds links to each table in the external database.
Get started using your new database
Depending on the template that you used, you might need to do one or more of the following to get started with the new database:
-
If Access displays a Login dialog box with an empty list of users, use the following procedure to get started:
-
Click New User.
-
Fill in the User Details form.
-
Click Save & Close.
-
Select the user name you just entered, and then click Login.
-
-
If Access displays an empty datasheet, you can begin typing data directly into that datasheet, or click other buttons and tabs to explore the database.
-
If Access displays a Getting Started page, you can click links on that page to learn more about the database, or click other buttons and tabs to explore the database.
-
If Access displays a Security Warning message in the message bar, and you trust the source of the template, click Enable Content. If the database requires a login, you will need to log in again.
For desktop and web databases, you also want to begin with one of these steps:
Add a table
You can add a new table to an existing database by using the tools in the Tables group on the Create tab.
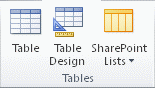
Note: In a web database, only the Table command is available in the Tables group.
Regardless of which view you start in, you can always switch to the other view by using the view buttons on the status bar of the Access window.
Create a blank table in Datasheet view In Datasheet view, you can enter data immediately, and let Access build the table structure behind the scenes. Field names are assigned numerically (Field1, Field2, and so on), and Access sets the field data type, based on the type of data that you enter.
-
On the Create tab, in the Tables group, click Table

-
Access creates the table, and then places the cursor in the first empty cell in the Click to Add column.
-
To add data, begin typing in the first empty cell — or you can paste data from another source, as described later in this article.
-
To rename a column (field), double-click the column heading, and then type the new name.
Tip: Give a meaningful name to each field, so that you can tell what it contains without having to look at the data.
-
To move a column, select it by clicking its column heading, and then drag it to where you want it. You can also select several contiguous columns and drag them all to a new location together.
To add more fields to your table, you can either begin typing in the Click to Add column in Datasheet view, or you can add new fields by using the commands in the Add & Delete group on the Fields tab.
-
Create a table starting in Design view In Design view, you first create the new table's structure. Then you either switch to Datasheet view to enter data, or you enter your data by using some other method, such as with a form.
Design view is not available for tables in a web database.
-
On the Create tab, in the Tables group, click Table Design.

-
For each field in your table, type a name in the Field Name column, and then select a data type from the Data Type list.
-
You can enter additional information for each field in the Description column. The description that you enter is displayed in the status bar when the insertion point is in that field, and is used as the status bar text for any controls that you create by dragging the field from the Field List pane to a form or report, and for any controls that are created for that field by the Form Wizard or Report Wizard.
-
After you have added all of your fields, save the table:
-
On the File tab, click Save.
-
-
You can begin entering data into the table at any time by switching to Datasheet view, clicking in the first empty cell, and typing. You can also paste data from another source, as described in the next section.
Create a table based on a SharePoint list With a SharePoint list, your data can be used by people who do not have Access. Moreover, list data is stored on a server, which generally offers better protection against data loss than files stored on a desktop computer. You can either start with a new list, or you can link to an existing list. You must have sufficient permissions on the SharePoint site where you want to create the list; this can vary by site so contact your SharePoint administrator for details about your options.
This feature is not available in a Web database.
-
On the Create tab, in the Tables group, click SharePoint Lists.
-
You can use one of the list templates to create a standard SharePoint list, such as Contacts or Events.
You can also choose to create a custom list, or to link to or import an existing list. Click the option that you want.
-
If you choose any of the list templates or to create a custom list, the Create New List dialog box opens to guide you through the process. If you choose to use an existing list, the Get External Data dialog box opens to help you.
For more information about tables, see the article Introduction to tables.
Paste data from another source into an Access table
If your data is currently stored in another program, such as Excel, you can copy and paste your data into an Access table. In general, this works best if your data is already separated into columns, as they are in an Excel worksheet. If your data is in a word processing program, you should first separate the columns of data by using tabs, or convert the data into a table in the word processing program, and then copy the data. If your data needs any editing or manipulation (for example, separating full names into first and last names), you might want to do this before you copy the data, particularly if you are not familiar with Access.
When you paste data into an empty table, Access sets the data type of each field according to what kind of data it finds there. For example, if a pasted field contains nothing but date values, Access applies the Date/Time data type to that field. If the pasted field contains only the words "yes" and "no", Access applies the Yes/No data type to the field.
Access names the fields depending on what it finds in the first row of pasted data. If the first row of pasted data is similar in type to the rows that follow, Access determines that the first row is part of the data and assigns the fields generic names (Field1, Field2, and so on). If the first row of pasted data is not similar to the rows that follow, Access uses the first row as field names, and excludes the first row in the actual data.
If Access assigns generic field names, you should rename the fields as soon as possible to avoid confusion. Use the following procedure:
-
On the File tab, click Save to save the table.
-
In Datasheet view, double-click each column heading, and then type a name for the column.
-
Save the table again.
Import or link to data from another source
You might have data that you've been collecting in another program that you would like to use in Access. Perhaps you work with people who store their data in other programs, and you want to work with their data in Access. Or, maybe you have multiple disparate sources of data, and need a "landing pad" where you can bring them all together for deeper analysis.
Access makes it easy to import or link data from other programs. You can bring in data from an Excel worksheet, from a table in another Access database, from a SharePoint list, or from any of a variety of other sources. The process differs slightly depending on the data source, but these instructions will get you started:
-
On the External Data tab, in the Import & Link group, click the command for the type of file that you are importing from.
For example, if you are importing data from an Excel worksheet, click Excel. If you don't see the correct program type, click More.
Note: If you can't find the correct format type in the Import & Link group, you may need to start the program in which you originally created the data, and then use that program to save the data in a file format that Access supports (such as a delimited text file), and then import or link to the data.
-
In the Get External Data dialog box, either click Browse to browse to the source data file, or type the full path of the source data file in the File name box.
-
Click the option that you want under Specify how and where you want to store the data in the current database. You can create a new table by using the imported data, or create a linked table that maintains a link to the data source.
-
Click OK.
Depending on your choice, the Link Objects dialog box or the Import Objects dialog box opens.
-
Use the dialog box to finish the process. The exact procedure you follow depends on the import or link option that you chose.
-
On the last page of the wizard, click Finish.
If you chose to import, Access asks whether you want to save the details of the import operation that you just completed.
-
If you think that you will be performing this same import operation again, click Save import steps, and then enter the details.
You can then easily reproduce the import operation by clicking Saved Imports in the Import group on the External Data tab, clicking the import specification, and then clicking Run.
-
If you don't want to save the details of the operation, click Close.
Access imports the data into a new table, and then displays the table under Tables in the Navigation Pane.
To learn more about how to import data into Access, follow the links in the See Also section of this article.
Next steps
The rest of the design process varies based on your goals, but you probably want to consider creating queries, forms, reports, and macros. This article does not provide information about creating additional database objects.
For more information, see these articles:
Import data from a spreadsheet or other program
If you are familiar with other database or spreadsheet programs, you probably know the basics of how these applications work and what databases are used for. Access differs from many other database applications by allowing you to create relational databases, and it further differs from most spreadsheet programs by offering tools for developing sophisticated queries, forms, and reports. Access also provides many options for working with other database programs, such as SQL Server.
Import an Excel worksheet into Access
Many people begin to explore Access after first building a list in Excel. Excel is a great place to start a list, but as the list grows, it becomes harder to organize and keep updated. Moving the list to Access is usually the next logical step.
A database table is similar in structure to a worksheet, in that data is stored in rows and columns. As a result, it is usually easy to import a worksheet into a database table. The main difference between storing your data in a worksheet and storing it in a database is in how the data is organized. Simply importing your entire worksheet as a new table in a database will not solve the problems associated with organizing and updating your data, particularly if your worksheet contains redundant data. To solve those problems, you must split the spreadsheet data into separate tables, each one containing related data. For more information about how to arrange the data in your tables, see the article Database design basics.
Access features the Table Analyzer Wizard, which can help you to complete this process. After importing your data into a table, the wizard helps you to split the table into separate tables, each of which contains data that is not duplicated in any of the other tables. The wizard also creates the necessary relationships between the tables.
Import an Excel worksheet as a table in a new database
-
On the File tab, click New, and then click Blank Database.
-
Type a name for the new database in the File Name box, and then click Create.
The new database opens, and Access creates a new empty table, Table1.
-
Close Table1.
When asked if you want to save changes to the design of Table1, click No.
-
On the External Data tab, in the Import & Link group, click Excel.

-
In the Get External Data dialog box, click Browse.
-
Use the File Open dialog box to locate your file.
-
Select the file, and then click Open.
-
In the Get External Data dialog box, ensure that the Import the source data into a new table in the current database option is selected.
-
Click OK.
The Import Spreadsheet Wizard starts, and asks you a few questions about your data.
-
Follow the instructions, clicking Next or Back to navigate through the pages. On the last page of the wizard, click Finish.
Note: Access asks whether you want to save the details of the import operation that you just completed. If you think that you will be performing this same import operation again, click Yes, and then enter the details. You can then easily reproduce the operation in the future by clicking Saved Imports in the Import group on the External Data tab. If you don't want to save the details of the operation, click Close.
Access imports the data into a new table, and then displays it under All Tables in the Navigation Pane.
Use the Table Analyzer Wizard to organize your data
After your data has been imported into an Access table, you can use the Table Analyzer Wizard to quickly identify redundant data. The wizard then provides a simple way to organize the data into separate tables, so that it is be stored in the most efficient way. Access preserves the original table as a backup, and then creates new tables that you can use as the basis for your database application.
-
Open the Access database that contains the table that you want to analyze.
-
On the Database Tools tab, in the Analyze group, click Analyze Table.
The Table Analyzer Wizard starts.
The first two pages of the wizard contain a short tutorial — complete with buttons that you can click to see examples. If you don't see the introductory pages, but instead see a check box labeled Show introductory pages?, select the check box, and then click Back twice to see the introduction. If you don't want to see the introductory pages again after reading the introduction, you can clear the Show introductory pages? check box.
-
On the Which table contains fields with values that are repeated in many records? page, select the table that you want to analyze, and then click Next.
-
You can let the wizard decide which fields go in which tables, or you can make that decision yourself. If you follow the wizard's suggestions, you can still make changes to the table layout on the next page of the wizard.
Note: If you let the wizard decide which fields to put in which tables, its choices may not always be appropriate for your data, especially if there is not much data to work with. You should check the wizard's results carefully. On the other hand, the wizard may suggest a more efficient organization than the one that you are thinking of, so it is a good idea to at least try the wizard's decisions once. If you don't like the suggestions, you can still rearrange the fields manually, and you can always click Back and arrange all of the fields yourself.
-
Click Next. On this page, you specify which tables contain which fields. If you chose to let the wizard decide, you should see multiple tables connected by relationship lines. Otherwise, Access creates only one table containing all of the fields. In either case, you can make changes on this page.
-
You can drag fields from a table to a blank area of the page to create a new table that contains those fields. Access prompts you for a table name.
-
You can drag fields from one table to another table if you think that they will be stored more efficiently there.
-
Most tables will be given an ID or a Generated Unique ID field. To learn more about the ID fields, click Tips in the upper-right corner of the wizard.
-
To undo a change, click the Undo button.
-
To rename a table, double-click its title bar, type the new name, and then click OK.
-
-
After you have the fields arranged the way that you want them, click Next.
-
If the wizard finds records that have very similar values, it will identify those values as possible typographical errors and present a screen where you can confirm what to do about them. Scroll through the list to find any that have values in the Correction column, and then click the appropriate item in the drop-down list. Select (Leave as-is) to keep the wizard from making any changes to the value. When you are finished, click Next.
-
The wizard asks whether you want to create a query that resembles your original table. If you have already built forms and reports that are based on the original table, creating such a query is a good idea. If you choose Yes, create the query, the wizard renames the original table by appending "_OLD" to the table name, and then names the new query by using the name of the original table. The forms and reports that were based on the table now use the query for their data, and they continue to work as before.
-
Click Finish.
The wizard creates the new tables as specified, and then opens them. Close them when you are finished inspecting the results.
Work with data from other programs
Access 2010 provides features for working with data that is stored in other programs.
Create a new Access database that links to data in another file format You can use Access to open a file in another file format such as text, dBASE, or a spreadsheet. Access automatically creates an Access database and links the file for you.
-
Start Access.
-
On the File tab, click Open.
-
In the Open dialog box, click the type of the file that you want to open in the list. If you're not sure of the file type, click All Files (*.*).
-
If needed, browse to the folder containing the file that you want to open. When you find the file, double-click it to open it.
-
Follow the instructions in the wizard. On the last page of the wizard, click Finish.
Import or link data to an existing Access database You can either import data from other sources and programs into Access tables so that the data is contained within the Access file, or you can link to the data from Access so that the data remains in the original file (outside of the Access file).
-
On the External Data tab, in the Import & Link group, click the format in which the data is stored.
You can import or link to data from the following sources:
-
Excel You can bring in data from a worksheet or a named range in an Excel workbook. Each worksheet or named range must be imported or linked separately.
-
Access This is very handy for separating your process from your data, creating a split database. That is, you can use one database to contain all your forms, reports, and macros, and keep your data in another database. You can then develop improvements without interrupting anyone's work. You can also combine data from many different Access databases in one, making it easier to summarize data across departments or between business partners.
-
ODBC database Many programs support this format, including many database server products. This helps you create "landing pad" databases, where you combine data from different systems.
-
Text file You can connect to a simple text file, and can even use Access to change the contents of that file. This can help make Access data easy to consume by a wide range of programs.
-
XML file This format also offers compatibility with a variety of other programs, including some web servers.
-
SharePoint list This makes your data usable with a web browser, the standard way to use a SharePoint list.
-
Data Services You can connect to web data services inside your enterprise.
-
HTML document
-
Outlook folder You can connect to Outlook folders, so you more easily integrate your contact information with the rest of your data.
-
dBase file dBase is a popular alternative database system that is supported by Access
The Get External Data dialog box appears.
-
-
Follow the instructions in the dialog box.
Access will import or link the data to your database. For most formats, you must specify the location of the data, and then choose how you want the data to be stored in your database.
Use an earlier-version database in several versions of Access
If your Access database or Access project was created in Access 2000 or later, you can use the database or project in the version of Access in which it was created or in any later version — even if the file is security enabled. For example, Access 2000 files can be used in Access 2000, Access 2002, Access 2003, Access 2007, and Access 2010.
You may have a situation where you want to keep your data in an earlier version of Access, but you have users with a later version of Access that want to link to that data but still take advantage of some of the features of the later version. The solution is to create a new "front-end" database in the later version (containing forms, reports, queries, macros, but no tables), and link it to the tables in the earlier version file. Use one of the following procedures, depending on whether your database is contained in one file, or is already split into a front-end/back-end application.
Use an Access database file in several versions of Access
If all the tables, forms, and other objects of your earlier-version Access database are contained in one file, and you want to use the database in several versions of Access, you can create a new front-end database in a later version and link it to the original file. Users that have the earlier version of Access are still able to use the original database. Users that have the later version can use the new front-end database to link to the same data. You can create several front-end versions if you need to accommodate multiple versions of Access.
Step 1: Make a copy of the existing database, and save it in a new format
Use the following procedure to convert the database to any of the three most recent formats: Access 2000, Access 2002-2003, or Access 2007. This command preserves the original database in its original format, and creates a copy in the format that you specify.
-
Close the Access file. If the file is a multiuser Access database located on a server or in a shared folder, ensure that no one else has it open.
-
Start Access 2010.
-
On the File tab, click Open.
-
Browse to the location of the file that you want to convert, and then double-click it to open it.
If the Database Enhancement dialog box appears, asking whether you want to enhance the database, click No.
-
If a form opens when you start the database, close the form.
-
On the File tab, click Save Database As.
-
In the Save As dialog box, type a name for the new database.
Note: Unless you will save the new database in a different location, its name must be different from that of the original database. In either case, it is usually best to use a different name, so that you can easily distinguish between the front-end database and the back-end database. However, if you are converting to Access 2007 format, the file name extension changes from .mdb to .accdb, so that you can use the same file name.
-
Click Save.
Step 2: Split the copy database, and use the original file as the back-end database
Split the converted database by using the following procedure:
-
On the Database Tools tab, in the Move Data group, click Access Database.

-
In the Database Splitter dialog box, click Split Database.
You can make a backup if you want, but you could also just re-create the copy by using the original database.
-
Type a name for the back-end database, and then click Split.
Step 3: Connect the new front-end to the original database
-
Delete the back-end database that the Database Splitter tool created — being careful not to delete your original database.
-
Link the new front-end database to the tables in the original database: On the External Data tab, in the Import & Link group, click Linked Table Manager.

-
Click Select All, and then select the Always prompt for new location check box.
-
Click OK, browse to the earlier-version database, and then double-click it.
If all goes well, Access displays a message stating that all selected linked tables were successfully refreshed.
You can now enhance the new front-end database to support new features for users who have newer versions of Access. Users who have earlier versions can continue to use the earlier version database.
Use a front-end/back-end application in several versions of Access
If your Access database is already a front-end/back-end application, you can convert the front end to the new file format. No changes are necessary for the back-end database.
The following procedure shows you how to use the Save Database As command to convert the front-end database to any one of the three most recent formats: Access 2000, Access 2002-2003, or Access 2007. This command preserves the original database in its original format and creates a copy in the format that you specify.
-
Close the front-end database. If the file is a multiuser Access database located on a server or in a shared folder, make sure that no one else has it open.
-
Start Access 2010.
-
On the File tab, click Open.
-
Browse to the location of the front-end database, and then double-click it to open it.
If the Database Enhancement dialog box appears, asking whether you want to enhance the database, click No.
-
If a form appears when you open the database, close the form.
-
On the File tab, click Save Database As.
-
In the Save As dialog box, type a name for the new database.
-
Click Save.
You can now enhance the new front-end database to support new features.


