
Add slide numbers, page numbers, or the date and time
You can add slide numbers and the date and time to your presentation.
1. Date and time
2. Slide number
To add header and footer information to handouts, see Edit page numbering, footers, and headers for Handouts in PowerPoint.
Add slide numbers or notes page numbers
-
On the View tab, in the Presentation Views group, click Normal.
-
On the left of your screen, in the pane that contains the slide thumbnails, click the first slide thumbnail in your presentation.
-
On the Insert tab, in the Text group, click Header & Footer.

-
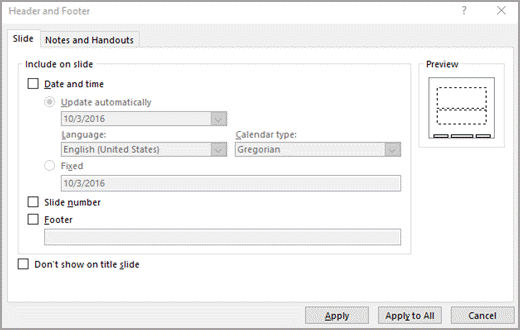
In the Header and Footer dialog box, do one of the following:
-
If you want to add slide numbers, click the Slide tab, and then select the Slide number check box.
-
If you want to add page numbers to notes, click the Notes and Handouts tab, and then select the Page number check box.
-
-
If you want to add page numbers to all of the slides or notes pages in your presentation, click Apply to All.
Change the starting slide number
You can change the starting slide number, number only one slide, or omit the slide number from the first slide. Here's how.
-
On the Design tab, in the Customize group, click Slide Size > Custom Slide Size.
-
In the Slide Size box, in the Number Slides from drop-down list, select a starting number.
Number only one slide or number all slides but the first slide
-
On the Insert tab, in the Text group, click Header & Footer.
-
In the Header and Footer dialog box, click the Slide tab.
-
Do one of the following:
-
To number the slide that you have selected, select the Slide number check box, and then click Apply. Repeat this step for each individual slide that you want to number.
-
To number all slides but the first slide, select the Slide number check box, select Don’t show on title slide, and then click Apply to All.
-
For information about how to rearrange the slides in your presentation, see Change the order of your slides.
Add the date and time
-
On the View tab, in the Presentation Views group, click Normal.
-
On the left of your screen, in the pane that contains the slide thumbnails, click the first slide thumbnail in your presentation.
-
On the Insert tab, in the Text group, click Date & Time.
-
In the Header and Footer box, do one of the following:
-
If you want to add the date and time to your slides, click the Slide tab.
-
If you want to add the date and time to your notes pages, click the Notes and Handouts tab.
-
-
Select the Date and time check box, and then do one of the following:
-
If you want the date and time to reflect the current date and time each time you open or print the presentation, click Update automatically, and then select the date and time format that you want .
-
If you want to set the date and time to a specific date, click Fixed, and then in the Fixed box, type in the date that you want.
By setting the date on your presentation so that it is Fixed, you can easily keep track of the last time you made changes to it.
-
-
If you want to add the date and time to all of the slides, notes pages, or handouts in your presentation, click Apply to All.
Insert or remove slide numbers
-
Go to View > Normal.
-
Go to Insert > Slide Number.
-
Select Slide Number and enter the starting slide number. Preview shows the location.
-
To add or remove the slide number from just the title page, clear or select Don’t show on title slide.
-
Select Apply to all or Apply.
-
On the Insert tab, select Footer > Slide Number.
-
In the Footer pane, select the Slide Number box.
-
If you want to avoid having a slide number on the title slide, select Don't show on title slide.
-
If you want to include additional "footer" text on your slides, select Footer, then enter the info you want in the text box.
-
Select Apply to All.
-
Close the Footer pane.


Need more help?
Want more options?
Explore subscription benefits, browse training courses, learn how to secure your device, and more.


Communities help you ask and answer questions, give feedback, and hear from experts with rich knowledge.


