
1. If you're not already in edit mode, at the top right of your space, select Edit.
2. On the canvas, select the circled + icon.
3. Select 360° Image.
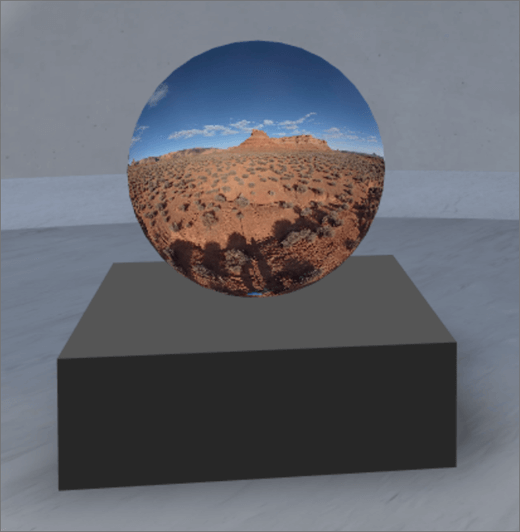
4. Click to place the web part anywhere on the structure (floor).
5. In the file picker, select the 360° image file you'd like to use, and then select Open.
5. Select the web part, and then select the pencil icon. This opens the property panel.
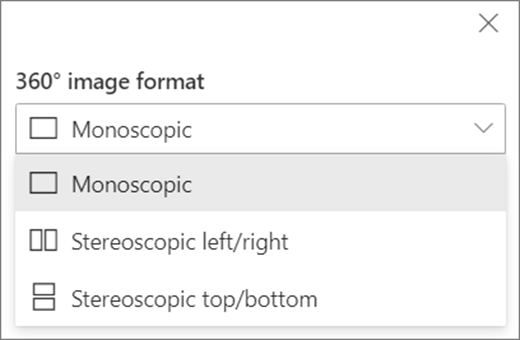
6. To change the image format, select Image not displaying correctly?.
-
If the camera you used to capture the 360° image was a single lens camera which was placed on a rig or ring formation to make a circle, select Monoscopic. If the camera you used to capture the 360° image was two cameras for each field of view, select Stereoscopic.
7. To set the starting view, select your preference for Image rotation.

8. (Optional) Select and enter Alternate text.
9. (Optional) If you want a podium to appear below the image, select Show podium. To set the distance between the image and the podium, use the Height from podium slider.
10. Select Save as draft or Publish.
Note: For guidance on sizing and placing web parts, see Add and use web parts in a SharePoint space.
Add actions to a 360° image
Actions make web parts interactive. You can select actions while editing your web part. After you save your space as a draft or publish it, they become interactive. Adding actions is optional.
1. While editing, select the 360° image web part, and select the pencil icon. This opens the property panel. Scroll down to Actions.
2. Select Add action.
-
When you select the web part, the On triggeraction occurs.
-
When you right-click (mouse) or press + hold (controller), More actions appears.

Note: Enter 360° image is the (locked) On trigger action for this web part. To configure More actions, select Add action, and then select ... (ellipsis). To re-order the actions, drag them into the order you want.
3. For More actions, select from the following:
-
Link to another space: Opens a linked SharePoint space).
-
Play audio: Plays an attached audio file.
-
Link to a page or item: Opens a linked URL (for example, a SharePoint page, a public website).
4. (Optional) Enter a Description.
5. To try out your actions, select Save as draft or Publish.


