
A Data Model allows you to integrate data from multiple tables, effectively building a relational data source inside an Excel workbook. Within Excel, Data Models are used transparently, providing tabular data used in PivotTables and PivotCharts. A Data Model is visualized as a collection of tables in a Field List, and most of the time, you’ll never even know it's there.
Before you can start working with the Data Model, you need to get some data. For that we'll use the Get & Transform (Power Query) experience, so you might want to take a step back and watch a video, or follow our learning guide on Get & Transform and Power Pivot.
-
Excel 2016 & Excel for Microsoft 365 - Power Pivot is included in the Ribbon.
-
Excel 2013 - Power Pivot is part of the Office Professional Plus edition of Excel 2013, but is not enabled by default. Learn more about starting the Power Pivot add-in for Excel 2013.
-
Excel 2010 - Download the Power Pivot add-in, then install the Power Pivot add-in.
Where is Get & Transform (Power Query)?
-
Excel 2016 & Excel for Microsoft 365 - Get & Transform (Power Query) has been integrated with Excel on the Data tab.
-
Excel 2013 - Power Query is an add-in that's included with Excel, but needs to be activated. Go to File > Options > Add-Ins, then in the Manage drop-down at the bottom of the pane, select COM Add-Ins > Go. Check Microsoft Power Query for Excel, then OK to activate it. A Power Query tab will be added to the ribbon.
-
Excel 2010 - Download and install the Power Query add-in.. Once activated, a Power Query tab will be added to the ribbon.
Getting started
First, you need to get some data.
-
In Excel 2016, and Excel for Microsoft 365, use Data > Get & Transform Data > Get Data to import data from any number of external data sources, such as a text file, Excel workbook, website, Microsoft Access, SQL Server, or another relational database that contains multiple related tables.
In Excel 2013 and 2010, go to Power Query > Get External Data, and select your data source.
-
Excel prompts you to select a table. If you want to get multiple tables from the same data source, check the Enable selection of multiple tables option. When you select multiple tables, Excel automatically creates a Data Model for you.
Note: For these examples, we're using an Excel workbook with fictional student details on classes and grades. You can download our Student Data Model sample workbook, and follow along. You can also download a version with a completed Data Model..

-
Select one or more tables, then click Load.
If you need to edit the source data, you can choose the Edit option. For more details see: Introduction to the Query Editor (Power Query).
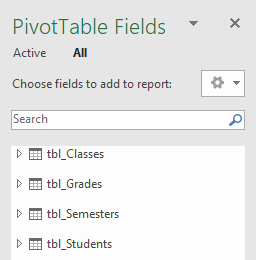
You now have a Data Model that contains all of the tables you imported, and they will be displayed in the PivotTable Field List.
Notes:
-
Models are created implicitly when you import two or more tables simultaneously in Excel.
-
Models are created explicitly when you use the Power Pivot add-in to import data. In the add-in, the model is represented in a tabbed layout similar to Excel, where each tab contains tabular data. See Get data using the Power Pivot add-into learn the basics of data import using a SQL Server database.
-
A model can contain a single table. To create a model based on just one table, select the table and click Add to Data Model in Power Pivot. You might do this if you want to use Power Pivot features, such as filtered datasets, calculated columns, calculated fields, KPIs, and hierarchies.
-
Table relationships can be created automatically if you import related tables that have primary and foreign key relationships. Excel can usually use the imported relationship information as the basis for table relationships in the Data Model.
-
For tips on how to reduce the size of a data model, see Create a memory-efficient Data Model using Excel and Power Pivot.
-
For further exploration, see Tutorial: Import Data into Excel, and Create a Data Model.
Tip: How can you tell if your workbook has a Data Model? Go to Power Pivot > Manage. If you see worksheet-like data, then a model exists. See: Find out which data sources are used in a workbook data model to learn more.
Create Relationships between your tables
The next step is to create relationships between your tables, so you can pull data from any of them. Each table needs to have a primary key, or unique field identifier, like Student ID, or Class number. The easiest way is to drag and drop those fields to connect them in Power Pivot's Diagram View.
-
Go to Power Pivot > Manage.
-
On the Home tab, select Diagram View.
-
All of your imported tables will be displayed, and you might want to take some time to resize them depending on how many fields each one has.
-
Next, drag the primary key field from one table to the next. The following example is the Diagram View of our student tables:
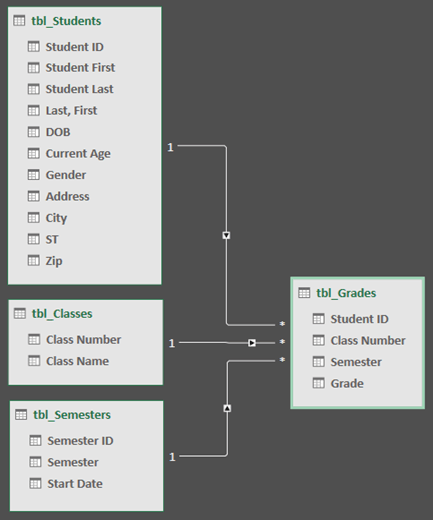
We've created the following links:
-
tbl_Students | Student ID > tbl_Grades | Student ID
In other words, drag the Student ID field from the Students table to the Student ID field in the Grades table.
-
tbl_Semesters | Semester ID > tbl_Grades | Semester
-
tbl_Classes | Class Number > tbl_Grades | Class Number
Notes:
-
Field names don't need to be the same in order to create a relationship, but they do need to be the same data type.
-
The connectors in the Diagram View have a "1" on one side, and an "*" on the other. This means that there is a one-to-many relationship between the tables, and that determines how the data is used in your PivotTables. See: Relationships between tables in a Data Model to learn more.
-
The connectors only indicate that there is a relationship between tables. They won't actually show you which fields are linked to each other. To see the links, go to Power Pivot > Manage > Design > Relationships > Manage Relationships. In Excel, you can go to Data > Relationships.
-
Use a Data Model to create a PivotTable or PivotChart
An Excel workbook can contain only one Data Model, but that model can contain multiple tables which can be used repeatedly throughout the workbook. You can add more tables to an existing Data Model at any time.
-
In Power Pivot, go to Manage.
-
On the Home tab, select PivotTable.
-
Select where you want the PivotTable to be placed: a new worksheet, or the current location.
-
Click OK, and Excel will add an empty PivotTable with the Field List pane displayed on the right.
Next, create a PivotTable, or create a Pivot Chart. If you've already created relationships between the tables, you can use any of their fields in the PivotTable. We've already created relationships in the Student Data Model sample workbook.
Add existing, unrelated data to a Data Model
Suppose you’ve imported or copied lots of data that you want to use in a model, but haven't added it to the Data Model. Pushing new data into a model is easier than you think.
-
Start by selecting any cell within the data that you want to add to the model. It can be any range of data, but data formatted as an Excel table is best.
-
Use one of these approaches to add your data:
-
Click Power Pivot > Add to Data Model.
-
Click Insert > PivotTable, and then check Add this data to the Data Model in the Create PivotTable dialog box.
The range or table is now added to the model as a linked table. To learn more about working with linked tables in a model, see Add Data by Using Excel Linked Tables in Power Pivot.
Adding data to a Power Pivot table
In Power Pivot, you cannot add a row to a table by directly typing in a new row like you can in an Excel worksheet. But you can add rows by copying and pasting, or updating the source data and refreshing the Power Pivot model.
Need more help?
You can always ask an expert in the Excel Tech Community or get support in Communities.
See Also
Get & Transform and Power Pivot learning guides
Introduction to the Query Editor (Power Query)
Create a memory-efficient Data Model using Excel and Power Pivot
Tutorial: Import Data into Excel, and Create a Data Model
Find out which data sources are used in a workbook data model


